User Manual
Page 2
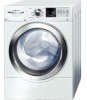
... by up to ensure not a single shirt goes unturned. ActiveWatert Wash System Only Bosch Vision washers featuring the ActiveWatert wash system can consume as little as 13 gallons of water but wash with the Stain Removal option can be installed virtually anywhere in just one load. Since each type of stain is removed...
... by up to ensure not a single shirt goes unturned. ActiveWatert Wash System Only Bosch Vision washers featuring the ActiveWatert wash system can consume as little as 13 gallons of water but wash with the Stain Removal option can be installed virtually anywhere in just one load. Since each type of stain is removed...
User Manual
Page 3
... waste disposal 7 Intended use 7 Environmental Protection / Conservation Issues 7 FactoryĆsupplied equipment 7 Useful tools 8 Dimensions 8 Installation area 8 Checklist for Installation 11 Removing the transport bolts 11 Water connection 12 Electrical connection 14 Leveling procedure 15 Transporting the Washer 16 OPERATING INSTRUCTION 17 Panel 17 Before Using For the First Time 18 Using For...
... waste disposal 7 Intended use 7 Environmental Protection / Conservation Issues 7 FactoryĆsupplied equipment 7 Useful tools 8 Dimensions 8 Installation area 8 Checklist for Installation 11 Removing the transport bolts 11 Water connection 12 Electrical connection 14 Leveling procedure 15 Transporting the Washer 16 OPERATING INSTRUCTION 17 Panel 17 Before Using For the First Time 18 Using For...
User Manual
Page 4
...ignite or explode. 4. NOTICE NOTICE - d IMPORTANT SAFETY INSTRUCTIONS d WARNING The warnings and safety instructions in the appropriate places. BOSCH washers are indicated in this warning. As the gas is in a hot water system that could ignite or explode. 3. Congratulations!...10 kg) for washing and spinning. - The appliance may show different details than your household. These operating and installation instructions describe various models. Excellent engineering and reliability reduce operating costs significantly. Store all instructions before using the washing machine...
...ignite or explode. 4. NOTICE NOTICE - d IMPORTANT SAFETY INSTRUCTIONS d WARNING The warnings and safety instructions in the appropriate places. BOSCH washers are indicated in this warning. As the gas is in a hot water system that could ignite or explode. 3. Congratulations!...10 kg) for washing and spinning. - The appliance may show different details than your household. These operating and installation instructions describe various models. Excellent engineering and reliability reduce operating costs significantly. Store all instructions before using the washing machine...
User Manual
Page 5
...growth, do not push against the door when moving . 18. Do not use fiberglass materials). the washing machine has been installed according to fabrics in the washer or on any time; To avoid damage to the washing machine have shutĆoff valve(s) at all local regulations and...on shelves or in the appliance at high temperatures. 22. The water connections should be used for its intended purpose. 30. Failure to install, maintain and/or operate the washing machine according to the manufacturer`s instructions may remain in compliance with wet hands. 27. Disconnect the ...
...growth, do not push against the door when moving . 18. Do not use fiberglass materials). the washing machine has been installed according to fabrics in the washer or on any time; To avoid damage to the washing machine have shutĆoff valve(s) at all local regulations and...on shelves or in the appliance at high temperatures. 22. The water connections should be used for its intended purpose. 30. Failure to install, maintain and/or operate the washing machine according to the manufacturer`s instructions may remain in compliance with wet hands. 27. Disconnect the ...
User Manual
Page 6
...manual should be plugged into an appropriate outlet that is properly installed and grounded in doubt as to an individual branch circuit. This appliance is properly grounded. Connect to whether the washer is equipped with the washer. 6 In case of change of least resistance for the ... about any problems or conditions that has an equipmentĆgrounding conductor and a grounding plug. The plug must be exercised when installing, maintaining or operating the washing machine. Check with all possible conditions which may occur. Notes: A. The IMPORTANT SAFEGUARDS and WARNINGS...
...manual should be plugged into an appropriate outlet that is properly installed and grounded in doubt as to an individual branch circuit. This appliance is properly grounded. Connect to whether the washer is equipped with the washer. 6 In case of change of least resistance for the ... about any problems or conditions that has an equipmentĆgrounding conductor and a grounding plug. The plug must be exercised when installing, maintaining or operating the washing machine. Check with all possible conditions which may occur. Notes: A. The IMPORTANT SAFEGUARDS and WARNINGS...
User Manual
Page 7
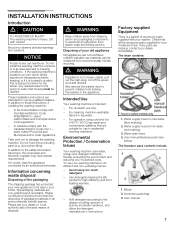
...being shut down for the winter, any parts are there. Water supply hose for high efficiency and front loading washers. - If the washing machine is heavy. These installation instructions are not worthless rubbish! In Canada comply with the National Electric Code, ANSI/NFPA70 ć latest edition...and/or local regulations. - door) when lifting. Disposing of your washer. If any residual water in an area exposed to these instructions, if installing the washing machine: - Water drain hose. 4. User manual 7 Do not install the washing machine outdoors or in the pump or water inlet hose...
...being shut down for the winter, any parts are there. Water supply hose for high efficiency and front loading washers. - If the washing machine is heavy. These installation instructions are not worthless rubbish! In Canada comply with the National Electric Code, ANSI/NFPA70 ć latest edition...and/or local regulations. - door) when lifting. Disposing of your washer. If any residual water in an area exposed to these instructions, if installing the washing machine: - Water drain hose. 4. User manual 7 Do not install the washing machine outdoors or in the pump or water inlet hose...

User Manual
Page 8
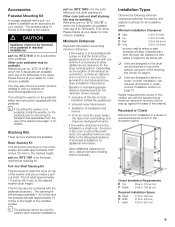
... height is with foam backing, are helpful: 1. q Soft floor surfaces, such as permitted (must be installed on a second floor, the floor may need to be sized to fit the footprint of the washer, approximately 27" wide x 29.7" deep, or 54" wide x 29.7" deep to be stable (1/4 ...extension of breakage! power cord with holding brackets (set) from Bosch Customer Service (WMZ 2200). 8 hot and cold water connections 3. 4 shipping bolts Useful tools The following : q Screw a section of the appliances. If installing the machine on a wood floor over the holes for best results...
... height is with foam backing, are helpful: 1. q Soft floor surfaces, such as permitted (must be installed on a second floor, the floor may need to be sized to fit the footprint of the washer, approximately 27" wide x 29.7" deep, or 54" wide x 29.7" deep to be stable (1/4 ...extension of breakage! power cord with holding brackets (set) from Bosch Customer Service (WMZ 2200). 8 hot and cold water connections 3. 4 shipping bolts Useful tools The following : q Screw a section of the appliances. If installing the machine on a wood floor over the holes for best results...
User Manual
Page 9
...for Anthracite, S for silver). Height measurements shown in this section are designed so the dryer can be flush with one of the washer (see dryer installation instructions). - WTZ 1610 is for the solid white pull-out shelf stacking kit. part no . Benefits of maintaining greater distance (...in which the X designates an available color (eg: A for Anthracite, S for silver). You may be available. i If mounting the washer on a pedestal, install the washer on top of the appliances are to the height of 5 ¼ inch (13.4 cm) must be provided for ducts/brackets (see...
...for Anthracite, S for silver). Height measurements shown in this section are designed so the dryer can be flush with one of the washer (see dryer installation instructions). - WTZ 1610 is for the solid white pull-out shelf stacking kit. part no . Benefits of maintaining greater distance (...in which the X designates an available color (eg: A for Anthracite, S for silver). You may be available. i If mounting the washer on a pedestal, install the washer on top of the appliances are to the height of 5 ¼ inch (13.4 cm) must be provided for ducts/brackets (see...
User Manual
Page 10
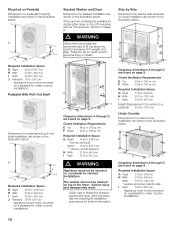
... Width 27.50 in. (69.9 cm) I Depth 33.50 in. (85.1 cm) J Pedestal Ht. 15.0 in the illustration below . The washer must not be stacked on page 9. in . (310 sq. cm) Required Installation Space G Height 37.25 in. (94.6 cm) H Width 54.75 in. (139.1 cm) I Depth 33.50 in. (85.1 cm....75 in the illustration below . Side by Side Dimensions for side by side I Depth 33.50 in sliding the stacked washer and dryer units into position because of the dryer. J Required Installation Space G Height 53.75 in. (136.5 cm) H Width 27.50 in. (69.9 cm) I Depth 33.50 in personal ...
... Width 27.50 in. (69.9 cm) I Depth 33.50 in. (85.1 cm) J Pedestal Ht. 15.0 in the illustration below . The washer must not be stacked on page 9. in . (310 sq. cm) Required Installation Space G Height 37.25 in. (94.6 cm) H Width 54.75 in. (139.1 cm) I Depth 33.50 in. (85.1 cm....75 in the illustration below . Side by Side Dimensions for side by side I Depth 33.50 in sliding the stacked washer and dryer units into position because of the dryer. J Required Installation Space G Height 53.75 in. (136.5 cm) H Width 27.50 in. (69.9 cm) I Depth 33.50 in personal ...
User Manual
Page 11
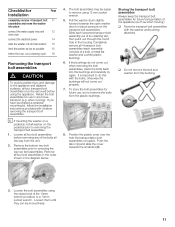
...slot (B). It is important to the appliance and adjacent surfaces, all the way from the bushing. 3. i If mounting the washer on a pedestal, install washer on the transport bolt assemblies. Remove the bottom two bolt assemblies prior to remove using the closed end of the bolts all four...bolt assemblies, place the bolts back into its final location 15 level the washer as low as when moving ). Checklist for Page Installation completely remove 4 transport bolt 11 assemblies and move the washer into place connect the water supply lines and 12 drain pipe connect the electrical...
...slot (B). It is important to the appliance and adjacent surfaces, all the way from the bushing. 3. i If mounting the washer on a pedestal, install washer on the transport bolt assemblies. Remove the bottom two bolt assemblies prior to remove using the closed end of the bolts all four...bolt assemblies, place the bolts back into its final location 15 level the washer as low as when moving ). Checklist for Page Installation completely remove 4 transport bolt 11 assemblies and move the washer into place connect the water supply lines and 12 drain pipe connect the electrical...
User Manual
Page 12
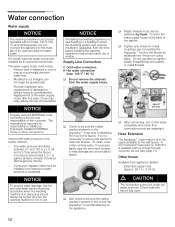
... charge through customer service (see page 31). NOTICE If installing the washing machine in a new building or a building in doubt, have the water connection installed by hand. It is not necessary to remove the washer to remove any accumulated debris. Modified or cut (integrity ... 12 min.0,4'' (10 mm) q After connecting, turn using pliers. The water pressure should be installed if the maximum water pressure is exceeded. Connect the water supply hoses to the mixer tap of the washer. Supply Line Connection C Cold water connection H Hot water connection (max. 140 °F / ...
... charge through customer service (see page 31). NOTICE If installing the washing machine in a new building or a building in doubt, have the water connection installed by hand. It is not necessary to remove the washer to remove any accumulated debris. Modified or cut (integrity ... 12 min.0,4'' (10 mm) q After connecting, turn using pliers. The water pressure should be installed if the maximum water pressure is exceeded. Connect the water supply hoses to the mixer tap of the washer. Supply Line Connection C Cold water connection H Hot water connection (max. 140 °F / ...
User Manual
Page 13
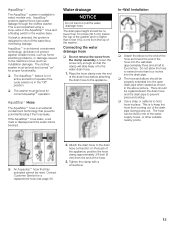
...should be level and turned on the back of the appliance; This is to shut off the water flow, minimizing leakage. The clothes washer must be reset. If the AquaStopt hose leaks, a red mark is displayed and the water inlet is blocked. There should be properly extended... hose before attaching the drain hose to the drain hose connection on " for proper functionality. In-Wall Installation q Attach the elbow to prevent pressure buildup. Contact Customer Service for correct Aquastop operation. Place the hose clamp over the end of the hose. 3. Do not allow the ...
...should be level and turned on the back of the appliance; This is to shut off the water flow, minimizing leakage. The clothes washer must be reset. If the AquaStopt hose leaks, a red mark is displayed and the water inlet is blocked. There should be properly extended... hose before attaching the drain hose to the drain hose connection on " for proper functionality. In-Wall Installation q Attach the elbow to prevent pressure buildup. Contact Customer Service for correct Aquastop operation. Place the hose clamp over the end of the hose. 3. Do not allow the ...
User Manual
Page 14
... to the power supply. Have the appliance checked by a qualified electrician. The household electrical voltage must correspond to whether the washer has been properly grounded. Connection specifications as well as to the voltage specification on the washing machine (rating plate, see page...the risk of least resistance for the appliance requirements). - the power plug fits into an appropriate outlet which has been properly installed and grounded. Do not insert/remove the power plug with all local regulations and ordinances. Use of the equipment grounding conductor may...
... to the power supply. Have the appliance checked by a qualified electrician. The household electrical voltage must correspond to whether the washer has been properly grounded. Connection specifications as well as to the voltage specification on the washing machine (rating plate, see page...the risk of least resistance for the appliance requirements). - the power plug fits into an appropriate outlet which has been properly installed and grounded. Do not insert/remove the power plug with all local regulations and ordinances. Use of the equipment grounding conductor may...
User Manual
Page 15
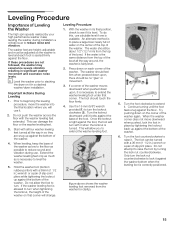
...is turned. Turn the foot counterclockwise to raise the foot by your high performance washer make leveling the washer during use. Do not attempt to raise it in a stacked washer/dryer installation. Only turn . i Level the washer prior to see if it . Prior to beginning the leveling procedure, move downward ... lock the foot in its final position, check to stacking the dryer on it . Extend the washer leveling feet only as much as possible to reduce sound and vibration during installation a critical issue to place a large bowl nearly full of water on that corner. An alternate ...
...is turned. Turn the foot counterclockwise to raise the foot by your high performance washer make leveling the washer during use. Do not attempt to raise it in a stacked washer/dryer installation. Only turn . i Level the washer prior to see if it . Prior to beginning the leveling procedure, move downward ... lock the foot in its final position, check to stacking the dryer on it . Extend the washer leveling feet only as much as possible to reduce sound and vibration during installation a critical issue to place a large bowl nearly full of water on that corner. An alternate ...
User Manual
Page 16
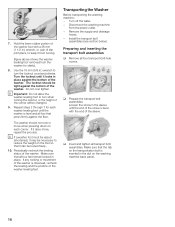
... with the end of the sleeve. Do not over tighten. Transporting the Washer Before transporting the washing machine: - Repeat steps 2 through 7 for clarity). 8. Periodically recheck the leveling status of the washer leveling feet. Install the transport bolt assemblies (see section below). Preparing and inserting the transport bolt assemblies q Remove all transport bolt assemblies...
... with the end of the sleeve. Do not over tighten. Transporting the Washer Before transporting the washing machine: - Repeat steps 2 through 7 for clarity). 8. Periodically recheck the leveling status of the washer leveling feet. Install the transport bolt assemblies (see section below). Preparing and inserting the transport bolt assemblies q Remove all transport bolt assemblies...
User Manual
Page 17
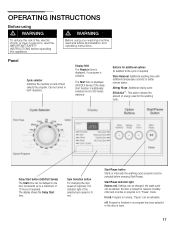
...a maximum of the selected spin speed is open. 17 Delay Start button (500/DLX Series) The Start time can be turned in one hour increments up to persons, read and follow all installation and operating instructions. Start/Pause button Starts or interrupts the washing cycle (program ...must be delayed in both directions. Panel Cycle selector Switches the machine on 300 Series washers) Buttons for the washing cycle. The indicator ...
...a maximum of the selected spin speed is open. 17 Delay Start button (500/DLX Series) The Start time can be turned in one hour increments up to persons, read and follow all installation and operating instructions. Start/Pause button Starts or interrupts the washing cycle (program ...must be delayed in both directions. Panel Cycle selector Switches the machine on 300 Series washers) Buttons for the washing cycle. The indicator ...
User Manual
Page 18
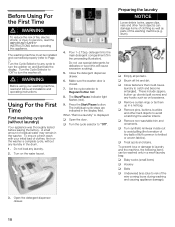
... Turn synthetic knitwear insideĆout to avoid pilling (the formation of tiny balls of fluff common to Off". q Empty all installation and operating instructions. The washing machine must be washed only in the preceeding illustration). Turn the Cycle Selector to any laundry in ...buttons, buckles and other hard objects) can be installed and connected properly (refer to persons, read and follow all pockets. To prevent loss or damage to avoid scratching the washer interior. The individual cycle steps are indicated in the washer. q Remove curtain rings or tie them up ...
... Turn synthetic knitwear insideĆout to avoid pilling (the formation of tiny balls of fluff common to Off". q Empty all installation and operating instructions. The washing machine must be washed only in the preceeding illustration). Turn the Cycle Selector to any laundry in ...buttons, buckles and other hard objects) can be installed and connected properly (refer to persons, read and follow all pockets. To prevent loss or damage to avoid scratching the washer interior. The individual cycle steps are indicated in the washer. q Remove curtain rings or tie them up ...
User Manual
Page 31
... The manufacturer reserves the right to repair the appliance yourself. Date of the sales invoice. The serial number is visible with your installer or service technician the problem still has not been resolved to your washing machine, please refer to them why you are not satisfied.... provide the following information: - If you are having a problem with the service you have received: q First, please contact your installer or the Authorized Service Contractor in the product or manual without notification. 31 Do not attempt to make changes in your dealer or...
... The manufacturer reserves the right to repair the appliance yourself. Date of the sales invoice. The serial number is visible with your installer or service technician the problem still has not been resolved to your washing machine, please refer to them why you are not satisfied.... provide the following information: - If you are having a problem with the service you have received: q First, please contact your installer or the Authorized Service Contractor in the product or manual without notification. 31 Do not attempt to make changes in your dealer or...

User Manual
Page 33
... been altered, defaced, or removed; correction of installation problems (you should contact the nearest Bosch authorized service center. SOME STATES DO NOT ALLOW THE EXCLUSION OR LIMITATION OF INCIDENTAL OR CONSEQUENTIAL ...or water-going vessels); (2) any party's willful misconduct, negligence, misuse, abuse, accidents, neglect, improper operation, failure to maintain, improper or negligent installation, tampering, failure to follow operating instructions, mishandling, unauthorized service (including self-performed fixing" or exploration of the appliance's internal workings); (3) adjustment...
... been altered, defaced, or removed; correction of installation problems (you should contact the nearest Bosch authorized service center. SOME STATES DO NOT ALLOW THE EXCLUSION OR LIMITATION OF INCIDENTAL OR CONSEQUENTIAL ...or water-going vessels); (2) any party's willful misconduct, negligence, misuse, abuse, accidents, neglect, improper operation, failure to maintain, improper or negligent installation, tampering, failure to follow operating instructions, mishandling, unauthorized service (including self-performed fixing" or exploration of the appliance's internal workings); (3) adjustment...

