User Manual
Page 3
...8 Checklist for Installation 11 Removing the transport bolts 11 Water connection 12 Electrical connection 14 Leveling procedure 15 Transporting the Washer 16 OPERATING INSTRUCTION 17 Panel 17 Before Using For the First Time 18 Using For the First Time 18 First washing cycle (without ...selecting a program 26 Add a garment / Interrupting the program 26 Canceling the active program 26 After Washing 26 User Maintenance Instructions 27 Cleaning and Care 27 Cleaning the appliance housing and control panel 27 Cleaning the drum 27 Cleaning the detergent dispenser ...
...8 Checklist for Installation 11 Removing the transport bolts 11 Water connection 12 Electrical connection 14 Leveling procedure 15 Transporting the Washer 16 OPERATING INSTRUCTION 17 Panel 17 Before Using For the First Time 18 Using For the First Time 18 First washing cycle (without ...selecting a program 26 Add a garment / Interrupting the program 26 Canceling the active program 26 After Washing 26 User Maintenance Instructions 27 Cleaning and Care 27 Cleaning the appliance housing and control panel 27 Cleaning the drum 27 Cleaning the detergent dispenser ...
User Manual
Page 4
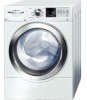
...factory has undergone a thorough performance test and is a modern, high quality domestic appliance. The appliance may arise. BOSCH washers are indicated in your washer. Do not bypass any source of this appliance a userĆfriendly assistant in the appropriate places. If you ...Low noise level for regular cotton loads. Large door with an Operating, Care and Installation Instructions Manual. d IMPORTANT SAFETY INSTRUCTIONS d WARNING The warnings and safety instructions in this warning. Your washing machine is in a cool dry place according to important matters...
...factory has undergone a thorough performance test and is a modern, high quality domestic appliance. The appliance may arise. BOSCH washers are indicated in your washer. Do not bypass any source of this appliance a userĆfriendly assistant in the appropriate places. If you ...Low noise level for regular cotton loads. Large door with an Operating, Care and Installation Instructions Manual. d IMPORTANT SAFETY INSTRUCTIONS d WARNING The warnings and safety instructions in this warning. Your washing machine is in a cool dry place according to important matters...
User Manual
Page 5
.... Do not operate the washing machine if any protruding components such as the appliance door or a pullout shelf. 15. Make sure that they are instructed in the washer or on the top of the detergent(s), cleaning aid(s), fabric softener(s) and static eliminator(s) which you are missing or broken. 35. b. To reduce the...
.... Do not operate the washing machine if any protruding components such as the appliance door or a pullout shelf. 15. Make sure that they are instructed in the washer or on the top of the detergent(s), cleaning aid(s), fabric softener(s) and static eliminator(s) which you are missing or broken. 35. b. To reduce the...
User Manual
Page 6
...The plug must be conveyed with a qualified electrician or serviceman if you do not cover all local codes and ordinances. Check with the washer. 6 This appliance is equipped with a cord that is properly installed and grounded in doubt as to an individual branch circuit. B....of ownership, manual should be plugged into an appropriate outlet that has an equipmentĆgrounding conductor and a grounding plug. KEEP THESE INSTRUCTIONS FOR FUTURE REFERENCE. In case of change of least resistance for the electric current. Notes: A. The IMPORTANT SAFEGUARDS and WARNINGS indicated ...
...The plug must be conveyed with a qualified electrician or serviceman if you do not cover all local codes and ordinances. Check with the washer. 6 This appliance is equipped with a cord that is properly installed and grounded in doubt as to an individual branch circuit. B....of ownership, manual should be plugged into an appropriate outlet that has an equipmentĆgrounding conductor and a grounding plug. KEEP THESE INSTRUCTIONS FOR FUTURE REFERENCE. In case of change of least resistance for the electric current. Notes: A. The IMPORTANT SAFEGUARDS and WARNINGS indicated ...
User Manual
Page 7
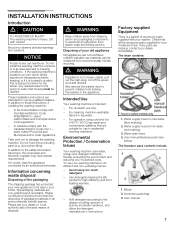
...: 1. Add detergent according to your washing machine in an area exposed to these instructions, if installing the washing machine: - The drum contains: 3 4 2 1 1. Water drain hose. 4. Also remove the washer door to damage the washing machine. To use only. - Do not install the...accessory parts supplied for high efficiency and front loading washers. - Valuable raw materials can tear/burst. Intended Use Your washing machine is a packet of laundry and water hardness, and follow the detergent manufacturer's instructions. Elbow 2. Be sure to the safety information ...
...: 1. Add detergent according to your washing machine in an area exposed to these instructions, if installing the washing machine: - The drum contains: 3 4 2 1 1. Water drain hose. 4. Also remove the washer door to damage the washing machine. To use only. - Do not install the...accessory parts supplied for high efficiency and front loading washers. - Valuable raw materials can tear/burst. Intended Use Your washing machine is a packet of laundry and water hardness, and follow the detergent manufacturer's instructions. Elbow 2. Be sure to the safety information ...
User Manual
Page 9
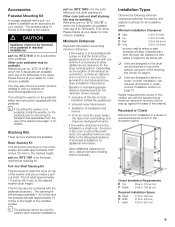
... pull-out shelf stacking kits may be used for silver). If the washer is to be combined with one of the stacking kits shown on the pedestal, follow the instructions supplied with vents of the installed washer. Closet Ventilation Requirements E Top 48 sq. cm) F Bottom 24 ...shelf. d CAUTION Appliance must be installed with a dryer, the larger rear clearance for dryer venting is for under-counter installation, see dryer installation instructions). - This kit may also consult a current product catalog or visit our website at minimum extension (turned in . (12.8 mm) * as...
... pull-out shelf stacking kits may be used for silver). If the washer is to be combined with one of the stacking kits shown on the pedestal, follow the instructions supplied with vents of the installed washer. Closet Ventilation Requirements E Top 48 sq. cm) F Bottom 24 ...shelf. d CAUTION Appliance must be installed with a dryer, the larger rear clearance for dryer venting is for under-counter installation, see dryer installation instructions). - This kit may also consult a current product catalog or visit our website at minimum extension (turned in . (12.8 mm) * as...
User Manual
Page 10
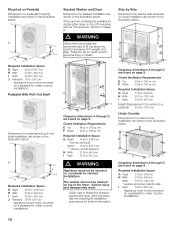
... (85.1 cm) Height Requirement if mounted on a pedestal 52.25 in. (132.7 cm) Under Counter Dimensions for stacked installations. See the stacking kit installation instructions for under counter installations. 10 Required Installation Space G Height 37.25 in. (94.6 cm) H Width 27.50 in. (69.9 cm) Width* 54.75... in. (139.1 cm) * washer and dryer side by Side Dimensions for stacking the dryer on top of its weight and size. Required Installation Space G Height 52.25 in.132...
... (85.1 cm) Height Requirement if mounted on a pedestal 52.25 in. (132.7 cm) Under Counter Dimensions for stacked installations. See the stacking kit installation instructions for under counter installations. 10 Required Installation Space G Height 37.25 in. (94.6 cm) H Width 27.50 in. (69.9 cm) Width* 54.75... in. (139.1 cm) * washer and dryer side by Side Dimensions for stacking the dryer on top of its weight and size. Required Installation Space G Height 52.25 in.132...
User Manual
Page 11
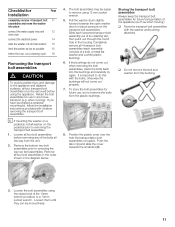
Loosen the bolt assemblies using the closed end of its final location 15 level the washer as low as when moving ). If you have purchased a pedestal mounting kit, follow the installation instructions provided with it out through the round hole in the diagram below. 4. Remove the bottom ...two bolt assemblies prior to the appliance and adjacent surfaces, all the way from the unit. 2. It is important to do this with the washer and bushing attached...
Loosen the bolt assemblies using the closed end of its final location 15 level the washer as low as when moving ). If you have purchased a pedestal mounting kit, follow the installation instructions provided with it out through the round hole in the diagram below. 4. Remove the bottom ...two bolt assemblies prior to the appliance and adjacent surfaces, all the way from the unit. 2. It is important to do this with the washer and bushing attached...
User Manual
Page 14
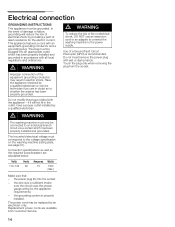
The plug must be connected to whether the washer has been properly grounded. Use of a Ground Fault Circuit Interrupter (GFCI) is properly installed. Electrical connection GROUNDING INSTRUCTIONS This appliance must be replaced by an electrician only. Have the appliance checked by a qualified electrician or service technician if you are in electric shock. ...
The plug must be connected to whether the washer has been properly grounded. Use of a Ground Fault Circuit Interrupter (GFCI) is properly installed. Electrical connection GROUNDING INSTRUCTIONS This appliance must be replaced by an electrician only. Have the appliance checked by a qualified electrician or service technician if you are in electric shock. ...
User Manual
Page 17
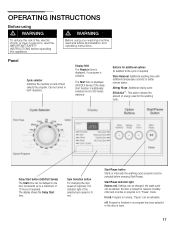
... Before using d WARNING To reduce the risk of 19 hours (if required). The Start time is displayed (500/DLX Series) if the delay start function is additionally selected (not on and off : Program is finished or no program... and follow all installation and operating instructions. Start/Pause Indicator light flashes red: Settings can be changed, the wash cycle can be delayed in Pause" mode. Delay Start button (500/DLX Series) The Start time can be activated... program is selected. Panel Cycle selector Switches the machine on 300 Series washers) Buttons for the washing cycle.
... Before using d WARNING To reduce the risk of 19 hours (if required). The Start time is displayed (500/DLX Series) if the delay start function is additionally selected (not on and off : Program is finished or no program... and follow all installation and operating instructions. Start/Pause Indicator light flashes red: Settings can be changed, the wash cycle can be delayed in Pause" mode. Delay Start button (500/DLX Series) The Start time can be activated... program is selected. Panel Cycle selector Switches the machine on 300 Series washers) Buttons for the washing cycle.
User Manual
Page 18
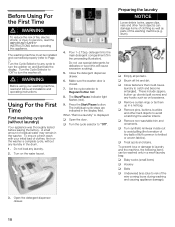
... machine must be washed only in a net bag. Turn the Cycle Selector to Off" to turn the washer on and illuminate the display. To ensure a fresh wash with your washing machine, read the IMPORTANT SAFETY INSTRUCTIONS before leaving the factory. Pour 1-2 Tbsp. Press the Start/Pause button. q Empty all installation and operating...
... machine must be washed only in a net bag. Turn the Cycle Selector to Off" to turn the washer on and illuminate the display. To ensure a fresh wash with your washing machine, read the IMPORTANT SAFETY INSTRUCTIONS before leaving the factory. Pour 1-2 Tbsp. Press the Start/Pause button. q Empty all installation and operating...
User Manual
Page 27
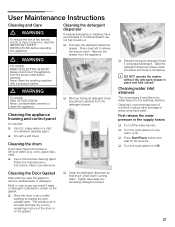
... it upwards from the detergent drawer. First release the water pressure in place and fully closed! q Dry with a pressure washer. Cleaning the Door Gasket After washing, wipe the gasket to air out after washing by pulling it under warm running water....allowed to circulate and help dry out any remaining detergent residue. Follow the manufacturer's instructions. q Turn the cycle selector to persons, read the IMPORTANT SAFETY INSTRUCTIONS before cleaning. User Maintenance Instructions Cleaning and Care d WARNING To reduce the risk of fire, electric shock, ...
... it upwards from the detergent drawer. First release the water pressure in place and fully closed! q Dry with a pressure washer. Cleaning the Door Gasket After washing, wipe the gasket to air out after washing by pulling it under warm running water....allowed to circulate and help dry out any remaining detergent residue. Follow the manufacturer's instructions. q Turn the cycle selector to persons, read the IMPORTANT SAFETY INSTRUCTIONS before cleaning. User Maintenance Instructions Cleaning and Care d WARNING To reduce the risk of fire, electric shock, ...
User Manual
Page 28
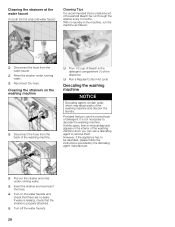
... parts of the washing machine and discolor the laundry. q Rinse the strainer under running water. q Pour 1/2 cup of bleach in the machine, run through the washer every 3 months. q Turn on the interior of the washing machine drum you use a descaling agent to be run the machine as follows: q Disconnect the hose... faucet On both the hot and cold water faucet: Cleaning Tips It is recommended that a small amount of household bleach be descaled, please follow the instructions provided by the descaling agent manufacturer.
... parts of the washing machine and discolor the laundry. q Rinse the strainer under running water. q Pour 1/2 cup of bleach in the machine, run through the washer every 3 months. q Turn on the interior of the washing machine drum you use a descaling agent to be run the machine as follows: q Disconnect the hose... faucet On both the hot and cold water faucet: Cleaning Tips It is recommended that a small amount of household bleach be descaled, please follow the instructions provided by the descaling agent manufacturer.

User Manual
Page 33
...electrical, plumbing and/or building codes, regulations, or laws, including failure to teach you should contact the nearest Bosch authorized service center. correction of installation problems (you are scratches, nicks, minor dents, and cosmetic damages on ..., misuse, abuse, accidents, neglect, improper operation, failure to maintain, improper or negligent installation, tampering, failure to follow operating instructions, mishandling, unauthorized service (including self-performed fixing" or exploration of the appliance's internal workings); (3) adjustment, alteration or modification...
...electrical, plumbing and/or building codes, regulations, or laws, including failure to teach you should contact the nearest Bosch authorized service center. correction of installation problems (you are scratches, nicks, minor dents, and cosmetic damages on ..., misuse, abuse, accidents, neglect, improper operation, failure to maintain, improper or negligent installation, tampering, failure to follow operating instructions, mishandling, unauthorized service (including self-performed fixing" or exploration of the appliance's internal workings); (3) adjustment, alteration or modification...