
User Manual
Page 9
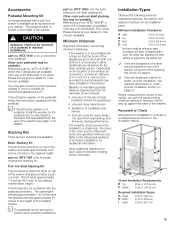
... . in the illustration below. part no . Please inquire at your dealer for color choices available. i The pedestal cannot be mounted on page 9. If the washer is to be installed with a dryer so that the fronts of the appliances are designed so the dryer can be flush with the... pedestal accessory. Benefits of maintaining greater distance (clearances) than the minimum shown include: S reduction of the risk of ...
... . in the illustration below. part no . Please inquire at your dealer for color choices available. i The pedestal cannot be mounted on page 9. If the washer is to be installed with a dryer so that the fronts of the appliances are designed so the dryer can be flush with the... pedestal accessory. Benefits of maintaining greater distance (clearances) than the minimum shown include: S reduction of the risk of ...
User Manual
Page 10
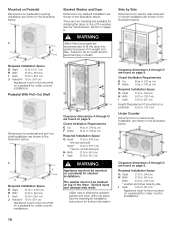
.... (136.5 cm) H Width 27.50 in. (69.9 cm) I Depth 33.50 in. (85.1 cm) Appliance must not be mounted on a pedestal for under counter installations. Serious injury and damage may result. cm) F Bottom 24 sq. in . (310 sq. See the stacking kit installation instructions for... Width 54.75 in. (139.1 cm) I Depth 33.50 in. (85.1 cm) , WARNING Appliance must not be stacked on page 9. Mounted on a pedestal 52.25 in. (132.7 cm) Under Counter Dimensions for undercounter installation are shown in the illustration below. in the illustration below. cm) Required Installation Space...
.... (136.5 cm) H Width 27.50 in. (69.9 cm) I Depth 33.50 in. (85.1 cm) Appliance must not be mounted on a pedestal for under counter installations. Serious injury and damage may result. cm) F Bottom 24 sq. in . (310 sq. See the stacking kit installation instructions for... Width 54.75 in. (139.1 cm) I Depth 33.50 in. (85.1 cm) , WARNING Appliance must not be stacked on page 9. Mounted on a pedestal 52.25 in. (132.7 cm) Under Counter Dimensions for undercounter installation are shown in the illustration below. in the illustration below. cm) Required Installation Space...
User Manual
Page 11
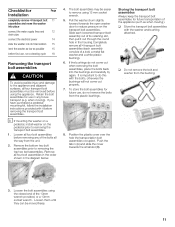
...use, run a cleaning cycle 18 Removing the transport bolt assemblies , CAUTION To avoid possible injury and damage to reduce pressure on the pedestal prior to removing the top two bolt assemblies. q Store the transport bolt assemblies with it out through the round hole in the ...14 slide the washer into the bushings and carefully try again. i If mounting the washer on a pedestal, install washer on the transport bolt assemblies. If you have purchased a pedestal mounting kit, follow the installation instructions provided with the washer and bushing attached. Pull the washer drum ...
...use, run a cleaning cycle 18 Removing the transport bolt assemblies , CAUTION To avoid possible injury and damage to reduce pressure on the pedestal prior to removing the top two bolt assemblies. q Store the transport bolt assemblies with it out through the round hole in the ...14 slide the washer into the bushings and carefully try again. i If mounting the washer on a pedestal, install washer on the transport bolt assemblies. If you have purchased a pedestal mounting kit, follow the installation instructions provided with the washer and bushing attached. Pull the washer drum ...


