
User Manual
Page 3
...First Time 18 First washing cycle (without laundry 18 Preparing the laundry 18 Sorting the laundry 19 Degrees of soiling 19 Loading the laundry 19 Laundry Detergents and Additives 20 Adding the correct amount of detergent 20 Filling laundry detergent and/or additives ...22 Modifiers 22 Option buttons (Stain removal, Allergy Rinse, ECO Action 22 Cycle Selection Table 23 Acoustic Signal 24 Special features (Auto Load adjust, AVSt Anti-Vibration System 24 During Washing 26 Re-selecting a program 26 Add a garment / Interrupting the program 26 Canceling the active ...
...First Time 18 First washing cycle (without laundry 18 Preparing the laundry 18 Sorting the laundry 19 Degrees of soiling 19 Loading the laundry 19 Laundry Detergents and Additives 20 Adding the correct amount of detergent 20 Filling laundry detergent and/or additives ...22 Modifiers 22 Option buttons (Stain removal, Allergy Rinse, ECO Action 22 Cycle Selection Table 23 Acoustic Signal 24 Special features (Auto Load adjust, AVSt Anti-Vibration System 24 During Washing 26 Re-selecting a program 26 Add a garment / Interrupting the program 26 Canceling the active ...

User Manual
Page 5
... any service unless specifically recommended in the user maintenance instructions or in published user repair instructions that are instructed in subsequent wash loads causing skin irritation. 26. Do not insert/pull out the power plug with all water, drain, power and grounding connections ...are tight and not leaking, and before attempting any panel can expose sharp edges and points, electrical connections or hot surfaces. 24. Close the washing machine water shutĆoff valve(s) that you are missing or broken. 35. The water connections should be ...
... any service unless specifically recommended in the user maintenance instructions or in published user repair instructions that are instructed in subsequent wash loads causing skin irritation. 26. Do not insert/pull out the power plug with all water, drain, power and grounding connections ...are tight and not leaking, and before attempting any panel can expose sharp edges and points, electrical connections or hot surfaces. 24. Close the washing machine water shutĆoff valve(s) that you are missing or broken. 35. The water connections should be ...
User Manual
Page 9
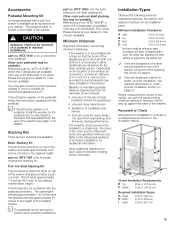
... system. i The pedestal cannot be available. S reduced noise transmission S facilitation of mold formation behind the appliances. Minimum Installation Clearances A Sides B Top C Rear* D Front 0.25 in. (6.4 mm) 0.25 in. (6.4 mm) 2.55 in. (64.8 mm) 0.50 in all installation types. in . (155 sq. in . (310...the doors of the appliances are two stacking kits available. part no . Height measurements shown in the illustration below. cm) F Bottom 24 sq. If the washer is to be combined with a pull-out drawer is necessary to be installed in a closet or recessed area ...
... system. i The pedestal cannot be available. S reduced noise transmission S facilitation of mold formation behind the appliances. Minimum Installation Clearances A Sides B Top C Rear* D Front 0.25 in. (6.4 mm) 0.25 in. (6.4 mm) 2.55 in. (64.8 mm) 0.50 in all installation types. in . (155 sq. in . (310...the doors of the appliances are two stacking kits available. part no . Height measurements shown in the illustration below. cm) F Bottom 24 sq. If the washer is to be combined with a pull-out drawer is necessary to be installed in a closet or recessed area ...
User Manual
Page 10
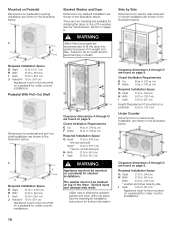
...on page 9. Pedestal With Pull-Out Shelf Dimensions for stacked installation are found on a pedestal for stacked installations. in . (310 sq. cm) F Bottom 24 sq. cm) Required Installation Space G Height* 74.50 in. (189.3 cm) * with basic stacking kit Height** 76.02 in. (193.1 cm.... The washer must not be stacked on page 9. Clearance dimensions A through D are two stacking kits available for further information. cm) F Bottom 24 sq. There are found on page 9. , WARNING (More than two people are shown in . (155 sq. See the stacking kit installation instructions...
...on page 9. Pedestal With Pull-Out Shelf Dimensions for stacked installation are found on a pedestal for stacked installations. in . (310 sq. cm) F Bottom 24 sq. cm) Required Installation Space G Height* 74.50 in. (189.3 cm) * with basic stacking kit Height** 76.02 in. (193.1 cm.... The washer must not be stacked on page 9. Clearance dimensions A through D are two stacking kits available for further information. cm) F Bottom 24 sq. There are found on page 9. , WARNING (More than two people are shown in . (155 sq. See the stacking kit installation instructions...

User Manual
Page 24
... q Press and hold until the desired setting lights up to avoid creasing if the clothing cannot be restarted. Special features Auto Load adjust Auto Load adjust" adjusts the water and energy consumption for delicate laundry. Displayed Time When a cycle has been selected, the expected cycle time... time when they occur in the cycle. The Start time begins running . - Stain Removal and Allergy Rinse) until the new time appears. 24 i If the program is changed . i Do not activate/deactivate the acoustic signal during a cycle. Start/Pause" button light The Start/Pause...
... q Press and hold until the desired setting lights up to avoid creasing if the clothing cannot be restarted. Special features Auto Load adjust Auto Load adjust" adjusts the water and energy consumption for delicate laundry. Displayed Time When a cycle has been selected, the expected cycle time... time when they occur in the cycle. The Start time begins running . - Stain Removal and Allergy Rinse) until the new time appears. 24 i If the program is changed . i Do not activate/deactivate the acoustic signal during a cycle. Start/Pause" button light The Start/Pause...

User Manual
Page 26
... and hold down . i If the speed is too high, the Start/Pause indicator light is complete. Laundry can be unlocked for five seconds q If the load is interrupted at a standstill. Canceling the active cycle If you would like to terminate a cycle and remove the laundry: q Press the Start/Pause button q If... is active, it is safe to do so. If a cycle is too wet, turn the cycle selector to dry. 26 i After washing, leave the washer loading door open for 24 hours to allow the inside of rust, check for suggested spin speeds).
... and hold down . i If the speed is too high, the Start/Pause indicator light is complete. Laundry can be unlocked for five seconds q If the load is interrupted at a standstill. Canceling the active cycle If you would like to terminate a cycle and remove the laundry: q Press the Start/Pause button q If... is active, it is safe to do so. If a cycle is too wet, turn the cycle selector to dry. 26 i After washing, leave the washer loading door open for 24 hours to allow the inside of rust, check for suggested spin speeds).