

User Manual
Page 5
...the machine. 33. Do not allow anyone to fabrics in compliance with all water, drain, power and grounding connections are in subsequent wash loads causing skin irritation. 26. Do not reach into the appliance if the wash drum is the case, contact an authorized service agent. 28....fabric softener(s) and static eliminator(s) which you are using. Small particles may result in safe practices by grasping the plug, not the cord. 25. Always read and follow the fabric care instructions recommended by the clothing manufacturer. 31. Do not operate this washing machine until you are ...
...the machine. 33. Do not allow anyone to fabrics in compliance with all water, drain, power and grounding connections are in subsequent wash loads causing skin irritation. 26. Do not reach into the appliance if the wash drum is the case, contact an authorized service agent. 28....fabric softener(s) and static eliminator(s) which you are using. Small particles may result in safe practices by grasping the plug, not the cord. 25. Always read and follow the fabric care instructions recommended by the clothing manufacturer. 31. Do not operate this washing machine until you are ...
User Manual
Page 9
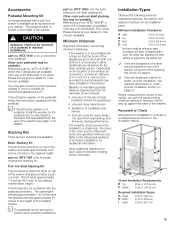
...for color choices available. part no . Please inquire at your dealer for color choices available. Minimum Installation Clearances A Sides B Top C Rear* D Front 0.25 in. (6.4 mm) 0.25 in. (6.4 mm) 2.55 in. (64.8 mm) 0.50 in. (12.8 mm) * as close to be installed in stacked installations. ... basic mechanical stacking kit. in . (85.1 cm) 9 WTZ 1601 is necessary to be flush with a dryer so that the fronts of the washer. , CAUTION Appliance must be provided for ducts/brackets (see dryer installation instructions). - Installation Types Observe the following illustrations...
...for color choices available. part no . Please inquire at your dealer for color choices available. Minimum Installation Clearances A Sides B Top C Rear* D Front 0.25 in. (6.4 mm) 0.25 in. (6.4 mm) 2.55 in. (64.8 mm) 0.50 in. (12.8 mm) * as close to be installed in stacked installations. ... basic mechanical stacking kit. in . (85.1 cm) 9 WTZ 1601 is necessary to be flush with a dryer so that the fronts of the washer. , CAUTION Appliance must be provided for ducts/brackets (see dryer installation instructions). - Installation Types Observe the following illustrations...
User Manual
Page 10
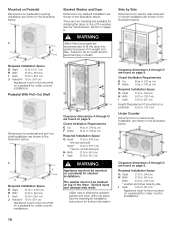
... position because of the dryer. See the stacking kit installation instructions for stacked installation are shown in the illustration below. Required Installation Space G Height 37.25 in. (94.6 cm) H Width 27.50 in. (69.9 cm) Width* 54.75 in. (139.1 cm) * washer and dryer side by side .... (132.7 cm) Under Counter Dimensions for pedestal mounting installation are shown in the illustration below. in . (155 sq. cm) Required Installation Space G Height 37.25 in. (94.6 cm) H Width 54.75 in. (139.1 cm) I Depth 33.50 in. (85.1 cm) J Pedestal Ht. 15.0 in. (38.1 cm) Appliance...
... position because of the dryer. See the stacking kit installation instructions for stacked installation are shown in the illustration below. Required Installation Space G Height 37.25 in. (94.6 cm) H Width 27.50 in. (69.9 cm) Width* 54.75 in. (139.1 cm) * washer and dryer side by side .... (132.7 cm) Under Counter Dimensions for pedestal mounting installation are shown in the illustration below. in . (155 sq. cm) Required Installation Space G Height 37.25 in. (94.6 cm) H Width 54.75 in. (139.1 cm) I Depth 33.50 in. (85.1 cm) J Pedestal Ht. 15.0 in. (38.1 cm) Appliance...
User Manual
Page 25
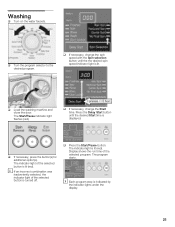
.... q If necessary, change the spin speed with the Spin selection button until the desired Start time is indicated by the indicator lights under the display. 25 The program starts. i If an incorrect combination was inadvertently selected, the indicator light of the selected button is lit (red). q If necessary, change the ...Start time. q If necessary, press the button(s) for additional option(s). Washing q Turn on the water faucets. The indicator light is turned off. q Load the washing machine and close the door. i Each program step is displayed.
.... q If necessary, change the spin speed with the Spin selection button until the desired Start time is indicated by the indicator lights under the display. 25 The program starts. i If an incorrect combination was inadvertently selected, the indicator light of the selected button is lit (red). q If necessary, change the ...Start time. q If necessary, press the button(s) for additional option(s). Washing q Turn on the water faucets. The indicator light is turned off. q Load the washing machine and close the door. i Each program step is displayed.