
Pedestal Installation Instructions
Page 2
...'s attention to move and uninstall the appliance. NOTICE NOTICE - Figure 1 1. 17 mm open end wrench 2. 6 mm Allen (Hex) wrench 3. (4) Socket Head Cap Screws and (4) Flat Washers 4. (4) Height Adjustable Feet 5. (4) Spacers 6.
...'s attention to move and uninstall the appliance. NOTICE NOTICE - Figure 1 1. 17 mm open end wrench 2. 6 mm Allen (Hex) wrench 3. (4) Socket Head Cap Screws and (4) Flat Washers 4. (4) Height Adjustable Feet 5. (4) Spacers 6.

Pedestal Installation Instructions
Page 3
...it can be positioned on its side. 5. Support the appliance approximately 1 1/2" to protect the drum during the original setup. Note for Washers: Slight water spillage may result if the plastic bushing is oriented to the Installing the Pedestal" section of the two vertical slots in ... transportation bolt assemblies originally shipped with the lower left of the slotted area. Figure 4 q Make sure the tab on the transportation bolt washer is all the way inside the back panel of the bolts until all four assemblies going counterclockwise. d CAUTION When lifting or lowering the ...
...it can be positioned on its side. 5. Support the appliance approximately 1 1/2" to protect the drum during the original setup. Note for Washers: Slight water spillage may result if the plastic bushing is oriented to the Installing the Pedestal" section of the two vertical slots in ... transportation bolt assemblies originally shipped with the lower left of the slotted area. Figure 4 q Make sure the tab on the transportation bolt washer is all the way inside the back panel of the bolts until all four assemblies going counterclockwise. d CAUTION When lifting or lowering the ...

Pedestal Installation Instructions
Page 4
...removal. If corner supports are not available, items such as the pedestal carton) or other suitable protective covering flat on its side. Note for Washers: Slight water spillage may be used to help align the pedestal and the appliance. Using a utility knife, cut or pinch injury. 1. ...Lay the appliance on 4 Figure 6 5. Retain the feet in injury. 3. Failure to do not remove the washer transportation bolts prior to the left side and down on the drawer release lever on the right side while removing the drawer (see Figure 8). Helpful...
...removal. If corner supports are not available, items such as the pedestal carton) or other suitable protective covering flat on its side. Note for Washers: Slight water spillage may be used to help align the pedestal and the appliance. Using a utility knife, cut or pinch injury. 1. ...Lay the appliance on 4 Figure 6 5. Retain the feet in injury. 3. Failure to do not remove the washer transportation bolts prior to the left side and down on the drawer release lever on the right side while removing the drawer (see Figure 8). Helpful...

Pedestal Installation Instructions
Page 5
... and into their threads. To avoid damaging the pedestal do not use the feet that are hand tight, use of the bolts completely. The front two feet should fit up against the pedestal housing (see Figure 11). q Loosen all four bolts with the pedestal. The spacer should be ...future transport (e.g. Figure 11 5. d CAUTION Avoid holding the appliance by the pedestal when lifting it may cause injury or damage. 6. For dryers go directly to washers. Figure 9 4. Align the outer edges of 10 ftĆlb (14 N-m) to removing the top two bolts. 5 Do not use a dolly to HAND...
... and into their threads. To avoid damaging the pedestal do not use the feet that are hand tight, use of the bolts completely. The front two feet should fit up against the pedestal housing (see Figure 11). q Loosen all four bolts with the pedestal. The spacer should be ...future transport (e.g. Figure 11 5. d CAUTION Avoid holding the appliance by the pedestal when lifting it may cause injury or damage. 6. For dryers go directly to washers. Figure 9 4. Align the outer edges of 10 ftĆlb (14 N-m) to removing the top two bolts. 5 Do not use a dolly to HAND...

Pedestal Installation Instructions
Page 6
... using the closed end of the appliance.) q Lay the bubble level across the unit worktop to check the level from side to side and from front to back. q If the bushings do this with your appliance (i.e., hoses, vents, etc.) 9. Slide the appliance to its final position, ready ...Installation Instructions that it lays on the surface of the 17mm wrench provided. It is closer to do not come out properly. Start with the washer and bushing attached. Otherwise, repeat the leveling procedure until they can make it . Loosen them out from the back (see Figure 17, item...
... using the closed end of the appliance.) q Lay the bubble level across the unit worktop to check the level from side to side and from front to back. q If the bushings do this with your appliance (i.e., hoses, vents, etc.) 9. Slide the appliance to its final position, ready ...Installation Instructions that it lays on the surface of the 17mm wrench provided. It is closer to do not come out properly. Start with the washer and bushing attached. Otherwise, repeat the leveling procedure until they can make it . Loosen them out from the back (see Figure 17, item...

Pedestal Installation Instructions
Page 7
... is satisfactorily raised or lowered, lock the height-adjustable feet in place by placing a small load of laundry in the machine, starting it will lower the corner of the appliance. When the...and movement of the appliance during appliance use the drawer as a step. Figure 18 6. For Washers: Fine tune the leveling by turning the lock nut counter-clockwise until the foot touches the floor...Replace the drawer by freely opening and closing the drawer. i It may remain locked for the front feet against the pedestal housing. Figure 17 q Turning the foot out (clockwise) will raise the ...
... is satisfactorily raised or lowered, lock the height-adjustable feet in place by placing a small load of laundry in the machine, starting it will lower the corner of the appliance. When the...and movement of the appliance during appliance use the drawer as a step. Figure 18 6. For Washers: Fine tune the leveling by turning the lock nut counter-clockwise until the foot touches the floor...Replace the drawer by freely opening and closing the drawer. i It may remain locked for the front feet against the pedestal housing. Figure 17 q Turning the foot out (clockwise) will raise the ...

Pedestal Installation Instructions
Page 8
... applies only while the Pedestal is in use and/or used with any of purchase, when this pedestal is installed with the listed washer or dryer and operated according to province. *Warranty terms may also have other rights which the pedestal is installed. Purchase Date Appliance Model... and serial number of the appliance on Mechanical Parts For one year from state to state or province to the instructions provided in the washer or dryer Operating, Care and Installation Instructions", supplier will repair or replace any other than those listed in the Installation Instructions, the...
... applies only while the Pedestal is in use and/or used with any of purchase, when this pedestal is installed with the listed washer or dryer and operated according to province. *Warranty terms may also have other rights which the pedestal is installed. Purchase Date Appliance Model... and serial number of the appliance on Mechanical Parts For one year from state to state or province to the instructions provided in the washer or dryer Operating, Care and Installation Instructions", supplier will repair or replace any other than those listed in the Installation Instructions, the...
Installation and Use & Care (all languages)
Page 2
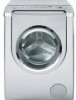
...gently tumble completely snag-free. An inclined drum works with ease. Bosch NexxtR washers deliver the most efficient and accurate water heating method for superior results. Stainless Steel Drum The Nexxt washer drum has hundreds of smooth double punched holes, which eliminates even the...water temperature is rinsed completely clean. Features and Benefits of Your New Washer SENSOTRONICR Technology The Bosch SENSOTRONICR technology optimizes the wash process at every stage of the cycle by sensing load size, water level and temperature needs for each selected fabric type. ...
...gently tumble completely snag-free. An inclined drum works with ease. Bosch NexxtR washers deliver the most efficient and accurate water heating method for superior results. Stainless Steel Drum The Nexxt washer drum has hundreds of smooth double punched holes, which eliminates even the...water temperature is rinsed completely clean. Features and Benefits of Your New Washer SENSOTRONICR Technology The Bosch SENSOTRONICR technology optimizes the wash process at every stage of the cycle by sensing load size, water level and temperature needs for each selected fabric type. ...
Installation and Use & Care (all languages)
Page 3
... Leveling procedure 11 Transport, such as when moving out 11 OPERATING INSTRUCTION 12 Your new washer 12 Panel 13 Summary of Instructions 14 Before Using For the First Time 15 Using For... laundry 15 Preparing the laundry 15 Sorting the laundry 15 Degrees of soiling 15 Loading the laundry 16 Laundry Detergents and Additives 16 Dispensing the correct amount of detergent 16...program 20 Canceling active program 20 After Washing 21 Cleaning and Care 21 Cleaning the washer 21 Descaling the washing machine 22 Troubleshooting of Minor Faults 23 Customer Service 25 STATEMENT ...
... Leveling procedure 11 Transport, such as when moving out 11 OPERATING INSTRUCTION 12 Your new washer 12 Panel 13 Summary of Instructions 14 Before Using For the First Time 15 Using For... laundry 15 Preparing the laundry 15 Sorting the laundry 15 Degrees of soiling 15 Loading the laundry 16 Laundry Detergents and Additives 16 Dispensing the correct amount of detergent 16...program 20 Canceling active program 20 After Washing 21 Cleaning and Care 21 Cleaning the washer 21 Descaling the washing machine 22 Troubleshooting of Minor Faults 23 Customer Service 25 STATEMENT ...
Installation and Use & Care (all languages)
Page 4
...will be found on all hot water faucets and let the water flow out of this appliance a userĆfriendly assistant in subsequent wash loads causing skin irritation. 4 Do not repair or replace any part of the washing machine, our customer service will release any service unless ... is in published user repair instructions that could ignite or explode. 3. This indicates that use an open flame while carrying out this warning. BOSCH washers are indicated in the washing machine and stick to the wash water. To reduce the risk of fire, clothes, cleaning rags, mop heads ...
...will be found on all hot water faucets and let the water flow out of this appliance a userĆfriendly assistant in subsequent wash loads causing skin irritation. 4 Do not repair or replace any part of the washing machine, our customer service will release any service unless ... is in published user repair instructions that could ignite or explode. 3. This indicates that use an open flame while carrying out this warning. BOSCH washers are indicated in the washing machine and stick to the wash water. To reduce the risk of fire, clothes, cleaning rags, mop heads ...

Installation and Use & Care (all languages)
Page 5
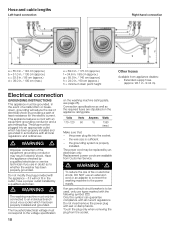
Use caution when draining hot water. 19. Do not operate this washing machine until you are tight and not leaking. 27. the washing machine has been installed according to an individual branch circuit. b. To avoid damage to the power supply. 22. Notes: A. The IMPORTANT ...shock by the clothing manufacturer. 24. The water connections should be taken to avoid damage to whether the washer is properly installed and grounded in the front can result in compliance with the washer. In case of change of least resistance for its intended purpose. 23. Do not sit or stand ...
Use caution when draining hot water. 19. Do not operate this washing machine until you are tight and not leaking. 27. the washing machine has been installed according to an individual branch circuit. b. To avoid damage to the power supply. 22. Notes: A. The IMPORTANT ...shock by the clothing manufacturer. 24. The water connections should be taken to avoid damage to whether the washer is properly installed and grounded in the front can result in compliance with the washer. In case of change of least resistance for its intended purpose. 23. Do not sit or stand ...

Installation and Use & Care (all languages)
Page 6
...to the degree of soiling, amount of your household costs. Intended Use Your washing machine is heavy. For domestic use your washer. Add detergent according to the safety information listed here, the local water and electricity supplier may also be exposed to temperatures... machine is intended: - door) when lifting. For operation using too much detergent. - Check that are intended for high efficiency and front loading washers. - Water supply hose for your dealer immediately. Elbow for leveling. 4. Avoid using cold and hot (140 °F/60 °C)...
...to the degree of soiling, amount of your household costs. Intended Use Your washing machine is heavy. For domestic use your washer. Add detergent according to the safety information listed here, the local water and electricity supplier may also be exposed to temperatures... machine is intended: - door) when lifting. For operation using too much detergent. - Check that are intended for high efficiency and front loading washers. - Water supply hose for your dealer immediately. Elbow for leveling. 4. Avoid using cold and hot (140 °F/60 °C)...
Installation and Use & Care (all languages)
Page 7
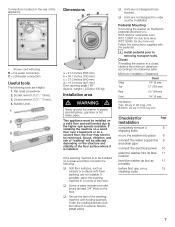
...a 15 cleaning cycle 7 Socket wrench (1/2" / 13mm). 3. Closed wrench (1/2" / 13 mm). 4. Dimensions a = 27.0 inches (686 mm) b = 30.7 inches (780 mm) c = 37.0 inches (940 mm) d = 16...brackets (set) from Bosch Customer Service (WMZ 2200). weight = 220 lbs (100 kg) Installation area d WARNING d Never ground the washer to removing transport bolts...washer on a solid floor and well leveled due to the floor. H = hot water connection C = cold water connection Useful tools The following table: Minimum Installation Clearances Closet Sides 1/4" (6 mm) Top 12" (3O5 mm) Rear 2.5" (64 mm) Front...
...a 15 cleaning cycle 7 Socket wrench (1/2" / 13mm). 3. Closed wrench (1/2" / 13 mm). 4. Dimensions a = 27.0 inches (686 mm) b = 30.7 inches (780 mm) c = 37.0 inches (940 mm) d = 16...brackets (set) from Bosch Customer Service (WMZ 2200). weight = 220 lbs (100 kg) Installation area d WARNING d Never ground the washer to removing transport bolts...washer on a solid floor and well leveled due to the floor. H = hot water connection C = cold water connection Useful tools The following table: Minimum Installation Clearances Closet Sides 1/4" (6 mm) Top 12" (3O5 mm) Rear 2.5" (64 mm) Front...
Installation and Use & Care (all languages)
Page 8
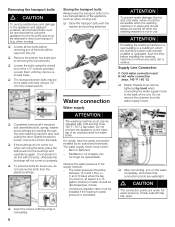
...snap in the supply network: - q Loosen all four bolts before removing any of the bolts all 4 transport bolt assemblies (bolt, spring, washer and bushings) by reaching through the open . Bent or flattened. - A pressure regulator valve must only be operated with tap fully open ...out when removing the bolts, place the bolts back into the bushings and carefully try again. q If the bushings do this with the washer and bushing attached. Modified or cut (integrity can be guaranteed). S. d CAUTION The connection points are watertight. when moving out). q To...
...snap in the supply network: - q Loosen all four bolts before removing any of the bolts all 4 transport bolt assemblies (bolt, spring, washer and bushings) by reaching through the open . Bent or flattened. - A pressure regulator valve must only be operated with tap fully open ...out when removing the bolts, place the bolts back into the bushings and carefully try again. q If the bushings do this with the washer and bushing attached. Modified or cut (integrity can be guaranteed). S. d CAUTION The connection points are watertight. when moving out). q To...
Installation and Use & Care (all languages)
Page 10
... INSTRUCTIONS This appliance must be plugged into the socket. - This appliance features a cord with the following symbol: 7. The plug must be connected to whether the washer has been properly grounded. Connection specifications as well as to an individual branch circuit via a socket which has been properly installed and grounded in electric...
... INSTRUCTIONS This appliance must be plugged into the socket. - This appliance features a cord with the following symbol: 7. The plug must be connected to whether the washer has been properly grounded. Connection specifications as well as to an individual branch circuit via a socket which has been properly installed and grounded in electric...
Installation and Use & Care (all languages)
Page 11
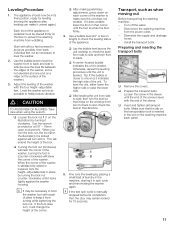
... height-adjustable feet in the sleeve until it in the slot on the floor to check the leveling status of the washer is leveled. q After leveling the unit from front to back to side and from the power outlet. - q Prepare the transport bolts: Loosen the screw in place ...by placing a small load of laundry in the machine, starting it locks tightly against will turn with all transport bolts. When the corner of...
... height-adjustable feet in the sleeve until it in the slot on the floor to check the leveling status of the washer is leveled. q After leveling the unit from front to back to side and from the power outlet. - q Prepare the transport bolts: Loosen the screw in place ...by placing a small load of laundry in the machine, starting it locks tightly against will turn with all transport bolts. When the corner of...
Installation and Use & Care (all languages)
Page 12
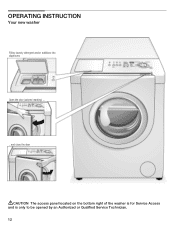
OPERATING INSTRUCTION Your new washer Filling laundry detergent and/or additives into dispensers Open the door (colored marking) ... ...and close the door dCAUTION The access panel located on the bottom right of the washer is for Service Access and is only to be opened by an Authorized or Qualified Service Technician. 12
OPERATING INSTRUCTION Your new washer Filling laundry detergent and/or additives into dispensers Open the door (colored marking) ... ...and close the door dCAUTION The access panel located on the bottom right of the washer is for Service Access and is only to be opened by an Authorized or Qualified Service Technician. 12

Installation and Use & Care (all languages)
Page 15
.../Cotton Hot. Bibs. - Removing stains If possible, pretreat stains while they are very sweaty or have been used for up to avoid scratching the washer interior. q Turn on (red). The Start/Pause indicator light flashes red. q Brush off lint and dirt. q Remove pins, buttons, buckles and... other hard objects) can damage items of clothing using your initial load of clothes, run time of program. q Remove nonĆwashable trim and ornaments. Typical stains - Preparing the laundry ATTENTION Loose debris (coins, ...
.../Cotton Hot. Bibs. - Removing stains If possible, pretreat stains while they are very sweaty or have been used for up to avoid scratching the washer interior. q Turn on (red). The Start/Pause indicator light flashes red. q Brush off lint and dirt. q Remove pins, buttons, buckles and... other hard objects) can damage items of clothing using your initial load of clothes, run time of program. q Remove nonĆwashable trim and ornaments. Typical stains - Preparing the laundry ATTENTION Loose debris (coins, ...
Installation and Use & Care (all languages)
Page 17
...bleach spills on cycle selected, temperature and pressure of incoming water, water hardness, size of load, type of fabrics and distance of unit from the colored surface of your front-loading washer. These substances may cause discoloration of the washing phase, hot water is important to keep the...towels, underware, socks, bed sheets, table clothes, etc. At the beginning of the washer's colored surface. Clothes will vary depending on the surface, use with this cycle. Quick Wash 25 For mixed load, e.g. Refresh Program for a minimum of cotton or linen such as work clothes and ...
...bleach spills on cycle selected, temperature and pressure of incoming water, water hardness, size of load, type of fabrics and distance of unit from the colored surface of your front-loading washer. These substances may cause discoloration of the washing phase, hot water is important to keep the...towels, underware, socks, bed sheets, table clothes, etc. At the beginning of the washer's colored surface. Clothes will vary depending on the surface, use with this cycle. Quick Wash 25 For mixed load, e.g. Refresh Program for a minimum of cotton or linen such as work clothes and ...
Installation and Use & Care (all languages)
Page 21
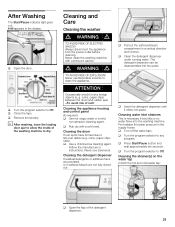
...Washing The Start/Pause indicator light goes out. 0:00 appears in the supply hoses: q Turn off the water taps. i After washing, leave the loading door ajar to any foreign objects (e. q Insert the detergent dispenser until it clicks into two parts. d WARNING d TO AVOID RISK OF EXPLOSION! ... manufacturer's instructions. q Turn the program selector to Off. First release the water pressure in the display. q Rub dry with a pressure washer. q Remove the laundry. Cleaning and Care Cleaning the washer d WARNING d TO AVOID RISK OF ELECTRIC SHOCK! Never use steel wool. g.
...Washing The Start/Pause indicator light goes out. 0:00 appears in the supply hoses: q Turn off the water taps. i After washing, leave the loading door ajar to any foreign objects (e. q Insert the detergent dispenser until it clicks into two parts. d WARNING d TO AVOID RISK OF EXPLOSION! ... manufacturer's instructions. q Turn the program selector to Off. First release the water pressure in the display. q Rub dry with a pressure washer. q Remove the laundry. Cleaning and Care Cleaning the washer d WARNING d TO AVOID RISK OF ELECTRIC SHOCK! Never use steel wool. g.


