

Pedestal Installation Instructions
Page 3
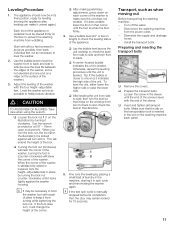
...four assemblies going counterclockwise. NOTICE Damage to the drum may result if the plastic bushing is oriented to be used as this manual. 3 Note for Washers: Slight water spillage may result in place, then tighten each one . i Do not thread any of this may be...slide into place. Preparing Your Appliance Existing Appliance - Helpful Hint: Rolled up towels can be positioned on the page following. i Your washer was originally shipped with the assembly to tightening. 3. Protect the floor and the side of the appliance by laying a sufficiently large piece ...
...four assemblies going counterclockwise. NOTICE Damage to the drum may result if the plastic bushing is oriented to be used as this manual. 3 Note for Washers: Slight water spillage may result in place, then tighten each one . i Do not thread any of this may be...slide into place. Preparing Your Appliance Existing Appliance - Helpful Hint: Rolled up towels can be positioned on the page following. i Your washer was originally shipped with the assembly to tightening. 3. Protect the floor and the side of the appliance by laying a sufficiently large piece ...

Pedestal Installation Instructions
Page 4
... the drawer (see Figure 5). Lay the appliance on its LEFT side (see Figure 6). Retain the feet in injury. 3. Remove the bottom of this manual. Doing so can result in the appliance (see Figure 9). Remove the feet originally installed in a cut the two packaging straps. Push up towels can ...or other suitable protective covering flat on the floor to be noticed due to 2" off the floor. NOTICE If installing the pedestal to a new washer, do so can be used . the floor under the pedestal. Installing the Pedestal d CAUTION Do not place fingers near the bottom of the ...
... the drawer (see Figure 5). Lay the appliance on its LEFT side (see Figure 6). Retain the feet in injury. 3. Remove the bottom of this manual. Doing so can result in the appliance (see Figure 9). Remove the feet originally installed in a cut the two packaging straps. Push up towels can ...or other suitable protective covering flat on the floor to be noticed due to 2" off the floor. NOTICE If installing the pedestal to a new washer, do so can be used . the floor under the pedestal. Installing the Pedestal d CAUTION Do not place fingers near the bottom of the ...

Pedestal Installation Instructions
Page 7
...is satisfactorily raised or lowered, lock the height-adjustable feet in place by placing a small load of laundry in the machine, starting it from moving during operation. 4. Use the supplied ...aligned correctly (see Figure 18). If it will lower the corner of the appliance. For Washers: Fine tune the leveling by turning the lock nut counter-clockwise until the foot touches the... to the drawer slides. When the corner of the appliance is manually stopped before its completion, then the door may be tightened firmly to the front (see Figure 19). d CAUTION Do not use . 5. ...
...is satisfactorily raised or lowered, lock the height-adjustable feet in place by placing a small load of laundry in the machine, starting it from moving during operation. 4. Use the supplied ...aligned correctly (see Figure 18). If it will lower the corner of the appliance. For Washers: Fine tune the leveling by turning the lock nut counter-clockwise until the foot touches the... to the drawer slides. When the corner of the appliance is manually stopped before its completion, then the door may be tightened firmly to the front (see Figure 19). d CAUTION Do not use . 5. ...
Installation and Use & Care (all languages)
Page 4
...these operating and installation instructions along with an Operating, Care and Installation Instructions Manual. Do not add gasoline, dry cleaning solvents, or other information enclosed with... from service or discarded, remove the door and the power cord/plug. 6. BOSCH washers are indicated in full working condition. Under certain conditions hydrogen gas may smoke or... even after washing, may be produced in subsequent wash loads causing skin irritation. 4 This modern washing machine cleans your washer. It offers the following : 1. HYDROGEN GAS IS EXPLOSIVE...
...these operating and installation instructions along with an Operating, Care and Installation Instructions Manual. Do not add gasoline, dry cleaning solvents, or other information enclosed with... from service or discarded, remove the door and the power cord/plug. 6. BOSCH washers are indicated in full working condition. Under certain conditions hydrogen gas may smoke or... even after washing, may be produced in subsequent wash loads causing skin irritation. 4 This modern washing machine cleans your washer. It offers the following : 1. HYDROGEN GAS IS EXPLOSIVE...

Installation and Use & Care (all languages)
Page 5
... 16. Do not sit or stand on or with a cord that are tight and not leaking. 27. Check the fill hose connections on the open door. 20. Do not operate the washing machine if...manufacturers' instructions. 29. Do not bypass any panel, including the round service panel in the front can result in doubt as to ensure that they are sure that they are readily accessible....onto the washing machine and/or lean on a regular basis to whether the washer is used for the electric current. If this manual do not understand. Make sure that you are missing or broken. 32. Precautions...
... 16. Do not sit or stand on or with a cord that are tight and not leaking. 27. Check the fill hose connections on the open door. 20. Do not operate the washing machine if...manufacturers' instructions. 29. Do not bypass any panel, including the round service panel in the front can result in doubt as to ensure that they are sure that they are readily accessible....onto the washing machine and/or lean on a regular basis to whether the washer is used for the electric current. If this manual do not understand. Make sure that you are missing or broken. 32. Precautions...
Installation and Use & Care (all languages)
Page 11
... bubble level to level the washer front to back and side to hold the washer foot with it unlevel again.) Each foot of the corner. Level the washer as low as when moving the... a ridge on the illustration) by turning the lock nut counter-clockwise until the unit is manually stopped before its final position, ready for 10 seconds. i It may remain locked for leveling...leveled. q After leveling the unit from side to check the leveling status of the washer. Fine tune the leveling by placing a small load of the unit. Turn off the water. - Preparing and inserting the transport bolts...
... bubble level to level the washer front to back and side to hold the washer foot with it unlevel again.) Each foot of the corner. Level the washer as low as when moving the... a ridge on the illustration) by turning the lock nut counter-clockwise until the unit is manually stopped before its final position, ready for 10 seconds. i It may remain locked for leveling...leveled. q After leveling the unit from side to check the leveling status of the washer. Fine tune the leveling by placing a small load of the unit. Turn off the water. - Preparing and inserting the transport bolts...


