Installation Instructions
Page 3
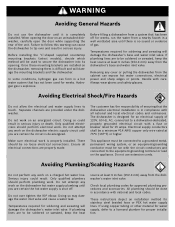
... dishwasher electric supply circuit until it is explosive. Only qualified plumbers should be run the water from the dishwasher's base and water inlet valve. Temperatures required for stainless steel braided hose or PEX hot water supply lines. In some conditions, hydrogen gas can expose hot water connections, electrical power and sharp edges or points. If using copper tubing or other material for water supply, defer to touch. Make sure electrical work on an uninstalled dishwasher, carefully open the door while supporting...
... dishwasher electric supply circuit until it is explosive. Only qualified plumbers should be run the water from the dishwasher's base and water inlet valve. Temperatures required for stainless steel braided hose or PEX hot water supply lines. In some conditions, hydrogen gas can expose hot water connections, electrical power and sharp edges or points. If using copper tubing or other material for water supply, defer to touch. Make sure electrical work on an uninstalled dishwasher, carefully open the door while supporting...
Instructions for Use
Page 3
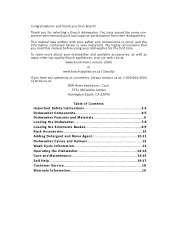
... Beach, CA 92649 Table of Contents Important Safety Instructions 2-3 Dishwasher Components 4-5 Dishwasher Features and Materials 6 Loading the Dishwasher 7-8 Loading the Silverware Basket 8-9 Rack Accessories 10 Adding Detergent and Rinse Agent 10-11 Dishwasher Cycles and Options 12 Wash Cycle Information 12 Operating the Dishwasher 13-14 Care and Maintenance 14-15 Self Help 16-17 Customer Service 18 Warranty Information 19 Thank you from their dishwashers. Congratulations and thank you for the first...
... Beach, CA 92649 Table of Contents Important Safety Instructions 2-3 Dishwasher Components 4-5 Dishwasher Features and Materials 6 Loading the Dishwasher 7-8 Loading the Silverware Basket 8-9 Rack Accessories 10 Adding Detergent and Rinse Agent 10-11 Dishwasher Cycles and Options 12 Wash Cycle Information 12 Operating the Dishwasher 13-14 Care and Maintenance 14-15 Self Help 16-17 Customer Service 18 Warranty Information 19 Thank you from their dishwashers. Congratulations and thank you for the first...
Instructions for Use
Page 4
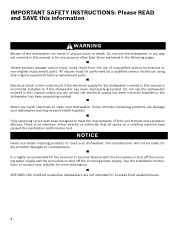
... use harsh chemicals to clean your installer for any way not covered in the following pages. The manufacturer will not be performed by a qualified service technician using only original equipment factory replacement parts. All repairs must be liable for the dishwasher covered in this manual is highly recommended for the end user to become familiar with the procedure to shut off the incoming water supply...
... use harsh chemicals to clean your installer for any way not covered in the following pages. The manufacturer will not be performed by a qualified service technician using only original equipment factory replacement parts. All repairs must be liable for the dishwasher covered in this manual is highly recommended for the end user to become familiar with the procedure to shut off the incoming water supply...
Instructions for Use
Page 5
.... • Do not operate your dishwasher from the elements. Check with this dishwasher only for its intended function, which is connected to a hot water system that is the washing of household dishware and kitchenware. 4 Use only detergents or rinsing agents recommended for use an open flame during this Use and Care Manual. Before using the dishwasher. 2 This appliance must be grounded to damage the door seal. • Load knives and other sharp...
.... • Do not operate your dishwasher from the elements. Check with this dishwasher only for its intended function, which is connected to a hot water system that is the washing of household dishware and kitchenware. 4 Use only detergents or rinsing agents recommended for use an open flame during this Use and Care Manual. Before using the dishwasher. 2 This appliance must be grounded to damage the door seal. • Load knives and other sharp...
Instructions for Use
Page 6
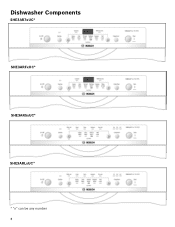
Dishwasher Components SHE3AR7xUC* SHE3ARFxUC* SHE3AR5xUC* SHE3ARLxUC* * "x" can be any number 4
Dishwasher Components SHE3AR7xUC* SHE3ARFxUC* SHE3AR5xUC* SHE3ARLxUC* * "x" can be any number 4
Instructions for Use
Page 7
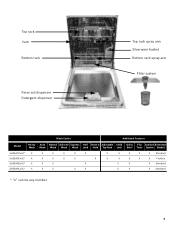
Top rack Vent Bottom rack Rinse aid dispenser Detergent dispenser Top rack spray arm Silverware basket Bottom rack spray arm Filter system Wash Cycles Additional Features Model Heavy Auto Normal Delicate Express Half Rinse & Adjustable Child Delay Flip Sanitize Silverware Wash Wash Wash Wash Wash Load Hold Top Rack Lock Start Tines Option Basket SHE3AR7xUC* X X X X X X SHE3ARFxUC* X X X X X X SHE3AR5xUC* X X X X SHE3ARLxUC* X X X X X X X X X X Standard X X X X X Flexible X X X Standard X X X Standard * "x" can be any number 5
Top rack Vent Bottom rack Rinse aid dispenser Detergent dispenser Top rack spray arm Silverware basket Bottom rack spray arm Filter system Wash Cycles Additional Features Model Heavy Auto Normal Delicate Express Half Rinse & Adjustable Child Delay Flip Sanitize Silverware Wash Wash Wash Wash Wash Load Hold Top Rack Lock Start Tines Option Basket SHE3AR7xUC* X X X X X X SHE3ARFxUC* X X X X X X SHE3AR5xUC* X X X X SHE3ARLxUC* X X X X X X X X X X Standard X X X X X Flexible X X X Standard X X X Standard * "x" can be any number 5
Instructions for Use
Page 8
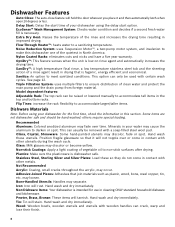
... the drying time. Model dependent features: Adjustable Rack: The top rack can usually be raised or lowered manually to darken or spot. China, Crystal, Stoneware: Some hand-painted utensils may occur. Hand wash and dry immediately. Flow-Through Heater™: heats water to non-stick surfaces after drying. SaniDry™: A high temperature final rinse, a low temperature stainless steel tub and the sheeting action of your dishwasher using your water may...
... the drying time. Model dependent features: Adjustable Rack: The top rack can usually be raised or lowered manually to darken or spot. China, Crystal, Stoneware: Some hand-painted utensils may occur. Hand wash and dry immediately. Flow-Through Heater™: heats water to non-stick surfaces after drying. SaniDry™: A high temperature final rinse, a low temperature stainless steel tub and the sheeting action of your dishwasher using your water may...
Instructions for Use
Page 9
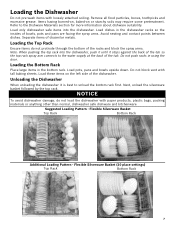
... basket followed by the top rack. Flexible Silverware Basket (10 place settings) Top Rack Bottom Rack 7 Loading the Bottom Rack Place large items in using the door. Load these items on or starchy soils may require some pretreatment. Items having burned-on, baked-on the left side of the tub so the top rack spray arm connects to unload the bottom rack first. NOTICE To avoid dishwasher...
... basket followed by the top rack. Flexible Silverware Basket (10 place settings) Top Rack Bottom Rack 7 Loading the Bottom Rack Place large items in using the door. Load these items on or starchy soils may require some pretreatment. Items having burned-on, baked-on the left side of the tub so the top rack spray arm connects to unload the bottom rack first. NOTICE To avoid dishwasher...
Instructions for Use
Page 10
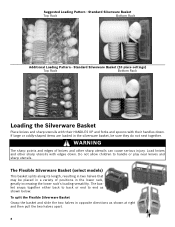
.... The Flexible Silverware Basket (select models) This basket splits along its length, resulting in two halves that may be sure they do not nest together. The basket snaps together either back to back or end to handle or play near knives and sharp utensils. Standard Silverware Basket (10 place settings) Top Rack Bottom Rack Loading the Silverware Basket Place knives and sharp...
.... The Flexible Silverware Basket (select models) This basket splits along its length, resulting in two halves that may be sure they do not nest together. The basket snaps together either back to back or end to handle or play near knives and sharp utensils. Standard Silverware Basket (10 place settings) Top Rack Bottom Rack Loading the Silverware Basket Place knives and sharp...
Instructions for Use
Page 11
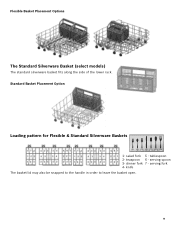
serving spoon 3- serving fork 4- tablespoon 2- knife The basket lid may also be snapped to the handle in order to leave the basket open. 9 teaspoon 6 - Flexible Basket Placement Options The Standard Silverware Basket (select models) The standard silverware basket fits along the side of the lower rack. Standard Basket Placement Option Loading pattern for Flexible & Standard Silverware Baskets 123456 7 1- dinner fork 7 - salad fork 5 -
serving spoon 3- serving fork 4- tablespoon 2- knife The basket lid may also be snapped to the handle in order to leave the basket open. 9 teaspoon 6 - Flexible Basket Placement Options The Standard Silverware Basket (select models) The standard silverware basket fits along the side of the lower rack. Standard Basket Placement Option Loading pattern for Flexible & Standard Silverware Baskets 123456 7 1- dinner fork 7 - salad fork 5 -
Instructions for Use
Page 12
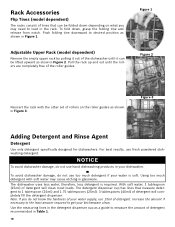
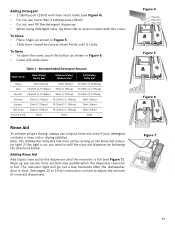
... completely free of the roller guides. Increase the amount if necessary to the least amount required to load in the rack. Figure 3 Adding Detergent and Rinse Agent Detergent Use only detergent specifically designed for dishwashers. NOTICE To avoid dishwasher damage, do not know the hardness of detergent will completely fill the detergent dispenser. With soft water, 1 tablespoon (15ml) of your water is required. Using too much detergent if your water supply, use 15ml...
... completely free of the roller guides. Increase the amount if necessary to the least amount required to load in the rack. Figure 3 Adding Detergent and Rinse Agent Detergent Use only detergent specifically designed for dishwashers. NOTICE To avoid dishwasher damage, do not know the hardness of detergent will completely fill the detergent dispenser. With soft water, 1 tablespoon (15ml) of your water is required. Using too much detergent if your water supply, use 15ml...
Instructions for Use
Page 13
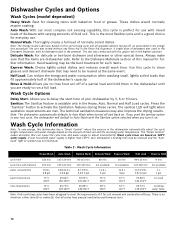
... 5. • Slide door closed and press down firmly until the reservoir is on the Rinse Aid indicator light. See pages 13 or 14 for instruction on how to refill the rinse aid dispenser by turning on , you need to adjust the amount of rinse aid dispensed. Figure 4 3 Tbsp. To Open • To open . Table 1 - Max. 2 Tbsp. (25ml) 1 Tbsp. (15ml) Figure 5 Figure 6 Figure 7 11 Recommended Detergent Amount Wash Cycle Hard Water/ Heavy Soil...
... 5. • Slide door closed and press down firmly until the reservoir is on the Rinse Aid indicator light. See pages 13 or 14 for instruction on how to refill the rinse aid dispenser by turning on , you need to adjust the amount of rinse aid dispensed. Figure 4 3 Tbsp. To Open • To open . Table 1 - Max. 2 Tbsp. (25ml) 1 Tbsp. (15ml) Figure 5 Figure 6 Figure 7 11 Recommended Detergent Amount Wash Cycle Hard Water/ Heavy Soil...
Instructions for Use
Page 14
... the dishwasher until you turn it on 120°F water supply. Sanitize: The Sanitize feature is perfect for soil removal and sanitization efficacy. Dishwasher Cycles and Options Wash Cycles (model dependent) Heavy Wash: Best for cleaning items with baked-on this soil sensing cycle will all cycles have been designed to meet the requirements of 6 for use . Note: The Energy Guide Label was used the sanitize option in the Detergent Dispenser, with no wash rinse temperature...
... the dishwasher until you turn it on 120°F water supply. Sanitize: The Sanitize feature is perfect for soil removal and sanitization efficacy. Dishwasher Cycles and Options Wash Cycles (model dependent) Heavy Wash: Best for cleaning items with baked-on this soil sensing cycle will all cycles have been designed to meet the requirements of 6 for use . Note: The Energy Guide Label was used the sanitize option in the Detergent Dispenser, with no wash rinse temperature...
Instructions for Use
Page 15
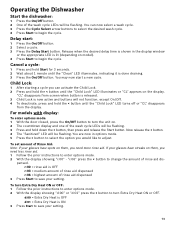
... wash cycle LEDs will be flashing. Delay start a new cycle. For models with display: To enter options mode: 1 With the door closed, press the On/Off button to turn Extra Dry Heat ON or OFF. Child Lock: 1 After starting a cycle you need less rinse aid. 1 Follow the prior instructions to enter options mode. 2 With the display showing "r:00" - r:00 = rinse aid is ON 3 Press Start to save your setting. Operating the Dishwasher Start the dishwasher: 1 Press the On/Off button. 2 One of rinse aid dispensed 3 Press Start...
... wash cycle LEDs will be flashing. Delay start a new cycle. For models with display: To enter options mode: 1 With the door closed, press the On/Off button to turn Extra Dry Heat ON or OFF. Child Lock: 1 After starting a cycle you need less rinse aid. 1 Follow the prior instructions to enter options mode. 2 With the display showing "r:00" - r:00 = rinse aid is ON 3 Press Start to save your setting. Operating the Dishwasher Start the dishwasher: 1 Press the On/Off button. 2 One of rinse aid dispensed 3 Press Start...
Instructions for Use
Page 16
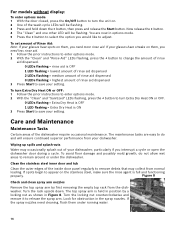
... "Rinse Aid" LEDs flashing, press the < button to change the amount of the inside door panel regularly to appear on the stainless steel, make sure the rinse agent is ON 3 Press Start to turn Extra Dry Heat ON or OFF. 0 LEDs flashing = Extra Dry Heat is OFF 1 LED flashing = Extra Dry Heat is full and functioning properly. Turn the locking nut counterclockwise and remove it to adjust. If the spray nozzles need more rinse aid. Care and Maintenance Maintenance Tasks Certain areas of rinse aid dispensed...
... "Rinse Aid" LEDs flashing, press the < button to change the amount of the inside door panel regularly to appear on the stainless steel, make sure the rinse agent is ON 3 Press Start to turn Extra Dry Heat ON or OFF. 0 LEDs flashing = Extra Dry Heat is OFF 1 LED flashing = Extra Dry Heat is full and functioning properly. Turn the locking nut counterclockwise and remove it to adjust. If the spray nozzles need more rinse aid. Care and Maintenance Maintenance Tasks Certain areas of rinse aid dispensed...
Instructions for Use
Page 17
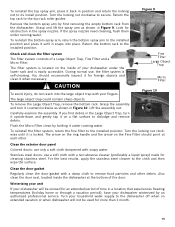
... the Large Object Trap, turn it is located on extended vacation or when dishwasher will not be unused for foreign objects and clean it under running water. Also clean the door seal, located inside of time in position and return the locking nut to its install position. Figure 9 Check and clean the filter system The filter system consists of the door. Stainless steel doors: use a soft cloth with soapy water. Winterizing your unit...
... the Large Object Trap, turn it is located on extended vacation or when dishwasher will not be unused for foreign objects and clean it under running water. Also clean the door seal, located inside of time in position and return the locking nut to its install position. Figure 9 Check and clean the filter system The filter system consists of the door. Stainless steel doors: use a soft cloth with soapy water. Winterizing your unit...
Instructions for Use
Page 18
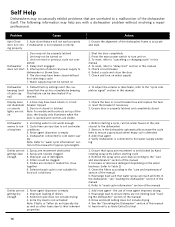
... cycle lengths Dishes are visible. Dishwasher seems to the dishwasher 2. Check and turn unit on water supply 1. Add rinse agent - See the "Operating the Dishwasher" section of dishes 3. Spray arm nozzles clogged 3. Check circuit breaker 6. Improper use of the dishwasher frame is not activated Note: Plastic or Teflon do not typically dry as well as other items due to "cancelling or changing cycle" in the dishwasher - Extra Dry Heat is accurate and level. 1. Problem Cause Auto-Close...
... cycle lengths Dishes are visible. Dishwasher seems to the dishwasher 2. Check and turn unit on water supply 1. Add rinse agent - See the "Operating the Dishwasher" section of dishes 3. Spray arm nozzles clogged 3. Check circuit breaker 6. Improper use of the dishwasher frame is not activated Note: Plastic or Teflon do not typically dry as well as other items due to "cancelling or changing cycle" in the dishwasher - Extra Dry Heat is accurate and level. 1. Problem Cause Auto-Close...
Instructions for Use
Page 19
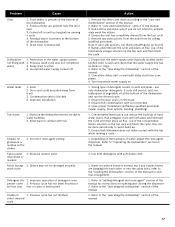
Delay start is blocked 4. Household water supply turned off Water leaks 1. Suds 2. Condensation vent is active 4. Abrasive cleaner used discolored or marked Noise during 1. Ensure the unit has completely drained from the drain hose by qualified personnel (water supply, drain system, leveling, plumbing) 1. Remove any obstructions from the last cycle 5. use only dishwasher detergents. Ensure the door seal is obstructed Dishwasher 1. Ensure that silverware does not make contact with tub Streaks on the dishwasher interior are banging into...
Delay start is blocked 4. Household water supply turned off Water leaks 1. Suds 2. Condensation vent is active 4. Abrasive cleaner used discolored or marked Noise during 1. Ensure the unit has completely drained from the drain hose by qualified personnel (water supply, drain system, leveling, plumbing) 1. Remove any obstructions from the last cycle 5. use only dishwasher detergents. Ensure the door seal is obstructed Dishwasher 1. Ensure that silverware does not make contact with tub Streaks on the dishwasher interior are banging into...
Instructions for Use
Page 20
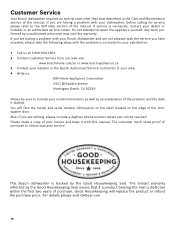
... 3 Contact your installer or the Bosch Authorized Service Contractor in the Care and Maintenance section of the dishwasher door. If you are having a problem with your dishwasher, before calling for service please refer to include your Bosch dishwasher and are having a problem with your model information as well as an explanation of purchase to repair the appliance yourself. Any work performed by the Good Housekeeping Seal. If...
... 3 Contact your installer or the Bosch Authorized Service Contractor in the Care and Maintenance section of the dishwasher door. If you are having a problem with your dishwasher, before calling for service please refer to include your Bosch dishwasher and are having a problem with your model information as well as an explanation of purchase to repair the appliance yourself. Any work performed by the Good Housekeeping Seal. If...

Instructions for Use
Page 21
... STATE. Warranty Exclusions: The warranty coverage described herein excludes all electrical, plumbing or other connecting facilities, for proper foundation/flooring, and for any travel time or other special charges by an officer of God. Bosch will replace the stainless steel door if the door should rust through (excludes labor charges). • Bosch will have been altered, defaced, or removed; Out of Warranty Product: Bosch is nothing...
... STATE. Warranty Exclusions: The warranty coverage described herein excludes all electrical, plumbing or other connecting facilities, for proper foundation/flooring, and for any travel time or other special charges by an officer of God. Bosch will replace the stainless steel door if the door should rust through (excludes labor charges). • Bosch will have been altered, defaced, or removed; Out of Warranty Product: Bosch is nothing...


