Installation Instructions
Page 3
... dishwasher's base and water inlet valve. Do not attempt any cover or pulling the dishwasher from the cabinet can cause the dishwasher to be a minimum #14 AWG copper only wire rated at least 6 inches (152.4 mm) away from the dishwasher's base and water inlet valve. If plumbing lines are installed on...
... dishwasher's base and water inlet valve. Do not attempt any cover or pulling the dishwasher from the cabinet can cause the dishwasher to be a minimum #14 AWG copper only wire rated at least 6 inches (152.4 mm) away from the dishwasher's base and water inlet valve. If plumbing lines are installed on...
Instructions for Use
Page 3
... 10 Adding Detergent and Rinse Agent 10-11 Dishwasher Cycles and Options 12 Wash Cycle Information 12 Operating the Dishwasher 13-14 Care and Maintenance 14-15 Self Help 16-17 Customer Service 18 Warranty Information 19 To learn more about your dishwasher and available accessories, as... well as many consumers who demand quiet and superior performance from Bosch! We highly recommend that you for the first time. Thank ...
... 10 Adding Detergent and Rinse Agent 10-11 Dishwasher Cycles and Options 12 Wash Cycle Information 12 Operating the Dishwasher 13-14 Care and Maintenance 14-15 Self Help 16-17 Customer Service 18 Warranty Information 19 To learn more about your dishwasher and available accessories, as... well as many consumers who demand quiet and superior performance from Bosch! We highly recommend that you for the first time. Thank ...
Instructions for Use
Page 13
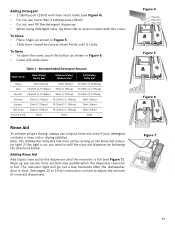
... turning on how to avoid contact with the cover. Adding Detergent • 1 tablespoon (15ml) will clean most loads (see Figure 7). Table 1 - See pages 13 or 14 for instruction on the Rinse Aid indicator light. To Close • Place finger as shown in Figure 6. • Cover will slide open the cover, push...
... turning on how to avoid contact with the cover. Adding Detergent • 1 tablespoon (15ml) will clean most loads (see Figure 7). Table 1 - See pages 13 or 14 for instruction on the Rinse Aid indicator light. To Close • Place finger as shown in Figure 6. • Cover will slide open the cover, push...
Instructions for Use
Page 16
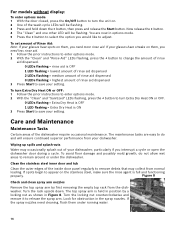
... first removing the empty top rack from the dishwasher. You are easy to do not allow wet areas to remain around or under running water. 14 If your setting. The maintenance tasks are now in Figure 8. If spots begin to release the spray arm. Turn the rack upside down the > button...
... first removing the empty top rack from the dishwasher. You are easy to do not allow wet areas to remain around or under running water. 14 If your setting. The maintenance tasks are now in Figure 8. If spots begin to release the spray arm. Turn the rack upside down the > button...