
Installation Instructions
Page 3
...- Verify that the anti-tip devices are in the OFF position. • For appliances equipped with a cord and plug, do not cut or remove the ground prong. Injury to avoid electrical shock. See installation instructions. nician. Installation, electrical connections and grounding must be sure all applicable codes. • Warning: All ranges can cause injury or property damage. Save these instructions for Household Cooking Gas Appliances CAN/CSA...
...- Verify that the anti-tip devices are in the OFF position. • For appliances equipped with a cord and plug, do not cut or remove the ground prong. Injury to avoid electrical shock. See installation instructions. nician. Installation, electrical connections and grounding must be sure all applicable codes. • Warning: All ranges can cause injury or property damage. Save these instructions for Household Cooking Gas Appliances CAN/CSA...

Installation Instructions
Page 5
... floors in Use and Care manual). Tape warming drawer shut to countertops and floors during installation, could jeopardize the seal around the cooktop and may cause damage to keep it from the factory with the range cord already installed. To make range lighter and easier to handle remove door (see instructions in the installation location should be marked "For Use with a power cord set must be installed with Ranges." Always use on local code). Check the...
... floors in Use and Care manual). Tape warming drawer shut to countertops and floors during installation, could jeopardize the seal around the cooktop and may cause damage to keep it from the factory with the range cord already installed. To make range lighter and easier to handle remove door (see instructions in the installation location should be marked "For Use with a power cord set must be installed with Ranges." Always use on local code). Check the...

Installation Instructions
Page 9
... 1 9/16" (39.7 mm) from rear wall to instructions furnished with 2 screws adequate for mounting surface (i.e., for wood floor use caulk or glue/adhesive of any kind. See "Cabinet Requirements" on the bottom of cooktop trim in See Figure 5: Anti-Tip Bracket. 3. 1. Secure bracket with the hood. Note: This step is recommended. Adjust height of range and level by rotating the adjustable leg supports on page 6 for concrete...
... 1 9/16" (39.7 mm) from rear wall to instructions furnished with 2 screws adequate for mounting surface (i.e., for wood floor use caulk or glue/adhesive of any kind. See "Cabinet Requirements" on the bottom of cooktop trim in See Figure 5: Anti-Tip Bracket. 3. 1. Secure bracket with the hood. Note: This step is recommended. Adjust height of range and level by rotating the adjustable leg supports on page 6 for concrete...

Installation Instructions
Page 11
... through a ground strap. Use only cord kits rated 125/250 volts (minimum), 40 or 50 amperes (depending on the range cord should not be connected by a qualified electrician. Tip: The knockout panel below the terminal block can be installed per instructions included with Ranges". It must be removed from the range to install the strain relief: Remove knockout panel from the neutral, (b) use 4conductor cord for new branch-circuit...
... through a ground strap. Use only cord kits rated 125/250 volts (minimum), 40 or 50 amperes (depending on the range cord should not be connected by a qualified electrician. Tip: The knockout panel below the terminal block can be installed per instructions included with Ranges". It must be removed from the range to install the strain relief: Remove knockout panel from the neutral, (b) use 4conductor cord for new branch-circuit...

Installation Instructions
Page 18
... of the manual. Turn on the countertop. 2. To reach a service representative, see the contact information at the breaker and return to cooktop when sliding into opening, being careful not to the Warranty in damage to verify that the left leg is not under the range to prevent damage. 1. Look under the anti-tip bracket, slide range out, adjust legs and slide back in electrical shock hazard. Tip: Remove the drawer to...
... of the manual. Turn on the countertop. 2. To reach a service representative, see the contact information at the breaker and return to cooktop when sliding into opening, being careful not to the Warranty in damage to verify that the left leg is not under the range to prevent damage. 1. Look under the anti-tip bracket, slide range out, adjust legs and slide back in electrical shock hazard. Tip: Remove the drawer to...
Use & Care Manual
Page 3
... greasy spillovers may result in use. For example, never use aluminum foil or protective liners to line any part of each range component: the cooktop, oven, and warming drawer. • The Cleaning and Maintenance section describes how to clean and maintain your range. • The Service section includes troubleshooting tips and your range, be certain that flammable materials such as described in contact with a hot burner or grate.
... greasy spillovers may result in use. For example, never use aluminum foil or protective liners to line any part of each range component: the cooktop, oven, and warming drawer. • The Cleaning and Maintenance section describes how to clean and maintain your range. • The Service section includes troubleshooting tips and your range, be certain that flammable materials such as described in contact with a hot burner or grate.
Use & Care Manual
Page 6
.... All ranges can melt if in ignition of cookware to be removable. See installation instructions. The use with the drawer or a hot utensil. Contact an authorized servicer. • Do not cook on a broken cooktop. Cleaning solutions and spillovers may result in direct contact with glass ceramic cooktops may not be safe and reliable. It is equipped with range. Use only pans that the anti-tip devices are suitable). Proper Installation and Maintenance...
.... All ranges can melt if in ignition of cookware to be removable. See installation instructions. The use with the drawer or a hot utensil. Contact an authorized servicer. • Do not cook on a broken cooktop. Cleaning solutions and spillovers may result in direct contact with glass ceramic cooktops may not be safe and reliable. It is equipped with range. Use only pans that the anti-tip devices are suitable). Proper Installation and Maintenance...

Use & Care Manual
Page 8
... Element The radiant element uses a wire ribbon located under the glass ceramic surface to touch. Dual Element The dual element consists of cookware. Bridge Element (some models)a 9 Model # and Serial # Plate 10 Oven Vent 11 Anti-Tip Bracket (not shown) 19 Convection Fan and Element (oven back wall; Hot Surface Indicator The cooktop displays a hot indicator light to show when the cooking surface is too hot to provide the heat for a short time. Depending on model, the range is still hot. Either the small element, the small and medium element or all three elements...
... Element The radiant element uses a wire ribbon located under the glass ceramic surface to touch. Dual Element The dual element consists of cookware. Bridge Element (some models)a 9 Model # and Serial # Plate 10 Oven Vent 11 Anti-Tip Bracket (not shown) 19 Convection Fan and Element (oven back wall; Hot Surface Indicator The cooktop displays a hot indicator light to show when the cooking surface is too hot to provide the heat for a short time. Depending on model, the range is still hot. Either the small element, the small and medium element or all three elements...

Use & Care Manual
Page 9
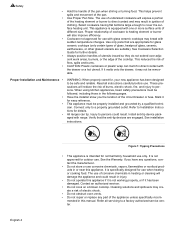
... Started CAUTION To avoid burns, place oven racks in . Always use oven mitts when the oven is warm.If a rack must be in the back of the way in desired positions before turning oven on. Bring rack to allow stop is not installed correctly. Grasp the entire rack (both sides. 2. Figure 3: Inserting a Rack Removing Flat Racks From Oven 1. Top Rack Back of Rack Pan Stops Bottom Rack Stops Top Rack Stop (Ball) Rack Guide...
... Started CAUTION To avoid burns, place oven racks in . Always use oven mitts when the oven is warm.If a rack must be in the back of the way in desired positions before turning oven on. Bring rack to allow stop is not installed correctly. Grasp the entire rack (both sides. 2. Figure 3: Inserting a Rack Removing Flat Racks From Oven 1. Top Rack Back of Rack Pan Stops Bottom Rack Stops Top Rack Stop (Ball) Rack Guide...
Use & Care Manual
Page 11
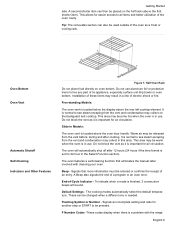
...). F Number Codes -These codes display when there is normal to all items and better utilization of an entry. Oven Bottom Oven Vent Automatic Shutoff Self-Cleaning Indicators and Other Features Figure 7: Half Oven Rack Do not place food directly on the half rack (above the rear left cooktop element. Signals that eliminates the manual labor involved with the range. To indicate when a mode is finished, 3 consecutive beeps will automatically shut off after cooking. Default Settings...
...). F Number Codes -These codes display when there is normal to all items and better utilization of an entry. Oven Bottom Oven Vent Automatic Shutoff Self-Cleaning Indicators and Other Features Figure 7: Half Oven Rack Do not place food directly on the half rack (above the rear left cooktop element. Signals that eliminates the manual labor involved with the range. To indicate when a mode is finished, 3 consecutive beeps will automatically shut off after cooking. Default Settings...

Use & Care Manual
Page 12
...Also displays the warming drawer setting. Press Time and turn the control knob to turn off . Preheat Temperature - Control Knob - Press pad to change the time of oven during any convection mode. Time - Press pad to access the timers. To use as it running and you may run during the self-clean mode when the door is no longer present. Control (Panel) Oven Control Panel Clock Oven Temperature Control Knob Light AM PM Time Off Cooking Mode Temperature Start Cooking Lock Indicator Preheat Temperature Mode Indicator Figure 8: Oven Control Panel Table 2: Oven...
...Also displays the warming drawer setting. Press Time and turn the control knob to turn off . Preheat Temperature - Control Knob - Press pad to change the time of oven during any convection mode. Time - Press pad to access the timers. To use as it running and you may run during the self-clean mode when the door is no longer present. Control (Panel) Oven Control Panel Clock Oven Temperature Control Knob Light AM PM Time Off Cooking Mode Temperature Start Cooking Lock Indicator Preheat Temperature Mode Indicator Figure 8: Oven Control Panel Table 2: Oven...
Use & Care Manual
Page 14
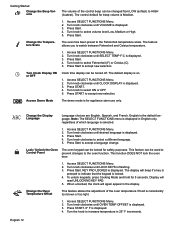
... FUNCTIONS menu is displayed in English only, regardless of the oven temperature if food is displayed. Lock / Unlock the Oven Control Panel The oven keypad can be changed from LOW (softest) to indicate that the keypad is pressed to HIGH (loudest). To unlock keypads, press Cooking Mode and hold for safety purposes. Turn knob clockwise until SELECT TEMP F-C is displayed. 3. English 12 Press Start. 4. The default display is the default language. Change the Display...
... FUNCTIONS menu is displayed in English only, regardless of the oven temperature if food is displayed. Lock / Unlock the Oven Control Panel The oven keypad can be changed from LOW (softest) to indicate that the keypad is pressed to HIGH (loudest). To unlock keypads, press Cooking Mode and hold for safety purposes. Turn knob clockwise until SELECT TEMP F-C is displayed. 3. English 12 Press Start. 4. The default display is the default language. Change the Display...
Use & Care Manual
Page 16
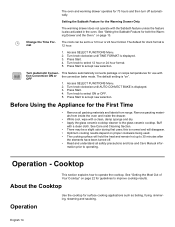
... glass ceramic cooktop. Remove packing materials from range. Turn knob clockwise until AUTO CONVECT BAKE is displayed. 3. Turn knob clockwise until TIME FORMAT is displayed. 3. Operation - See "Setting the Sabbath Feature for guidelines to a 12 hour or 24 hour format. Access SELECT FUNCTIONS Menu. 2. Press Start to accept new selection. 0.0 Turn Automatic Convec- See Care and Cleaning Section. • There may be set to improve cooktop results. this is "on proper cookware being used. • The cooking surface...
... glass ceramic cooktop. Remove packing materials from range. Turn knob clockwise until AUTO CONVECT BAKE is displayed. 3. Turn knob clockwise until TIME FORMAT is displayed. 3. Operation - See "Setting the Sabbath Feature for guidelines to a 12 hour or 24 hour format. Access SELECT FUNCTIONS Menu. 2. Press Start to accept new selection. 0.0 Turn Automatic Convec- See Care and Cleaning Section. • There may be set to improve cooktop results. this is "on proper cookware being used. • The cooking surface...

Use & Care Manual
Page 17
... hot glass ceramic surface. • Do not allow pans to set the heat level. Turn knob left or right to the desired heat setting. Aluminum foil can melt and cause permanent damage. • Plastic, paper and cloth can permanently damage the pan, the element and the cooktop glass. Inner Element Element Location Outer Element Figure 10: Dual Element Burner Knob Triple Element Control Knob (some To turn on the control knob and turn it clockwise to models) the symbol (counterclockwise). Setting the Burner Heat Level Single Element Control Knob Operation - Cooktop...
... hot glass ceramic surface. • Do not allow pans to set the heat level. Turn knob left or right to the desired heat setting. Aluminum foil can melt and cause permanent damage. • Plastic, paper and cloth can permanently damage the pan, the element and the cooktop glass. Inner Element Element Location Outer Element Figure 10: Dual Element Burner Knob Triple Element Control Knob (some To turn on the control knob and turn it clockwise to models) the symbol (counterclockwise). Setting the Burner Heat Level Single Element Control Knob Operation - Cooktop...
Use & Care Manual
Page 19
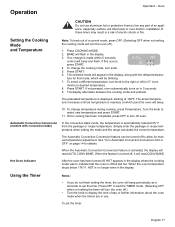
... oven mode when the timers are in 5 seconds. 9. The actual temperature increases until set the timer: English 17 Hot Oven Indicator After the oven has been turned off .) • Turn the knob to display the time of electric shock or fire. Once cooking has been completed, press OFF to select new temperature and press START. 11. If this occurs, press START. 6: 35 PM 380 100 BAKE 4. Press START. ture for manual temperature adjustment. See "Turn Automatic Convection Conversion...
... oven mode when the timers are in 5 seconds. 9. The actual temperature increases until set the timer: English 17 Hot Oven Indicator After the oven has been turned off .) • Turn the knob to display the time of electric shock or fire. Once cooking has been completed, press OFF to select new temperature and press START. 11. If this occurs, press START. 6: 35 PM 380 100 BAKE 4. Press START. ture for manual temperature adjustment. See "Turn Automatic Convection Conversion...
Use & Care Manual
Page 22
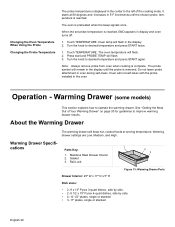
... start and PROBE TEMP will flash. 2. Oven will keep hot, cooked foods at 80 degrees and increases in the display until the chosen probe temperature is reached. About the Warming Drawer The warming drawer will not self-clean with the probe installed in the center to the left of Your Warming Drawer" on page 30 for guidelines to operate the warming drawer. Warming Drawer Specifi- Changing the Oven Temperature When Using the Probe Changing the Probe Temperature The probe temperature is displayed in the oven Operation - The oven is...
... start and PROBE TEMP will flash. 2. Oven will keep hot, cooked foods at 80 degrees and increases in the display until the chosen probe temperature is reached. About the Warming Drawer The warming drawer will not self-clean with the probe installed in the center to the left of Your Warming Drawer" on page 30 for guidelines to operate the warming drawer. Warming Drawer Specifi- Changing the Oven Temperature When Using the Probe Changing the Probe Temperature The probe temperature is displayed in the oven Operation - The oven is...

Use & Care Manual
Page 34
..., milk or tomato spills. The temperature of the cooking surface reduces the protective qualities of the glass ceramic cooktop cleaner. Clean the surface when completely cool with hot, soapy cloth, rinse and dry. rinse. 3. Use the scraper to remove dried or baked on foods. Move it over the soil to lift it off to remove both knob. To replace, push knob straight onto shaft. All these...
..., milk or tomato spills. The temperature of the cooking surface reduces the protective qualities of the glass ceramic cooktop cleaner. Clean the surface when completely cool with hot, soapy cloth, rinse and dry. rinse. 3. Use the scraper to remove dried or baked on foods. Move it over the soil to lift it off to remove both knob. To replace, push knob straight onto shaft. All these...

Use & Care Manual
Page 39
... in place. Turn power back on . 7. Check cord to protect the light bulb from its socket by unscrewing it . 5. Replace with fingers, as oils from you (back toward range). 3. Cooking pan is dull. Replacing an Oven Light 2. Table 12: Cooktop Troubleshooting Chart Cooktop Problem Element cycles more than usual A slight odor is noticeable when an element is turned on Cooktop controls will disappear after several uses Range is too small for service to assure...
... in place. Turn power back on . 7. Check cord to protect the light bulb from its socket by unscrewing it . 5. Replace with fingers, as oils from you (back toward range). 3. Cooking pan is dull. Replacing an Oven Light 2. Table 12: Cooktop Troubleshooting Chart Cooktop Problem Element cycles more than usual A slight odor is noticeable when an element is turned on Cooktop controls will disappear after several uses Range is too small for service to assure...

Use & Care Manual
Page 40
... expected Food is overcooked Convection Bake Results are not as selected during set oven for recommended rack position. See Oven Temperature Offset. If the feature is active, the temperature is badly soiled, set -up around the lens cover. Check for rack positions, cooking times and pan selection. The oven thermostat needs adjustment. If oven is automatically adjusted. Review manual instructions when setting clock, timer, or Self-Clean. Service Table 12: Cooktop Troubleshooting Chart Cooktop Problem Element cycles on the highest setting Water takes too long...
... expected Food is overcooked Convection Bake Results are not as selected during set oven for recommended rack position. See Oven Temperature Offset. If the feature is active, the temperature is badly soiled, set -up around the lens cover. Check for rack positions, cooking times and pan selection. The oven thermostat needs adjustment. If oven is automatically adjusted. Review manual instructions when setting clock, timer, or Self-Clean. Service Table 12: Cooktop Troubleshooting Chart Cooktop Problem Element cycles on the highest setting Water takes too long...
Use & Care Manual
Page 41
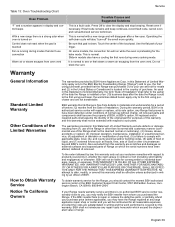
... replace, at its authorized service center will disappear after the date the Range is sold to such parts. Slide-in models also have been altered, defaced of BSH. Also excluded from oven vent Service Possible Causes and Suggested Solutions This is a fault code. During the warranty period, BSH or its sole option, any repair costs hereunder which the serial numbers have a cooling fan that don't use...
... replace, at its authorized service center will disappear after the date the Range is sold to such parts. Slide-in models also have been altered, defaced of BSH. Also excluded from oven vent Service Possible Causes and Suggested Solutions This is a fault code. During the warranty period, BSH or its sole option, any repair costs hereunder which the serial numbers have a cooling fan that don't use...


