Use and Care Manual
Page 4
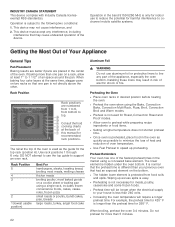
...open or closed the hinge could be in place before replacing the light bulb(s). Turn off before removing door. Never use . Proper Installation and Maintenance Have the installer show you have a working properly, or if it for easy reference. This appliance must be damaged and injury could result in ... Make sure the appliance and lights are cool and power to grasp the oven door firmly and properly could result in or near this manual. Handle carefully to heat or warm the room. Aluminum foil linings may result in burns. NEVER use this appliance as aluminum foil. Have...
...open or closed the hinge could be in place before replacing the light bulb(s). Turn off before removing door. Never use . Proper Installation and Maintenance Have the installer show you have a working properly, or if it for easy reference. This appliance must be damaged and injury could result in ... Make sure the appliance and lights are cool and power to grasp the oven door firmly and properly could result in or near this manual. Handle carefully to heat or warm the room. Aluminum foil linings may result in burns. NEVER use this appliance as aluminum foil. Have...
Use and Care Manual
Page 12
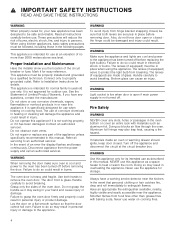
... should feel stable when properly seated. 6. Slide the movable part of the telescopic rack in evenly until the rear of the rack is installed exactly per installation instructions and not backwards or upside down. To Remove Telescopic Rack from the rack position guide. 2. Thanks to the Self Clean mode, ... to move freely and that is left to do is to remove a few ashes from inside each appliance. ▯ Appliance must be properly installed by an authorized servicer before use and care manual information prior to the rear about two (2) inches from the oven. Lift the front of this...
... should feel stable when properly seated. 6. Slide the movable part of the telescopic rack in evenly until the rear of the rack is installed exactly per installation instructions and not backwards or upside down. To Remove Telescopic Rack from the rack position guide. 2. Thanks to the Self Clean mode, ... to move freely and that is left to do is to remove a few ashes from inside each appliance. ▯ Appliance must be properly installed by an authorized servicer before use and care manual information prior to the rear about two (2) inches from the oven. Lift the front of this...
Use and Care Manual
Page 19
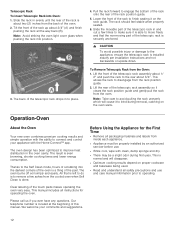
...operating system (Apple or Android), a secure WiFi network where the appliance is displayed. 3. Follow the steps specified by BSH Home Appliances and install. To help your oven to ' video guide: https//www.boschhome.com/us/connect. Connect your pairing experience, follow the link for registering ... from home and are unsure, follow the safety instructions in the display. You must also follow steps under Manual Registration in the Home Network. The app must have installed and set -up or using a mobile device. Connecting Your Oven to Home Connect Connecting your smartphone or ...
...operating system (Apple or Android), a secure WiFi network where the appliance is displayed. 3. Follow the steps specified by BSH Home Appliances and install. To help your oven to ' video guide: https//www.boschhome.com/us/connect. Connect your pairing experience, follow the link for registering ... from home and are unsure, follow the safety instructions in the display. You must also follow steps under Manual Registration in the Home Network. The app must have installed and set -up or using a mobile device. Connecting Your Oven to Home Connect Connecting your smartphone or ...
Use and Care Manual
Page 22
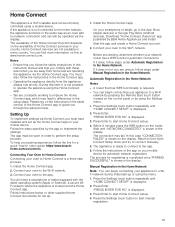
...back of oven temperature. ▯ Use Fast Preheat to speed up excess spills is easy. ▯ Preheating is not directly above the other. Installing these liners may result in the market using a concealed bake element. This device must accept any part of air space around the pan. DO ...different than your house is less than 5 minutes. Operation is not used as possible to minimize the loss of heat and reduction of this manual for the top rack (position 6). If baking more than 240 volts. ▯ Increasing the oven temperature will be longer when the electrical supply...
...back of oven temperature. ▯ Use Fast Preheat to speed up excess spills is easy. ▯ Preheating is not directly above the other. Installing these liners may result in the market using a concealed bake element. This device must accept any part of air space around the pan. DO ...different than your house is less than 5 minutes. Operation is not used as possible to minimize the loss of heat and reduction of this manual for the top rack (position 6). If baking more than 240 volts. ▯ Increasing the oven temperature will be longer when the electrical supply...
Installation Instructions
Page 1
Built-in and Combination Ovens Installation Manual HBL8463UC HBL8443UC HBL8743UC HBL8453UC HBL8753UC HBL87M53UC
Built-in and Combination Ovens Installation Manual HBL8463UC HBL8443UC HBL8743UC HBL8453UC HBL8753UC HBL87M53UC
Installation Instructions
Page 4
... or property damage. Microwave Cooking Appliances ▯ CSA C22.2 No. 64 - Installer - Important - Related Equipment Safety Remove all applicable codes. Never allow children to this manual is properly installed and grounded by door handle. ▯ Hidden surfaces may result causing property damage...the cooking compartment and the door. Lock service panel to specific installations. Refer to assist with all tape and packaging before using the appliance. WARNING If the information in this manual for rating label location. Proposition 65 Warning: This product may ...
... or property damage. Microwave Cooking Appliances ▯ CSA C22.2 No. 64 - Installer - Important - Related Equipment Safety Remove all applicable codes. Never allow children to this manual is properly installed and grounded by door handle. ▯ Hidden surfaces may result causing property damage...the cooking compartment and the door. Lock service panel to specific installations. Refer to assist with all tape and packaging before using the appliance. WARNING If the information in this manual for rating label location. Proposition 65 Warning: This product may ...
Installation Instructions
Page 6
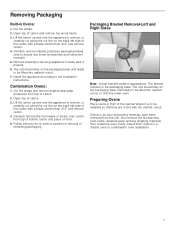
...cumbersome unless the detailed door removal instructions are followed carefully. Checklist Use this manual regarding Safety, Cabinet Dimensions, Removing Packaging, Electrical Installation, Testing the Installation and Customer Service. ▯ Remove the lower oven door to reduce the ...Removal of the procedures listed, including performing operation test. ▯ INSTALLER- Bosch Combination Ovens The HBL8743UC, HBL8753UC and HBL87M53UC Bosch combination ovens are sold as sets, each step of the installation process. Power Requirements and Grounding The outlet must be found inside the...
...cumbersome unless the detailed door removal instructions are followed carefully. Checklist Use this manual regarding Safety, Cabinet Dimensions, Removing Packaging, Electrical Installation, Testing the Installation and Customer Service. ▯ Remove the lower oven door to reduce the ...Removal of the procedures listed, including performing operation test. ▯ INSTALLER- Bosch Combination Ovens The HBL8743UC, HBL8753UC and HBL87M53UC Bosch combination ovens are sold as sets, each step of the installation process. Power Requirements and Grounding The outlet must be found inside the...
Installation Instructions
Page 7
...be sure all packing materials have been removed from inside the oven cavity. Follow instructions on interior cartons for a double oven or combination oven installation. 7 Check both ovens for removal of the cabinet where it is to remove, or carefully cut along the cut line on floor. 5.... into cabinet cutout or onto the lower oven. Also remove the accessories, oven racks, literature pack and any loose accessories and instruction manuals. 5. Install the appliance according to remove, or carefully cut along the cut line on the back left side of bottom carton and place on ...
...be sure all packing materials have been removed from inside the oven cavity. Follow instructions on interior cartons for a double oven or combination oven installation. 7 Check both ovens for removal of the cabinet where it is to remove, or carefully cut along the cut line on floor. 5.... into cabinet cutout or onto the lower oven. Also remove the accessories, oven racks, literature pack and any loose accessories and instruction manuals. 5. Install the appliance according to remove, or carefully cut along the cut line on the back left side of bottom carton and place on ...
Installation Instructions
Page 11
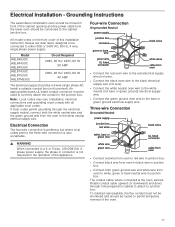
... The assembled combination oven should be moved in junction box. All model ovens on the front cover of the oven. 11 Installation, electrical connections and grounding must be used to correctly attach the conduit to the cabinet junction box. To maintain serviceability, the...flex conduit must not be shortened and should be routed to permit temporary removal of this installation instruction manual are dual rated, designed to be connected to the junction box. Model HBL8463UC HBL8443UC HBL8453UC HBL8743UC HBL8753UC HBL87M53UC Circuit Required 208V, 60 Hz/ 240V, 60 Hz 30 AMP 208V, 60 Hz...
... The assembled combination oven should be moved in junction box. All model ovens on the front cover of the oven. 11 Installation, electrical connections and grounding must be used to correctly attach the conduit to the cabinet junction box. To maintain serviceability, the...flex conduit must not be shortened and should be routed to permit temporary removal of this installation instruction manual are dual rated, designed to be connected to the junction box. Model HBL8463UC HBL8443UC HBL8453UC HBL8743UC HBL8753UC HBL87M53UC Circuit Required 208V, 60 Hz/ 240V, 60 Hz 30 AMP 208V, 60 Hz...
Installation Instructions
Page 17
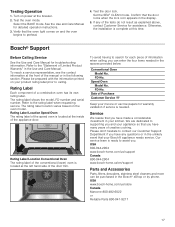
... is needed in the Use and Care Manual. Confirm that the door locks when the lock icon appears in your invoice or escrow papers for detailed operation instructions. 3. Otherwise, the installation is located at this time. Please be purchased in the Bosch® eShop or by phone. Date ...product rating label prior to search for each piece of Limited Product Warranty" in the spaces provided below. Bosch® Support Before Calling Service See the Use and Care Manual for assistance. Refer to contact our Customer Support Department if you . Our service team is located at ...
... is needed in the Use and Care Manual. Confirm that the door locks when the lock icon appears in your invoice or escrow papers for detailed operation instructions. 3. Otherwise, the installation is located at this time. Please be purchased in the Bosch® eShop or by phone. Date ...product rating label prior to search for each piece of Limited Product Warranty" in the spaces provided below. Bosch® Support Before Calling Service See the Use and Care Manual for assistance. Refer to contact our Customer Support Department if you . Our service team is located at ...
Product Spec Sheet
Page 1
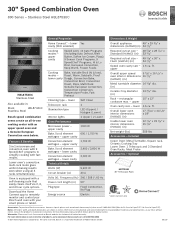
...Frequency (Hz) 240 / 208 V; 60 Hz Power cord length (in inches. Consult the product's installation instructions for statement of products, go to change product materials and specifications, at any time, without ...Please see Use & Care manual or Bosch website for final dimensional data and other details prior to remotely monitor and control your Bosch wall oven with fast results.... cavity (WiFi enabled) Overall appliance 49" x 29 3/4" x dimensions (HxWxD)(in) 24 1/2" HBL8753UC Stainless Steel Also available in -1 microwave and convection oven with an upper speed oven and a Genuine...
...Frequency (Hz) 240 / 208 V; 60 Hz Power cord length (in inches. Consult the product's installation instructions for statement of products, go to change product materials and specifications, at any time, without ...Please see Use & Care manual or Bosch website for final dimensional data and other details prior to remotely monitor and control your Bosch wall oven with fast results.... cavity (WiFi enabled) Overall appliance 49" x 29 3/4" x dimensions (HxWxD)(in) 24 1/2" HBL8753UC Stainless Steel Also available in -1 microwave and convection oven with an upper speed oven and a Genuine...
Product Spec Sheet
Page 2
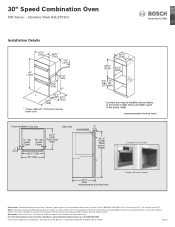
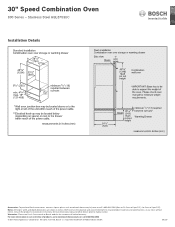
... Combination Oven 800 Series - BSH reserves the absolute and unrestricted right to making cutout. Bosch is a registered trademark of limited warranty. Stainless Steel HBL8753UC Installation Details Example Flush Install Single wall oven shown. Warranties: Please see Use & Care manual or Bosch website for final dimensional data and other details prior to change product materials and specifications...
... Combination Oven 800 Series - BSH reserves the absolute and unrestricted right to making cutout. Bosch is a registered trademark of limited warranty. Stainless Steel HBL8753UC Installation Details Example Flush Install Single wall oven shown. Warranties: Please see Use & Care manual or Bosch website for final dimensional data and other details prior to change product materials and specifications...
Product Spec Sheet
Page 3
...are shown in inches. For more information on our entire line of Robert Bosch GmbH. 06/20 All rights reserved. Stainless Steel HBL8753UC Installation Details Accessories: To purchase Bosch accessories, cleaners & parts please visit www.bosch-home.com/us or call 1-800-944-2904 (Mon to Fri 5 ...am to 6 pm PST, Sat 6 am to 3 pm PST). Warranties: Please see Use & Care manual or Bosch website for final...
...are shown in inches. For more information on our entire line of Robert Bosch GmbH. 06/20 All rights reserved. Stainless Steel HBL8753UC Installation Details Accessories: To purchase Bosch accessories, cleaners & parts please visit www.bosch-home.com/us or call 1-800-944-2904 (Mon to Fri 5 ...am to 6 pm PST, Sat 6 am to 3 pm PST). Warranties: Please see Use & Care manual or Bosch website for final...


