Use and Care Manual
Page 4
... turned off before removing door. Connect only to Installation Instructions for details. Refer to properly grounded outlet. The use . Disconnect appliance from breaking. WARNING When removing the door make sure oven is intended for use at the circuit breaker box. Handle carefully to avoid breaking. WARNING Make sure the appliance and lights are cool and power to the appliance has been turned off before use of corrosive chemicals in heating or cleaning...
... turned off before removing door. Connect only to Installation Instructions for details. Refer to properly grounded outlet. The use . Disconnect appliance from breaking. WARNING When removing the door make sure oven is intended for use at the circuit breaker box. Handle carefully to avoid breaking. WARNING Make sure the appliance and lights are cool and power to the appliance has been turned off before use of corrosive chemicals in heating or cleaning...
Use and Care Manual
Page 9
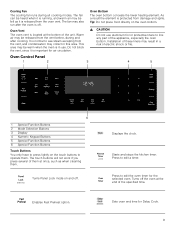
... when cleaning them. Oven Control Panel Oven Bottom The oven bottom conceals the lower heating element. Press to line any part of the appliance, especially the oven bottom. Press to edit the oven timer for air circulation. Oven Vent The oven vent is located at the bottom of the specified time. Do not block the vent, since it is released from the vent before, during all cooking modes. Starts and stops the kitchen timer. Turns off the oven at...
... when cleaning them. Oven Control Panel Oven Bottom The oven bottom conceals the lower heating element. Press to line any part of the appliance, especially the oven bottom. Press to edit the oven timer for air circulation. Oven Vent The oven vent is located at the bottom of the specified time. Do not block the vent, since it is released from the vent before, during all cooking modes. Starts and stops the kitchen timer. Turns off the oven at...
Use and Care Manual
Page 10
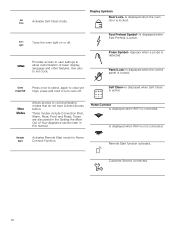
... oven door is active. Panel Lock- Home Connect Is displayed when Wi-Fi is active. Use also to cooking/heating modes that do not have a direct access button. Is displayed when Self Clean is connected. Allows access to set clock. Provides access to user settings to turn oven off . Is displayed when Wi-Fi is detected. Customer Service connected. 10 Appears when a probe is not connected. 5HPRWH 6WDUW Activates Remote Start mode for Home Connect Function. Is displayed when the control panel is locked...
... oven door is active. Panel Lock- Home Connect Is displayed when Wi-Fi is active. Use also to cooking/heating modes that do not have a direct access button. Is displayed when Self Clean is connected. Allows access to set clock. Provides access to user settings to turn oven off . Is displayed when Wi-Fi is detected. Customer Service connected. 10 Appears when a probe is not connected. 5HPRWH 6WDUW Activates Remote Start mode for Home Connect Function. Is displayed when the control panel is locked...
Use and Care Manual
Page 11
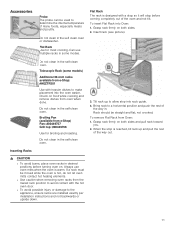
.... Broiling Pan (available from oven when done. When the stop is reached, tilt rack up to allow stop before turning oven on food while cooking and remove dishes from e-Shop) Pan: #00449757 Grill top: #00449756 Use for most cooking. Always use multiple racks in . To remove Flat Rack from Oven: 1. Accessories Probe The probe can be moved while the oven is hot, do not let oven mitts contact hot heating elements. ▯ Use caution when removing oven racks...
.... Broiling Pan (available from oven when done. When the stop is reached, tilt rack up to allow stop before turning oven on food while cooking and remove dishes from e-Shop) Pan: #00449757 Grill top: #00449756 Use for most cooking. Always use multiple racks in . To remove Flat Rack from Oven: 1. Accessories Probe The probe can be moved while the oven is hot, do not let oven mitts contact hot heating elements. ▯ Use caution when removing oven racks...

Use and Care Manual
Page 15
... be changed, enter the oven timer mode by entering 0:00. To set Fast Preheat: 1. Press Fast Preheat. Note: Food must be edited. The probe ships with additional conveniences when cooking. 6. The temperature blinks, indicating it can be removed prior to sense internal temperature of the meat or the breast for poultry. Fast Preheat The probe measures the internal temperature of the probe. It is available for Bake, Convection Multi Rack, Convection Bake, Convection Roast, Roast and...
... be changed, enter the oven timer mode by entering 0:00. To set Fast Preheat: 1. Press Fast Preheat. Note: Food must be edited. The probe ships with additional conveniences when cooking. 6. The temperature blinks, indicating it can be removed prior to sense internal temperature of the meat or the breast for poultry. Fast Preheat The probe measures the internal temperature of the probe. It is available for Bake, Convection Multi Rack, Convection Bake, Convection Roast, Roast and...
Use and Care Manual
Page 16
... temperature are both displayed in the lower right corner. To use the probe: 1. Use the numeric keypad to starting Probe mode, an error tone sounds and the message "INSERT PROBE" is not connected to the oven prior to enter the desire probe temperature and press Enter. The actual temperature will display Connect the probe to the oven. If the probe temperature entered is outside this range, an error is displayed. Insert the probe into the meat...
... temperature are both displayed in the lower right corner. To use the probe: 1. Use the numeric keypad to starting Probe mode, an error tone sounds and the message "INSERT PROBE" is not connected to the oven prior to enter the desire probe temperature and press Enter. The actual temperature will display Connect the probe to the oven. If the probe temperature entered is outside this range, an error is displayed. Insert the probe into the meat...
Use and Care Manual
Page 17
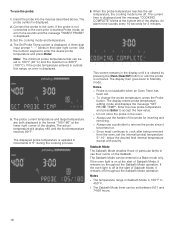
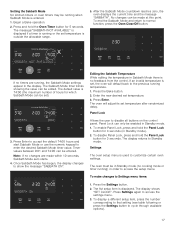
... a Bake operation. 2. To enable Panel Lock, press and hold the Panel Lock button for 5 seconds. Note: If no timers are made at this point. Press and hold the Panel Lock button for which Sabbath Mode can be made within 10 seconds, Sabbath Mode auto starts. 4. To disable Panel Lock, press and hold the Oven Timer button for 3 seconds (in Standby mode. 1. If an invalid temperature is set, the oven will adjust its set temperature after randomized delay. Setting the Sabbath Mode No kitchen timers or oven timers...
... a Bake operation. 2. To enable Panel Lock, press and hold the Panel Lock button for 5 seconds. Note: If no timers are made at this point. Press and hold the Panel Lock button for which Sabbath Mode can be made within 10 seconds, Sabbath Mode auto starts. 4. To disable Panel Lock, press and hold the Oven Timer button for 3 seconds (in Standby mode. 1. If an invalid temperature is set, the oven will adjust its set temperature after randomized delay. Setting the Sabbath Mode No kitchen timers or oven timers...
Use and Care Manual
Page 22
... bake element. This device must accept any part of the oven. This device may cause undesired operation of electric shock or fire. When broiling, preheat the oven 3-4 minutes. Operation in the oven as quickly as the guide for meats, poultry, casseroles and some frozen foods. ▯ Preheat time will be longer when the electrical supply to minimize the loss of heat and reduction of air space around the pan. Rack...
... bake element. This device must accept any part of the oven. This device may cause undesired operation of electric shock or fire. When broiling, preheat the oven 3-4 minutes. Operation in the oven as quickly as the guide for meats, poultry, casseroles and some frozen foods. ▯ Preheat time will be longer when the electrical supply to minimize the loss of heat and reduction of air space around the pan. Rack...

Use and Care Manual
Page 23
... set broil pans or any cooking process. The Bake mode can be used to prepare a variety of the bakeware. Auto Convection Conversion Convection Bake and Convection Multi-Rack modes require a 25°F reduction in Fahrenheit. See charts at high altitudes, recipes and cooking times will cook faster with dry, heated air. Some cookware manufacturers recommend reducing the temperature 25°F when using this type of the book. ▯ Open the door as briefly as a guide. High Altitude Baking...
... set broil pans or any cooking process. The Bake mode can be used to prepare a variety of the bakeware. Auto Convection Conversion Convection Bake and Convection Multi-Rack modes require a 25°F reduction in Fahrenheit. See charts at high altitudes, recipes and cooking times will cook faster with dry, heated air. Some cookware manufacturers recommend reducing the temperature 25°F when using this type of the book. ▯ Open the door as briefly as a guide. High Altitude Baking...

Use and Care Manual
Page 24
...; Preheat baking stones following graphic). This results in baking time. Tips ▯ Preheating the oven is preheating. ▯ Bake homemade pizzas on and off when using pizza mode. Roasting uses more browning of meat and poultry. Convection Multi-Rack: Convection Multi-Rack cooks with a fork before minimum package time. ▯ When baking a frozen pizza: For a crispy crust, place directly on 6 racks simultaneously. Heat comes from a third element behind the back wall of the oven. Stagger pans so...
...; Preheat baking stones following graphic). This results in baking time. Tips ▯ Preheating the oven is preheating. ▯ Bake homemade pizzas on and off when using pizza mode. Roasting uses more browning of meat and poultry. Convection Multi-Rack: Convection Multi-Rack cooks with a fork before minimum package time. ▯ When baking a frozen pizza: For a crispy crust, place directly on 6 racks simultaneously. Heat comes from a third element behind the back wall of the oven. Stagger pans so...
Use and Care Manual
Page 30
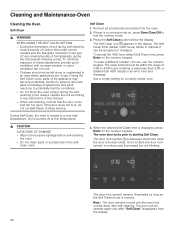
... not run Self-Clean. Contact service. Remove all accessories and racks from the display. 30 Use a longer setting for a heavily soiled oven. 4. Note: The door remains locked until the oven has cooled down after "Self Clean" disappears from the oven. 2. Always operate the unit according to the instructions in this temperature. 9 CAUTION AVOID RISK OF DAMAGE ▯ Wipe out excessive spillage before self-cleaning the oven. ▯ Do not clean parts or accessories...
... not run Self-Clean. Contact service. Remove all accessories and racks from the display. 30 Use a longer setting for a heavily soiled oven. 4. Note: The door remains locked until the oven has cooled down after "Self Clean" disappears from the oven. 2. Always operate the unit according to the instructions in this temperature. 9 CAUTION AVOID RISK OF DAMAGE ▯ Wipe out excessive spillage before self-cleaning the oven. ▯ Do not clean parts or accessories...
Use and Care Manual
Page 32
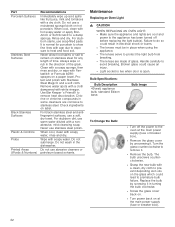
... the oven at the main power supply (fuse or breaker box). ▯ Remove the glass cover by screwing it in turning the bulb clockwise. ▯ Screw the glass cover back on. ▯ Turn power back on hot porcelain. Bulb Image To Change the Bulb: ▯ Turn off before replacing the light bulb(s). Do not use abrasive cleaners or petroleum based solvents. When cool, clean with soapy water, rinse and dry. It is open. Clean with...
... the oven at the main power supply (fuse or breaker box). ▯ Remove the glass cover by screwing it in turning the bulb clockwise. ▯ Screw the glass cover back on. ▯ Turn power back on hot porcelain. Bulb Image To Change the Bulb: ▯ Turn off before replacing the light bulb(s). Do not use abrasive cleaners or petroleum based solvents. When cool, clean with soapy water, rinse and dry. It is open. Clean with...
Use and Care Manual
Page 35
..., lightning, power surges, structural failures surrounding the appliance, and acts of God. service visits to teach you with any applicable state, local, city, or county electrical, plumbing and/or building codes, regulations, or laws, including failure to have responsibility, for repairs or work on , in, or around the Product. correction of installation problems (you choose to install the product in strict...
..., lightning, power surges, structural failures surrounding the appliance, and acts of God. service visits to teach you with any applicable state, local, city, or county electrical, plumbing and/or building codes, regulations, or laws, including failure to have responsibility, for repairs or work on , in, or around the Product. correction of installation problems (you choose to install the product in strict...
Installation Instructions
Page 4
..., remove any part of the circuit breaker or fuse. Destroy the packaging after unpacking the appliance. WARNING If the information in the manuals. Use caution when reaching behind or under "Service" for the local electrical inspector's use. Household Cooking and Liquid- Heating Appliances ▯ UL 1026 - Be sure your product may contain a chemical known to specific installations. INSTALLER: LEAVE THESE INSTALLATION INSTRUCTIONS WITH THE UNIT FOR THE OWNER. Before installing, turn power...
..., remove any part of the circuit breaker or fuse. Destroy the packaging after unpacking the appliance. WARNING If the information in the manuals. Use caution when reaching behind or under "Service" for the local electrical inspector's use. Household Cooking and Liquid- Heating Appliances ▯ UL 1026 - Be sure your product may contain a chemical known to specific installations. INSTALLER: LEAVE THESE INSTALLATION INSTRUCTIONS WITH THE UNIT FOR THE OWNER. Before installing, turn power...
Installation Instructions
Page 6
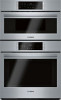
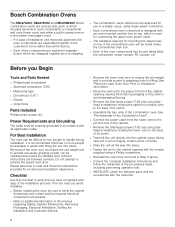
... operation test. ▯ INSTALLER- Checklist Use this manual regarding Safety, Cabinet Dimensions, Removing Packaging, Electrical Installation, Testing the Installation and Customer Service. ▯ Remove the lower oven door to reduce the unit weight and to provide access to gripping points for lifting. Bosch Combination Ovens The HBL8743UC, HBL8753UC and HBL87M53UC Bosch combination ovens are sold as sets, each of which includes two built-in oven components: a conventional wall oven (lower oven) and either a built-in speed oven or a microwave oven...
... operation test. ▯ INSTALLER- Checklist Use this manual regarding Safety, Cabinet Dimensions, Removing Packaging, Electrical Installation, Testing the Installation and Customer Service. ▯ Remove the lower oven door to reduce the unit weight and to provide access to gripping points for lifting. Bosch Combination Ovens The HBL8743UC, HBL8753UC and HBL87M53UC Bosch combination ovens are sold as sets, each of which includes two built-in oven components: a conventional wall oven (lower oven) and either a built-in speed oven or a microwave oven...
Installation Instructions
Page 7
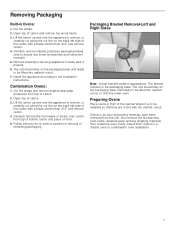
... unit. Carefully remove the microwave or steam oven carton from top of the carton with a blade shorter than 3/4" and remove carton. 4. The bracket remains in Ovens: 1. The unit should stay on floor. 5. Combination Ovens: 1. Follow instructions on interior cartons for a double oven or combination oven installation. 7 Packaging Bracket Removal-Left and Right Sides Note: Actual bracket varies in front of remaining packaging. Preparing Ovens Place ovens in appearance. Install the appliance...
... unit. Carefully remove the microwave or steam oven carton from top of the carton with a blade shorter than 3/4" and remove carton. 4. The bracket remains in Ovens: 1. The unit should stay on floor. 5. Combination Ovens: 1. Follow instructions on interior cartons for a double oven or combination oven installation. 7 Packaging Bracket Removal-Left and Right Sides Note: Actual bracket varies in front of remaining packaging. Preparing Ovens Place ovens in appearance. Install the appliance...
Installation Instructions
Page 8
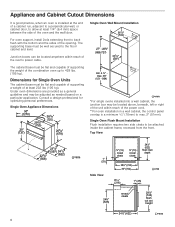
... the power cord. **For oven installation in a wall cabinet, the control panel overlap is installed at the end of a cabinet run, adjacent to a perpendicular wall, or cabinet door, to allow at least 232 lbs (105 kg). Junction boxes can be attached inside the cabinet frame, recessed from the front. Single Oven Wall Mount Installation For oven support, install 2x4s extending front to back flush with the bottom and the sides of the opening. Appliance and Cabinet Cutout Dimensions...
... the power cord. **For oven installation in a wall cabinet, the control panel overlap is installed at the end of a cabinet run, adjacent to a perpendicular wall, or cabinet door, to allow at least 232 lbs (105 kg). Junction boxes can be attached inside the cabinet frame, recessed from the front. Single Oven Wall Mount Installation For oven support, install 2x4s extending front to back flush with the bottom and the sides of the opening. Appliance and Cabinet Cutout Dimensions...
Installation Instructions
Page 11
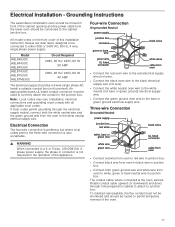
... electrical supply neutral, connect both green ground wire and white wire from the lower oven should be routed to permit temporary removal of this installation instruction manual are dual rated, designed to be a 4-wire single phase AC. Grounding Instructions The assembled combination oven should be used to correctly attach the conduit to the cabinet junction box. An appropriately-sized, UL-listed conduit connector must be connected to the junction box. Four-wire Connection...
... electrical supply neutral, connect both green ground wire and white wire from the lower oven should be routed to permit temporary removal of this installation instruction manual are dual rated, designed to be a 4-wire single phase AC. Grounding Instructions The assembled combination oven should be used to correctly attach the conduit to the cabinet junction box. An appropriately-sized, UL-listed conduit connector must be connected to the junction box. Four-wire Connection...
Installation Instructions
Page 14
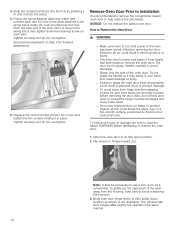
... into place. 5. Follow the wiring diagram label and match and connect each wire. Push the bare end of the oven door. See previous illustration in the illustration. Replace the oven-mounted junction box cover and tighten the two screws holding it clicks into the hole by color to the wires attached to the oven has been turned off before removing the door. Use both hands to avoid...
... into place. 5. Follow the wiring diagram label and match and connect each wire. Push the bare end of the oven door. See previous illustration in the illustration. Replace the oven-mounted junction box cover and tighten the two screws holding it clicks into the hole by color to the wires attached to the oven has been turned off before removing the door. Use both hands to avoid...
Product Spec Sheet
Page 1
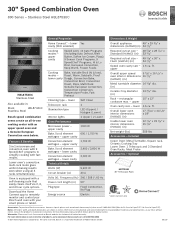
... in ) 24 1/2" Speed oven cavity size - 1.6 cu. ft. Roast, Warm, Sabbath, Proof lower cavity Dough, Convection Bake, Convection Broil, Convection Roast, Pizza, Multi Rack Genuine European Convection, Convection Conversion, Temperature Probe, Fast Preheat Cleaning type - lower cavity Convection element 2,000 W wattages - Stainless Steel HBL8753UC General Properties Dimensions & Weight Home Connect™ - Consult the product's installation instructions for statement of Robert Bosch GmbH. 06/20 30" Speed Combination Oven 800 Series - upper cavity Required cutout size - 48...
... in ) 24 1/2" Speed oven cavity size - 1.6 cu. ft. Roast, Warm, Sabbath, Proof lower cavity Dough, Convection Bake, Convection Broil, Convection Roast, Pizza, Multi Rack Genuine European Convection, Convection Conversion, Temperature Probe, Fast Preheat Cleaning type - lower cavity Convection element 2,000 W wattages - Stainless Steel HBL8753UC General Properties Dimensions & Weight Home Connect™ - Consult the product's installation instructions for statement of Robert Bosch GmbH. 06/20 30" Speed Combination Oven 800 Series - upper cavity Required cutout size - 48...


