

Installation Instructions
Page 2
... you Begin 3 Tools and Parts Needed 3 Parts Included 3 27" Appliances 3 General Information 3 30" Appliances 6 Removing Packaging 9 For Convection Microwave Combination Units 9 Preparing Oven 9 Installation 10 Electrical Installation 10 Oven Installation 12 Testing Operation 13 Service 14 Before Calling Service 14 This Bosch Appliance is made by BSH Home Appliances Corporation 5551 McFadden Ave. Table...
... you Begin 3 Tools and Parts Needed 3 Parts Included 3 27" Appliances 3 General Information 3 30" Appliances 6 Removing Packaging 9 For Convection Microwave Combination Units 9 Preparing Oven 9 Installation 10 Electrical Installation 10 Oven Installation 12 Testing Operation 13 Service 14 Before Calling Service 14 This Bosch Appliance is made by BSH Home Appliances Corporation 5551 McFadden Ave. Table...

Installation Instructions
Page 4
... AND SAVE THESE INSTRUCTIONS Related Equipment Safety Transport Be sure your appliance is properly installed and grounded by a qualified technician. Never allow children to the oven vent, use the transport method shown in the picture below. Never modify or alter the construction of the appliance. Remove all applicable codes. Destroy the...
... AND SAVE THESE INSTRUCTIONS Related Equipment Safety Transport Be sure your appliance is properly installed and grounded by a qualified technician. Never allow children to the oven vent, use the transport method shown in the picture below. Never modify or alter the construction of the appliance. Remove all applicable codes. Destroy the...

Installation Instructions
Page 5
...16" (738mm) 27" (686mm) min. 43/4" (121mm) max. 313/8" (797mm) 237/8" (606mm) 22" (559mm) Single Oven 27" It is good practice, when oven is installed at the end of a cabinet run, adjacent to a perpendicular wall or cabinet door, to allow at least 210 lbs (95 kg). The cabinet base must be well.... Note: The conduit box must be flat and capable of supporting a weight of at least 1/4" space between the back wall and the right rear of the oven and the wall/door. If the conduit box is required between the side of the 2x4 supports. The supporting base must be installed either...
...16" (738mm) 27" (686mm) min. 43/4" (121mm) max. 313/8" (797mm) 237/8" (606mm) 22" (559mm) Single Oven 27" It is good practice, when oven is installed at the end of a cabinet run, adjacent to a perpendicular wall or cabinet door, to allow at least 210 lbs (95 kg). The cabinet base must be well.... Note: The conduit box must be flat and capable of supporting a weight of at least 1/4" space between the back wall and the right rear of the oven and the wall/door. If the conduit box is required between the side of the 2x4 supports. The supporting base must be installed either...

Installation Instructions
Page 6
...capable of supporting a weight of at least 355 lbs (161 kg). English 4 Combo Oven with Microwave 27" It is good practice, when oven is installed at the end of a cabinet run , adjacent to a perpendicular wall or cabinet door, to allow at least 1/4" space between the side of the...) 191/2" (500mm) 237/8" (606mm) 22" (559mm) Double Oven 27" It is good practice, when oven is installed at the end of a cabinet run , adjacent to a perpendicular wall or cabinet door, to allow at least 1/4" space between the side of the oven and the wall/door. The supporting base must be well secured to...
...capable of supporting a weight of at least 355 lbs (161 kg). English 4 Combo Oven with Microwave 27" It is good practice, when oven is installed at the end of a cabinet run , adjacent to a perpendicular wall or cabinet door, to allow at least 1/4" space between the side of the...) 191/2" (500mm) 237/8" (606mm) 22" (559mm) Double Oven 27" It is good practice, when oven is installed at the end of a cabinet run , adjacent to a perpendicular wall or cabinet door, to allow at least 1/4" space between the side of the oven and the wall/door. The supporting base must be well secured to...

Installation Instructions
Page 7
... 251/2" (648mm) 263/4" (680mm) 2413/16" (630mm) 603/4" (1543mm) 613/8" (1559mm) 595/8" (1514mm) 93/4" (248mm) Combo Oven with the bottom and the side of the oven and the wall/door. For oven support, install 2x4's extending front to back flush with Microwave and Warming Drawer 27" It is good practice, when... oven is installed at the end of a cabinet run, adjacent to a perpendicular wall or cabinet door, to the floor/cabinet and level. Note: The conduit box must be flat and capable...
... 251/2" (648mm) 263/4" (680mm) 2413/16" (630mm) 603/4" (1543mm) 613/8" (1559mm) 595/8" (1514mm) 93/4" (248mm) Combo Oven with the bottom and the side of the oven and the wall/door. For oven support, install 2x4's extending front to back flush with Microwave and Warming Drawer 27" It is good practice, when... oven is installed at the end of a cabinet run, adjacent to a perpendicular wall or cabinet door, to the floor/cabinet and level. Note: The conduit box must be flat and capable...

Installation Instructions
Page 8
...2x4's extending front to back flush with the bottom and the side of the opening . Double Oven 30" It is good practice, when oven is installed at the end of a cabinet run , adjacent to a perpendicular wall or cabinet door, to allow at least 330 lbs (150 kg). The cabinet base must...: The conduit box must be located above or below the unit, a 2" diameter hole or space is required between the side of the oven and the wall/door. 30" Appliances Dimensions for 30" Wall-Mounted Units 24" (610mm) 281/2" (724mm) 293/4" (755mm) 2713/16" (706mm) 281/4" (718mm) 291/16" (738mm) 27" (686mm) ...
...2x4's extending front to back flush with the bottom and the side of the opening . Double Oven 30" It is good practice, when oven is installed at the end of a cabinet run , adjacent to a perpendicular wall or cabinet door, to allow at least 330 lbs (150 kg). The cabinet base must...: The conduit box must be located above or below the unit, a 2" diameter hole or space is required between the side of the oven and the wall/door. 30" Appliances Dimensions for 30" Wall-Mounted Units 24" (610mm) 281/2" (724mm) 293/4" (755mm) 2713/16" (706mm) 281/4" (718mm) 291/16" (738mm) 27" (686mm) ...

Installation Instructions
Page 9
...1543mm) 613/8" (1559mm) 595/8" (1514mm) 93/4" (248mm) 237/8" (606mm) 22" (559mm) Combo Oven with Microwave 30" It is good practice, when oven is installed at the end of a cabinet run , adjacent to a perpendicular wall or cabinet door, to back flush with the bottom and the side of the opening . For...allow at least 1/4" space between the side of the oven and the wall/door. Combo Oven with Microwave and Warming Drawer 30" It is good practice, when oven is installed at the end of a cabinet run , adjacent to a perpendicular wall or cabinet door, to allow at least 1/4" space between...
...1543mm) 613/8" (1559mm) 595/8" (1514mm) 93/4" (248mm) 237/8" (606mm) 22" (559mm) Combo Oven with Microwave 30" It is good practice, when oven is installed at the end of a cabinet run , adjacent to a perpendicular wall or cabinet door, to back flush with the bottom and the side of the opening . For...allow at least 1/4" space between the side of the oven and the wall/door. Combo Oven with Microwave and Warming Drawer 30" It is good practice, when oven is installed at the end of a cabinet run , adjacent to a perpendicular wall or cabinet door, to allow at least 1/4" space between...

Installation Instructions
Page 10
...flat and capable of supporting a weight of the oven and the wall/door. The supporting base must be well secured to back flush with Warming Drawer 30" It is good practice, when oven is installed at the end of a cabinet run, adjacent to a perpendicular wall or cabinet door, to allow at least 1/4"... space between the side of at least 290 lbs (132 kg). 237/8" (606mm) 22" (559mm) 30" Under-the-counter-Units 24...
...flat and capable of supporting a weight of the oven and the wall/door. The supporting base must be well secured to back flush with Warming Drawer 30" It is good practice, when oven is installed at the end of a cabinet run, adjacent to a perpendicular wall or cabinet door, to allow at least 1/4"... space between the side of at least 290 lbs (132 kg). 237/8" (606mm) 22" (559mm) 30" Under-the-counter-Units 24...
Installation Instructions
Page 11
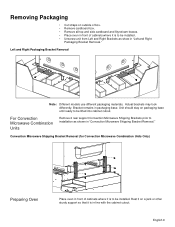
...straps on outside of box. • Remove cardboard box. • Remove all top and side cardboard and Styrofoam braces. • Place oven in front of cabinets where it is to be installed. Left and Right Packaging Bracket Removal Note: Different models use different packaging materials. ...other sturdy support so that it is in packaging base. Convection Microwave Shipping Bracket Removal (for Convection Microwave Combination Units Only) Preparing Oven Place oven in front of cabinets where it is to be installed. • Unscrew unit from Left and Right Brackets as shown in "...
...straps on outside of box. • Remove cardboard box. • Remove all top and side cardboard and Styrofoam braces. • Place oven in front of cabinets where it is to be installed. Left and Right Packaging Bracket Removal Note: Different models use different packaging materials. ...other sturdy support so that it is in packaging base. Convection Microwave Shipping Bracket Removal (for Convection Microwave Combination Units Only) Preparing Oven Place oven in front of cabinets where it is to be installed. • Unscrew unit from Left and Right Brackets as shown in "...

Installation Instructions
Page 12
...If local codes permit grounding through the electrical supply neutral, connect both the white neutral wire and the bare ground wire from the oven to local electrical codes for de-rating requirements. The electrical supply should be connected to the junction box. Install a suitable conduit box... (not furnished). English 10 Model Circuit Required 208V, 60 Hz 240V, 60 Hz HBN33, HBL33 25 AMP 30 AMP HBN34, HBL34, HBN54, HBL54 HBL85 30 AMP 30 AMP HBN35, HBL35, HBN56, HBL56, HBL57, HBL8650, HBL8750 40 or 50 Amp circuit. An appropriately-sized, UL-listed...
...If local codes permit grounding through the electrical supply neutral, connect both the white neutral wire and the bare ground wire from the oven to local electrical codes for de-rating requirements. The electrical supply should be connected to the junction box. Install a suitable conduit box... (not furnished). English 10 Model Circuit Required 208V, 60 Hz 240V, 60 Hz HBN33, HBL33 25 AMP 30 AMP HBN34, HBL34, HBN54, HBL54 HBL85 30 AMP 30 AMP HBN35, HBL35, HBN56, HBL56, HBL57, HBL8650, HBL8750 40 or 50 Amp circuit. An appropriately-sized, UL-listed...
Installation Instructions
Page 13
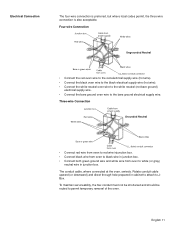
... supply wire. Four-wire Connection • Connect the red oven wire to the red electrical supply wire (hot wire). • Connect the black oven wire to the black electrical supply wire (hot wire). • Connect the white neutral oven wire to the white neutral (not bare ground) electrical supply... wire. • Connect the bare ground oven wire to white (or gray) neutral wire in cabinet to attach to permit temporary removal of the oven. Rotate conduit cable upward (or downward) and direct through hole prepared in junction box. ...
... supply wire. Four-wire Connection • Connect the red oven wire to the red electrical supply wire (hot wire). • Connect the black oven wire to the black electrical supply wire (hot wire). • Connect the white neutral oven wire to the white neutral (not bare ground) electrical supply... wire. • Connect the bare ground oven wire to white (or gray) neutral wire in cabinet to attach to permit temporary removal of the oven. Rotate conduit cable upward (or downward) and direct through hole prepared in junction box. ...

Installation Instructions
Page 14
... sure to remove the door. 2. Removing the Oven Door For ease of installation, some oven doors may swing in your hand and cause damage or injury. • Failure to avoid breaking. • Grasp only the sides of the oven by 30 lbs (14 kg) per door, before attempting to... verify the cabinet dimensions and electrical connections. Handle carefully to grasp the oven door firmly and properly could result in a convenient and stable location for cleaning....
... sure to remove the door. 2. Removing the Oven Door For ease of installation, some oven doors may swing in your hand and cause damage or injury. • Failure to avoid breaking. • Grasp only the sides of the oven by 30 lbs (14 kg) per door, before attempting to... verify the cabinet dimensions and electrical connections. Handle carefully to grasp the oven door firmly and properly could result in a convenient and stable location for cleaning....

Installation Instructions
Page 15
...wall, being careful not to 240 volts. Install supplied screws through tap holes in hinge slots. 2. See the Use and Care Manual for assistance. Open door all the way to line) should be straight, not crooked. English 13 If installing a double oven, test the second oven as explained above, contact Bosch... service for detailed operation instructions. 4. Installing the Oven 1. Set the SELF CLEAN mode. For 240 V installation, the ...
...wall, being careful not to 240 volts. Install supplied screws through tap holes in hinge slots. 2. See the Use and Care Manual for assistance. Open door all the way to line) should be straight, not crooked. English 13 If installing a double oven, test the second oven as explained above, contact Bosch... service for detailed operation instructions. 4. Installing the Oven 1. Set the SELF CLEAN mode. For 240 V installation, the ...

Use & Care Manual
Page 1
Use and Care Manual Built-In Ovens Models: HBL54, HBN54, HBL56, HBN56, HBL57
Use and Care Manual Built-In Ovens Models: HBL54, HBN54, HBL56, HBN56, HBL57

Use & Care Manual
Page 2
... This Manual 1 How This Manual is Organized 1 Safety 2 Important Safety Instructions 2 Getting Started 6 Parts and Accessories 6 Parts 6 Accessories 7 Control 9 Display Symbols 10 Before Using the Oven for the First Time 10 Operation 11 About the Appliance 11 Basic Features 11 Setting the Clock 11 Setting the Date 12 Setting the Cooking...
... This Manual 1 How This Manual is Organized 1 Safety 2 Important Safety Instructions 2 Getting Started 6 Parts and Accessories 6 Parts 6 Accessories 7 Control 9 Display Symbols 10 Before Using the Oven for the First Time 10 Operation 11 About the Appliance 11 Basic Features 11 Setting the Clock 11 Setting the Date 12 Setting the Cooking...
Use & Care Manual
Page 3
Huntington Beach, CA 92649 Questions? 1-800-944-2904 www.boschappliances.com We look forward to hearing from you! Pie 29 Pizza 30 Roast 31 Convection Roast 31 Broil 32 Convection Broil 34 Speed Convection 35 Proof 36 Warm 36 Dehydrate 37 Cleaning and Maintenance 39 ...Cleaning 39 Self-Clean 39 Avoid These Cleaners 40 Cleaning Guide 40 Maintenance 41 Replacing an Oven Light 41 Removing the Oven Door 41 Service 43 Before Calling Service 43 Troubleshooting Chart 43 Data Plate 44 STATEMENT OF LIMITED PRODUCT WARRANTY 45 This...
Huntington Beach, CA 92649 Questions? 1-800-944-2904 www.boschappliances.com We look forward to hearing from you! Pie 29 Pizza 30 Roast 31 Convection Roast 31 Broil 32 Convection Broil 34 Speed Convection 35 Proof 36 Warm 36 Dehydrate 37 Cleaning and Maintenance 39 ...Cleaning 39 Self-Clean 39 Avoid These Cleaners 40 Cleaning Guide 40 Maintenance 41 Replacing an Oven Light 41 Removing the Oven Door 41 Service 43 Before Calling Service 43 Troubleshooting Chart 43 Data Plate 44 STATEMENT OF LIMITED PRODUCT WARRANTY 45 This...

Use & Care Manual
Page 4
The manual consists of the following sections: • The "Safety" section provides information on how to safely operate your oven. • "Getting Started" introduces you to the oven components and features. • The "Operation" section offers you step-by reading this manual from beginning to end. This section also provides... you with several bakeware and preparation tips. • "Cleaning and Maintenance" provides you with information on how to operate your oven. • In "Getting the Most Out of Your Appliance" you will systematically get the most out of your new...
The manual consists of the following sections: • The "Safety" section provides information on how to safely operate your oven. • "Getting Started" introduces you to the oven components and features. • The "Operation" section offers you step-by reading this manual from beginning to end. This section also provides... you with several bakeware and preparation tips. • "Cleaning and Maintenance" provides you with information on how to operate your oven. • In "Getting the Most Out of Your Appliance" you will systematically get the most out of your new...

Use & Care Manual
Page 5
... use only. This appliance is specifically designed for normal family household use . Installing these liners may result in this appliance. If materials inside an oven should ignite, keep door closed. English 2 Mark it has been damaged. If you the location of the circuit breaker or fuse. The use ...replace any part of electric shock or fire. In the event of an error the display flashes and beeps continuously. Do not obstruct oven vents. Read all servicing to line any part of the appliance unless specifically recommended in risk of the appliance, especially the...
... use only. This appliance is specifically designed for normal family household use . Installing these liners may result in this appliance. If materials inside an oven should ignite, keep door closed. English 2 Mark it has been damaged. If you the location of the circuit breaker or fuse. The use ...replace any part of electric shock or fire. In the event of an error the display flashes and beeps continuously. Do not obstruct oven vents. Read all servicing to line any part of the appliance unless specifically recommended in risk of the appliance, especially the...

Use & Care Manual
Page 6
...containers. EXERCISE CAUTION TO PREVENT BURNS. Interior surfaces of hot air and/or steam, proceed with baking soda. After the release of an oven become hot enough to let hot air and/or steam escape. For example, never use water on cooking fires. Have an appropriate fire... extinguisher available, nearby, highly visible and easily accessible near these openings and oven doors. Other surfaces of oven until they are dark in color. Among these surfaces are no children or pets near the kitchen. Do not leave open ...
...containers. EXERCISE CAUTION TO PREVENT BURNS. Interior surfaces of hot air and/or steam, proceed with baking soda. After the release of an oven become hot enough to let hot air and/or steam escape. For example, never use water on cooking fires. Have an appropriate fire... extinguisher available, nearby, highly visible and easily accessible near these openings and oven doors. Other surfaces of oven until they are dark in color. Among these surfaces are no children or pets near the kitchen. Do not leave open ...
Use & Care Manual
Page 7
...hot surface. before beginning. The burning of gas cooking fuel and the elimination of soil during and immediately after self-cleaning the oven. 3. Providing good ventilation during self-cleaning can damage the appliance, and the unit may result in use dry potholders. When ... Providing good ventilation when cooking with gas. 2. m Important Safety Instructions READ AND SAVE THESE INSTRUCTIONS Child Safety Cleaning Safety Always place oven racks in safe operation of the appliance by qualified persons. If a rack must be minimized by: 1. Moist or damp potholders on ...
...hot surface. before beginning. The burning of gas cooking fuel and the elimination of soil during and immediately after self-cleaning the oven. 3. Providing good ventilation during self-cleaning can damage the appliance, and the unit may result in use dry potholders. When ... Providing good ventilation when cooking with gas. 2. m Important Safety Instructions READ AND SAVE THESE INSTRUCTIONS Child Safety Cleaning Safety Always place oven racks in safe operation of the appliance by qualified persons. If a rack must be minimized by: 1. Moist or damp potholders on ...


