

Installation Instructions
Page 3
... of Microwave Cooking Appliances • UL 507, The Standard for the Safety of Electric Fans • ANSI Z21.1, The American National Standard for data plate location. English 1 WARNING: Do not repair or replace any part of the appliance unless specifically recommended in Use and Care Manual. Remove the door for the local electrical inspector's use. See "Data Plate" under appliance. Safety m Important Safety Instructions READ AND SAVE THESE INSTRUCTIONS Appliance Handling...
... of Microwave Cooking Appliances • UL 507, The Standard for the Safety of Electric Fans • ANSI Z21.1, The American National Standard for data plate location. English 1 WARNING: Do not repair or replace any part of the appliance unless specifically recommended in Use and Care Manual. Remove the door for the local electrical inspector's use. See "Data Plate" under appliance. Safety m Important Safety Instructions READ AND SAVE THESE INSTRUCTIONS Appliance Handling...

Installation Instructions
Page 5
... you Begin Tools and Parts Needed Parts Included 27" Appliances • Phillips head screwdriver • Measuring tape • Drill with bit (1/8") • Phillips head screws (6) General Information Power Requirements The outlet must be flat and capable of supporting a weight of at least 1/4" space between the back wall and the right rear of the 2x4 supports. Dimensions for 27" Wall-Mounted Units 24" (610mm) 251...
... you Begin Tools and Parts Needed Parts Included 27" Appliances • Phillips head screwdriver • Measuring tape • Drill with bit (1/8") • Phillips head screws (6) General Information Power Requirements The outlet must be flat and capable of supporting a weight of at least 1/4" space between the back wall and the right rear of the 2x4 supports. Dimensions for 27" Wall-Mounted Units 24" (610mm) 251...

Installation Instructions
Page 8
... hole or space is installed at the end of a cabinet run , adjacent to a perpendicular wall or cabinet door, to facilitate connecting and servicing. The supporting base must be installed either above the unit to allow at least 1/4" space between the side of the oven and the wall/door. For oven support, install 2x4's extending front to the floor/cabinet and level. 30" Appliances Dimensions for 30" Wall-Mounted Units 24" (610mm...
... hole or space is installed at the end of a cabinet run , adjacent to a perpendicular wall or cabinet door, to facilitate connecting and servicing. The supporting base must be installed either above the unit to allow at least 1/4" space between the side of the oven and the wall/door. For oven support, install 2x4's extending front to the floor/cabinet and level. 30" Appliances Dimensions for 30" Wall-Mounted Units 24" (610mm...

Installation Instructions
Page 12
... the oven to local electrical codes for de-rating requirements. Refer to the white neutral electrical supply wire. English 10 An appropriately-sized, UL-listed conduit connector must comply with all applicable local codes. The electrical supply should be connected to either 208/240V AC, 60 Hz, 4 wire, single-phase power supply. Install a suitable conduit box (not furnished). Model Circuit Required 208V, 60 Hz 240V, 60 Hz HBN33, HBL33 25 AMP 30 AMP...
... the oven to local electrical codes for de-rating requirements. Refer to the white neutral electrical supply wire. English 10 An appropriately-sized, UL-listed conduit connector must comply with all applicable local codes. The electrical supply should be connected to either 208/240V AC, 60 Hz, 4 wire, single-phase power supply. Install a suitable conduit box (not furnished). Model Circuit Required 208V, 60 Hz 240V, 60 Hz HBN33, HBL33 25 AMP 30 AMP...

Installation Instructions
Page 14
... the oven by 30 lbs (14 kg) per door, before attempting to the oven has been turned off before removing the door. Close door carefully until it may be sure that both hands to verify the cabinet dimensions and electrical connections. Open the door completely. 3. English 12 Use both levers are securely in a convenient and stable location for cleaning. m CAUTION: When removing the door: • Make sure oven is heavy. 6. the hinge...
... the oven by 30 lbs (14 kg) per door, before attempting to the oven has been turned off before removing the door. Close door carefully until it may be sure that both hands to verify the cabinet dimensions and electrical connections. Open the door completely. 3. English 12 Use both levers are securely in a convenient and stable location for cleaning. m CAUTION: When removing the door: • Make sure oven is heavy. 6. the hinge...

Installation Instructions
Page 15
... from you until oven trim is complete at the breaker. 2. Select the BAKE mode. Set the SELF CLEAN mode. Otherwise, the installation is flush with the bracket. 4. The oven should be 190 to preheat. 5. Turn on and the oven begins to 208 volts. 3. Confirm that the oven light comes on power at this time. Lift or slide unit into cabinet cutout. Check power at junction box using a volt meter. Close and open door slowly to crimp...
... from you until oven trim is complete at the breaker. 2. Select the BAKE mode. Set the SELF CLEAN mode. Otherwise, the installation is flush with the bracket. 4. The oven should be 190 to preheat. 5. Turn on and the oven begins to 208 volts. 3. Confirm that the oven light comes on power at this time. Lift or slide unit into cabinet cutout. Check power at junction box using a volt meter. Close and open door slowly to crimp...

Use & Care Manual
Page 5
... oven vents. Turn off the appliance, and disconnect the circuit at the circuit breaker box. If materials inside an oven should ignite, keep door closed. It is intended for outdoor use when heating or cooking food. If you the location of the appliance, especially the oven bottom. Do not repair or replace any part of the circuit breaker or fuse. It is not working properly, or if it is specifically designed for details. Installing...
... oven vents. Turn off the appliance, and disconnect the circuit at the circuit breaker box. If materials inside an oven should ignite, keep door closed. It is intended for outdoor use when heating or cooking food. If you the location of the appliance, especially the oven bottom. Do not repair or replace any part of the circuit breaker or fuse. It is not working properly, or if it is specifically designed for details. Installing...
Use & Care Manual
Page 9
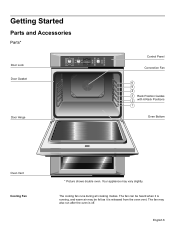
... oven vent. Getting Started Parts and Accessories Parts* Door Lock Door Gasket Upper True Convection Off Speed Conv Conv Bake Conv Broil Conv Roast Pizza Dehydrate Recipe Bake Broil Roast Self Clean Warm Proof Warm Pie Self Clean Lower Off Roast Heating 170¡ Bake Roast Oven 350¡ Probe 200¡ 12:12 pm Broil Convection Bake Oven 200¡ Preheating 12:30 pm Fast Preheat Timer Cook Time am/pm Settings Info Upper Light Lower Stop Start Door Hinge Control Panel Convection Fan 6 5 4 3 Rack Position Guides 2 with 6 Rack Positions 1 Oven Bottom Oven...
... oven vent. Getting Started Parts and Accessories Parts* Door Lock Door Gasket Upper True Convection Off Speed Conv Conv Bake Conv Broil Conv Roast Pizza Dehydrate Recipe Bake Broil Roast Self Clean Warm Proof Warm Pie Self Clean Lower Off Roast Heating 170¡ Bake Roast Oven 350¡ Probe 200¡ 12:12 pm Broil Convection Bake Oven 200¡ Preheating 12:30 pm Fast Preheat Timer Cook Time am/pm Settings Info Upper Light Lower Stop Start Door Hinge Control Panel Convection Fan 6 5 4 3 Rack Position Guides 2 with 6 Rack Positions 1 Oven Bottom Oven...
Use & Care Manual
Page 10
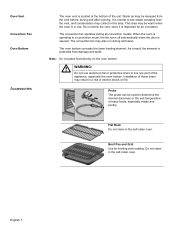
... heating element. Installation of these liners may result in use aluminum foil or protective liners to see steam escaping from the vent, and condensation may also run during all convection modes. Flat Rack Do not clean in a convection mode, the fan turns off automatically when the door is important for broiling and roasting. English 7 This area may be warm when the oven is operating in the self-clean oven. Broil Pan and Grid Use for air circulation. Probe...
... heating element. Installation of these liners may result in use aluminum foil or protective liners to see steam escaping from the vent, and condensation may also run during all convection modes. Flat Rack Do not clean in a convection mode, the fan turns off automatically when the door is important for broiling and roasting. English 7 This area may be warm when the oven is operating in the self-clean oven. Broil Pan and Grid Use for air circulation. Probe...
Use & Care Manual
Page 12
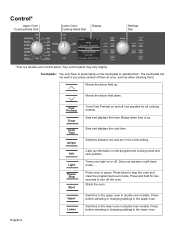
... once, such as when cleaning them . Control* Upper Oven Cooking Mode Dial Upper True Convection Off Speed Conv Conv Bake Conv Broil Conv Roast Pizza Dehydrate Recipe Lower Oven Cooking Mode Dial Display Bake Broil Roast Self Clean Warm Proof Warm Pie Self Clean Lower Off Roast Heating 170° Bake Roast Oven 350° Probe 200° 12:12 pm Broil Convection Bake Oven 200° Preheating 12:30 pm Settings Dial Fast Preheat Timer Cook Time am /pm Info Light Pause Stop Start Upper Lower Turns Fast Preheat on and off (not...
... once, such as when cleaning them . Control* Upper Oven Cooking Mode Dial Upper True Convection Off Speed Conv Conv Bake Conv Broil Conv Roast Pizza Dehydrate Recipe Lower Oven Cooking Mode Dial Display Bake Broil Roast Self Clean Warm Proof Warm Pie Self Clean Lower Off Roast Heating 170° Bake Roast Oven 350° Probe 200° 12:12 pm Broil Convection Bake Oven 200° Preheating 12:30 pm Settings Dial Fast Preheat Timer Cook Time am /pm Info Light Pause Stop Start Upper Lower Turns Fast Preheat on and off (not...
Use & Care Manual
Page 13
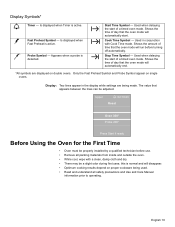
Used in the display while settings are displayed on double ovens. Shows the time of day that appears between the lines can be a slight odor during first uses; The value that the oven mode will run before use. • Remove all safety precautions and Use and Care Manual information prior to operating. Start Time Symbol - Cook Time Symbol - Stop Time Symbol - Is displayed when Fast Preheat is detected. ? ? ! Appears when a probe is active. ä Probe Symbol - Shows...
Used in the display while settings are displayed on double ovens. Shows the time of day that appears between the lines can be a slight odor during first uses; The value that the oven mode will run before use. • Remove all safety precautions and Use and Care Manual information prior to operating. Start Time Symbol - Cook Time Symbol - Stop Time Symbol - Is displayed when Fast Preheat is detected. ? ? ! Appears when a probe is active. ä Probe Symbol - Shows...
Use & Care Manual
Page 16
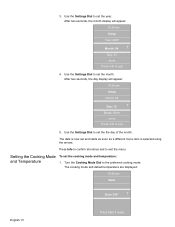
...:30 am Bake Oven 350° +- Turn the Cooking Mode Dial to set the the day of the month. English 13 Press Start if ready Setting the Cooking Mode and Temperature To set and starts as soon as a different menu item is selected using the arrows. Beeps: Short ...more ... 3. Press Info to quit 4. The date is now set the cooking mode and temperature: 1. The cooking mode and default temperature are displayed: 10:30 am Setup Year...
...:30 am Bake Oven 350° +- Turn the Cooking Mode Dial to set the the day of the month. English 13 Press Start if ready Setting the Cooking Mode and Temperature To set and starts as soon as a different menu item is selected using the arrows. Beeps: Short ...more ... 3. Press Info to quit 4. The date is now set the cooking mode and temperature: 1. The cooking mode and default temperature are displayed: 10:30 am Setup Year...
Use & Care Manual
Page 17
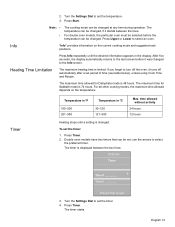
... displayed between the lines. The maximum time for Dehydrate mode is limited. If you forget to select the preferred timer. Note: • • The cooking mode can be changed , if it stands between the two lines: 10:30 am Timer Timer1 __:__:__ +- Double oven models have two timers that can be set the temperature. 3. The temperature can be changed at any time during operation. Turn the Settings Dial to set : use...
... displayed between the lines. The maximum time for Dehydrate mode is limited. If you forget to select the preferred timer. Note: • • The cooking mode can be changed , if it stands between the two lines: 10:30 am Timer Timer1 __:__:__ +- Double oven models have two timers that can be set the temperature. 3. The temperature can be changed at any time during operation. Turn the Settings Dial to set : use...
Use & Care Manual
Page 28
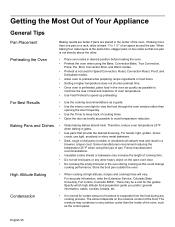
... time, stagger pans on any surface cooler than the inside of the oven, such as the control panel. Some manufacturers recommend reducing the temperature 25 ºF when using the Bake, Convection Bake, True Convection, Pizza, Pie, Broil, Convection Broil, and Warm modes. • Preheat is not used for Speed Convection, Roast, Convection Roast, Proof, and Dehydrate modes. • Allow oven to preheat while preparing recipe ingredients or food items. • Setting a higher temperature does not shorten preheat time. • Once oven...
... time, stagger pans on any surface cooler than the inside of the oven, such as the control panel. Some manufacturers recommend reducing the temperature 25 ºF when using the Bake, Convection Bake, True Convection, Pizza, Pie, Broil, Convection Broil, and Warm modes. • Preheat is not used for Speed Convection, Roast, Convection Roast, Proof, and Dehydrate modes. • Allow oven to preheat while preparing recipe ingredients or food items. • Setting a higher temperature does not shorten preheat time. • Once oven...
Use & Care Manual
Page 29
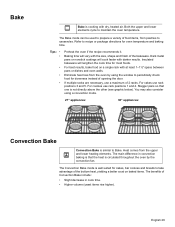
... nonstick coatings will vary with at least 1-1½" space between pans or dishes and oven walls. For cakes use rack positions 1 and 4. The Bake mode can be used to Bake. Baking time will cook faster with dry, heated air. Insulated bakeware will lengthen the cook time for doneness instead of Convection Bake include: • Slight decrease in convection baking is that one is similar to prepare a variety of the bakeware...
... nonstick coatings will vary with at least 1-1½" space between pans or dishes and oven walls. For cakes use rack positions 1 and 4. The Bake mode can be used to Bake. Baking time will cook faster with dry, heated air. Insulated bakeware will lengthen the cook time for doneness instead of Convection Bake include: • Slight decrease in convection baking is that one is similar to prepare a variety of the bakeware...

Use & Care Manual
Page 34
... not cover meat or use in this mode. English 31 Convection Roast á Convection Roast uses heat from the upper element than non-convection modes. • Rich, golden browning. Refer to chart for use cooking bags. Roasting uses more browning of the exterior while the inside remains especially moist. Tips Use a high-sided broil pan, or cover dish with kitchen string. Roasting bags are suitable for recommended rack positions. Use a meat thermometer to maintain the t oven temperature. A shallow, uncovered pan...
... not cover meat or use in this mode. English 31 Convection Roast á Convection Roast uses heat from the upper element than non-convection modes. • Rich, golden browning. Refer to chart for use cooking bags. Roasting uses more browning of the exterior while the inside remains especially moist. Tips Use a high-sided broil pan, or cover dish with kitchen string. Roasting bags are suitable for recommended rack positions. Use a meat thermometer to maintain the t oven temperature. A shallow, uncovered pan...
Use & Care Manual
Page 42
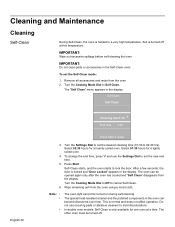
... clean parts or accessories in the display: 02:00 pm Self Clean English 39 Cleaning time1:30 +End time 3:30 Press Start if ready 3. Turn the Cooking Mode Dial to lock the door. The other oven must be turned on during self-cleaning. Remove all accessories and racks from the oven. 2. The "Self Clean" menu appears in the Self-Clean oven. Select 01:30 hours for a heavily soiled oven. Do not use the Settings Dial to set the Self-Clean mode: 1. To set the new end time. 5. Self-Clean starts...
... clean parts or accessories in the display: 02:00 pm Self Clean English 39 Cleaning time1:30 +End time 3:30 Press Start if ready 3. Turn the Cooking Mode Dial to lock the door. The other oven must be turned on during self-cleaning. Remove all accessories and racks from the oven. 2. The "Self Clean" menu appears in the Self-Clean oven. Select 01:30 hours for a heavily soiled oven. Do not use the Settings Dial to set the Self-Clean mode: 1. To set the new end time. 5. Self-Clean starts...
Use & Care Manual
Page 44
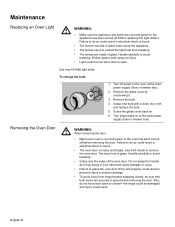
... grasp the handle as it . 3. Turn off before removing the door. English 41 Use only 40 Watt light bulbs. Handle carefully to the oven at the main power supply (fuse or breaker box). Grasp new bulb with a clean, dry cloth and replace the bulb. 5. Handle carefully to do not force door open . Remove the glass cover by unscrewing it may swing in electrical shock or burns. • The oven door is cool and power to grasp the oven door firmly and...
... grasp the handle as it . 3. Turn off before removing the door. English 41 Use only 40 Watt light bulbs. Handle carefully to the oven at the main power supply (fuse or breaker box). Grasp new bulb with a clean, dry cloth and replace the bulb. 5. Handle carefully to do not force door open . Remove the glass cover by unscrewing it may swing in electrical shock or burns. • The oven door is cool and power to grasp the oven door firmly and...
Use & Care Manual
Page 46
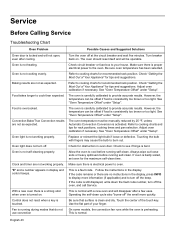
... in display and control beeps. The oven is normal. Oven is preheating. See "Oven Temperature Offset" under "Setup". If oven is still displayed, write down the fault code number, turn off the oven, and call Service. Oven light is activated. Check for tips and suggestions. The oven should reset itself and will be manually reduced by 25 ºF, unless Automatic Convection Conversion is not working properly. Be sure that do not use convection On some models, the convection fan runs...
... in display and control beeps. The oven is normal. Oven is preheating. See "Oven Temperature Offset" under "Setup". If oven is still displayed, write down the fault code number, turn off the oven, and call Service. Oven light is activated. Check for tips and suggestions. The oven should reset itself and will be manually reduced by 25 ºF, unless Automatic Convection Conversion is not working properly. Be sure that do not use convection On some models, the convection fan runs...
Use & Care Manual
Page 49
..., mud slides, freezing temperatures, excessive moisture or extended exposure to follow operating instructions, mishandling, unauthorized service (including self-performed "fixing" or exploration of the appliance's internal workings). • Adjustment, alteration or modification of food, liquid, grease accumulations, or other substances that are scratches, nicks, minor dents, and cosmetic damages on which the serial numbers have been altered, defaced, or removed;
..., mud slides, freezing temperatures, excessive moisture or extended exposure to follow operating instructions, mishandling, unauthorized service (including self-performed "fixing" or exploration of the appliance's internal workings). • Adjustment, alteration or modification of food, liquid, grease accumulations, or other substances that are scratches, nicks, minor dents, and cosmetic damages on which the serial numbers have been altered, defaced, or removed;


