
Installation Instructions
Page 2
... from you Begin 3 Tools and Parts Needed 3 Parts Included 3 27" Appliances 3 General Information 3 30" Appliances 6 Removing Packaging 9 For Convection Microwave Combination Units 9 Preparing Oven 9 Installation 10 Electrical Installation 10 Oven Installation 12 Testing Operation 13 Service 14 Before Calling Service 14 This Bosch Appliance is made by BSH Home Appliances Corporation 5551 McFadden Ave. Table of...
... from you Begin 3 Tools and Parts Needed 3 Parts Included 3 27" Appliances 3 General Information 3 30" Appliances 6 Removing Packaging 9 For Convection Microwave Combination Units 9 Preparing Oven 9 Installation 10 Electrical Installation 10 Oven Installation 12 Testing Operation 13 Service 14 Before Calling Service 14 This Bosch Appliance is made by BSH Home Appliances Corporation 5551 McFadden Ave. Table of...

Installation Instructions
Page 4
Never allow children to the oven vent, use the transport method shown in the picture below. Destroy the packaging after unpacking the appliance. English 2 Installation, electrical connections and grounding must comply with packaging material. For example, do not remove leveling legs, panels, wire covers or anti-tip brackets/screws. Never modify ...
Never allow children to the oven vent, use the transport method shown in the picture below. Destroy the packaging after unpacking the appliance. English 2 Installation, electrical connections and grounding must comply with packaging material. For example, do not remove leveling legs, panels, wire covers or anti-tip brackets/screws. Never modify ...

Installation Instructions
Page 5
For oven support, install 2x4's extending front to the floor/cabinet and level. The supporting base must be well secured to back flush with all applicable codes. ...) 251/2" (648mm) 263/4" (680mm) 2413/16" (630mm) 281/4" (718mm) 291/16" (738mm) 27" (686mm) min. 43/4" (121mm) max. 313/8" (797mm) 237/8" (606mm) 22" (559mm) Single Oven 27" It is good practice, when oven is required between the side of the...
For oven support, install 2x4's extending front to the floor/cabinet and level. The supporting base must be well secured to back flush with all applicable codes. ...) 251/2" (648mm) 263/4" (680mm) 2413/16" (630mm) 281/4" (718mm) 291/16" (738mm) 27" (686mm) min. 43/4" (121mm) max. 313/8" (797mm) 237/8" (606mm) 22" (559mm) Single Oven 27" It is good practice, when oven is required between the side of the...

Installation Instructions
Page 6
... the end of a cabinet run , adjacent to a perpendicular wall or cabinet door, to allow at least 1/4" space between the side of the oven and the wall/door. The cabinet base must be flat and capable of supporting a weight of at least 355 lbs (161 kg). English 4 ...) 251/2" (648mm) 50" (1270mm) 263/4" (680mm) 2413/16" (630mm) 491/2" (1257mm) 483/8" (1229mm) 191/2" (500mm) 237/8" (606mm) 22" (559mm) Double Oven 27" It is good practice, when oven is installed at the end of a cabinet run , adjacent to a perpendicular wall or cabinet door, to allow at least 1/4" space between the...
... the end of a cabinet run , adjacent to a perpendicular wall or cabinet door, to allow at least 1/4" space between the side of the oven and the wall/door. The cabinet base must be flat and capable of supporting a weight of at least 355 lbs (161 kg). English 4 ...) 251/2" (648mm) 50" (1270mm) 263/4" (680mm) 2413/16" (630mm) 491/2" (1257mm) 483/8" (1229mm) 191/2" (500mm) 237/8" (606mm) 22" (559mm) Double Oven 27" It is good practice, when oven is installed at the end of a cabinet run , adjacent to a perpendicular wall or cabinet door, to allow at least 1/4" space between the...

Installation Instructions
Page 7
... the floor/cabinet and level. Note: The conduit box must be located above the unit to allow at least 1/4" space between the side of the oven and the wall/door. 24" (610mm) 251/2" (648mm) 263/4" (680mm) 2413/16" (630mm) 603/4" (1543mm) 613/8" (1559mm) 595/8" (1514mm) 93/4" (248mm) Combo... Oven with the bottom and the side of at least 370 lbs (168 kg). 237/8" (606mm) 22" (559mm) 27" Under-the-counter units 24" (610mm) 161/2" (...
... the floor/cabinet and level. Note: The conduit box must be located above the unit to allow at least 1/4" space between the side of the oven and the wall/door. 24" (610mm) 251/2" (648mm) 263/4" (680mm) 2413/16" (630mm) 603/4" (1543mm) 613/8" (1559mm) 595/8" (1514mm) 93/4" (248mm) Combo... Oven with the bottom and the side of at least 370 lbs (168 kg). 237/8" (606mm) 22" (559mm) 27" Under-the-counter units 24" (610mm) 161/2" (...

Installation Instructions
Page 8
...weight of at least 330 lbs (150 kg). Double Oven 30" It is good practice, when oven is installed at the end of a cabinet run , adjacent to a perpendicular wall or cabinet door, to allow at least 1/4" space between the side of the oven and the wall/door. The supporting base must...16" (706mm) 24" (610mm) 281/2" (724mm) 513/4" (1314mm) 511/8" (1299mm) 493/4" (1264mm) 93/4" (248mm) 237/8" (606mm) 22" (559mm) Single Oven 30" It is good practice, when oven is installed at the end of a cabinet run , adjacent to a perpendicular wall or cabinet door, to allow at least 1/4" space between the side...
...weight of at least 330 lbs (150 kg). Double Oven 30" It is good practice, when oven is installed at the end of a cabinet run , adjacent to a perpendicular wall or cabinet door, to allow at least 1/4" space between the side of the oven and the wall/door. The supporting base must...16" (706mm) 24" (610mm) 281/2" (724mm) 513/4" (1314mm) 511/8" (1299mm) 493/4" (1264mm) 93/4" (248mm) 237/8" (606mm) 22" (559mm) Single Oven 30" It is good practice, when oven is installed at the end of a cabinet run , adjacent to a perpendicular wall or cabinet door, to allow at least 1/4" space between the side...

Installation Instructions
Page 9
...293/4" (755mm) 2713/16" (706mm) 603/4" (1543mm) 613/8" (1559mm) 595/8" (1514mm) 93/4" (248mm) 237/8" (606mm) 22" (559mm) Combo Oven with Microwave 30" It is good practice, when oven is installed at the end of a cabinet run , adjacent to a perpendicular wall or cabinet door, to allow at least 1/4" space between the... side of the oven and the wall/door. For oven support, install 2x4's extending front to back flush with Microwave and Warming Drawer 30" It is good practice, when oven is installed at the end of a cabinet run , adjacent to a...
...293/4" (755mm) 2713/16" (706mm) 603/4" (1543mm) 613/8" (1559mm) 595/8" (1514mm) 93/4" (248mm) 237/8" (606mm) 22" (559mm) Combo Oven with Microwave 30" It is good practice, when oven is installed at the end of a cabinet run , adjacent to a perpendicular wall or cabinet door, to allow at least 1/4" space between the... side of the oven and the wall/door. For oven support, install 2x4's extending front to back flush with Microwave and Warming Drawer 30" It is good practice, when oven is installed at the end of a cabinet run , adjacent to a...

Installation Instructions
Page 10
...237/8" (606mm) 22" (559mm) 24" (610mm) 281/2" (724mm) 293/4" (755mm) 2713/16" (706mm) 40" (1016mm) 407/16" (1027mm) 381/8" (968mm) 93/4" (248mm) Combo Oven with the bottom and the side of the opening. The supporting base must be flat and capable of supporting a weight of at least 1/4" space between... the side of the oven and the wall/door. For oven support, install 2x4's extending front to back flush with Warming Drawer 30" It is good practice, when oven is installed at the end of a cabinet run, adjacent to a perpendicular wall...
...237/8" (606mm) 22" (559mm) 24" (610mm) 281/2" (724mm) 293/4" (755mm) 2713/16" (706mm) 40" (1016mm) 407/16" (1027mm) 381/8" (968mm) 93/4" (248mm) Combo Oven with the bottom and the side of the opening. The supporting base must be flat and capable of supporting a weight of at least 1/4" space between... the side of the oven and the wall/door. For oven support, install 2x4's extending front to back flush with Warming Drawer 30" It is good practice, when oven is installed at the end of a cabinet run, adjacent to a perpendicular wall...
Installation Instructions
Page 11
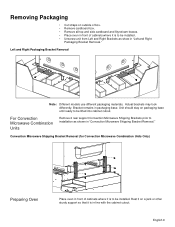
... cabinet cutout. Bracket remains in "Convection Microwave Shipping Bracket Removal." Removing Packaging • Cut straps on outside of box. • Remove cardboard box. • Remove all top and side cardboard and Styrofoam braces. • Place oven in front of cabinets where it ...or other sturdy support so that it is to be installed. Actual brackets may look differently. Convection Microwave Shipping Bracket Removal (for Convection Microwave Combination Units Only) Preparing Oven Place oven in front of cabinets where it is to be installed. • Unscrew unit from Left ...
... cabinet cutout. Bracket remains in "Convection Microwave Shipping Bracket Removal." Removing Packaging • Cut straps on outside of box. • Remove cardboard box. • Remove all top and side cardboard and Styrofoam braces. • Place oven in front of cabinets where it ...or other sturdy support so that it is to be installed. Actual brackets may look differently. Convection Microwave Shipping Bracket Removal (for Convection Microwave Combination Units Only) Preparing Oven Place oven in front of cabinets where it is to be installed. • Unscrew unit from Left ...

Installation Instructions
Page 12
...not furnished). Important: Local Codes may vary; If local codes permit grounding through the electrical supply neutral, connect both the white neutral wire and the bare ground wire from the oven to local electrical codes for de-rating requirements. Model Circuit Required 208V, 60 Hz 240V, 60 Hz... HBN33, HBL33 25 AMP 30 AMP HBN34, HBL34, HBN54, HBL54 HBL85 30 AMP 30 AMP HBN35, HBL35, HBN56, HBL56, HBL57, HBL8650,...
...not furnished). Important: Local Codes may vary; If local codes permit grounding through the electrical supply neutral, connect both the white neutral wire and the bare ground wire from the oven to local electrical codes for de-rating requirements. Model Circuit Required 208V, 60 Hz 240V, 60 Hz... HBN33, HBL33 25 AMP 30 AMP HBN34, HBL34, HBN54, HBL54 HBL85 30 AMP 30 AMP HBN35, HBL35, HBN56, HBL56, HBL57, HBL8650,...
Installation Instructions
Page 13
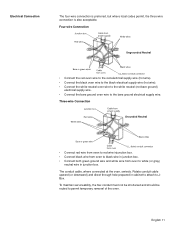
...ground wire and white wire from oven to permit temporary removal of the oven. To maintain serviceability, the flex conduit must not be shortened and should be routed to white (or gray) neutral wire in cabinet to attach to the bare ground electrical supply wire. Rotate conduit cable...wire Connection • Connect the red oven wire to the red electrical supply wire (hot wire). • Connect the black oven wire to the black electrical supply wire (hot wire). • Connect the white neutral oven wire to the white neutral (not bare ground) electrical supply wire. • Connect the bare...
...ground wire and white wire from oven to permit temporary removal of the oven. To maintain serviceability, the flex conduit must not be shortened and should be routed to white (or gray) neutral wire in cabinet to attach to the bare ground electrical supply wire. Rotate conduit cable...wire Connection • Connect the red oven wire to the red electrical supply wire (hot wire). • Connect the black oven wire to the black electrical supply wire (hot wire). • Connect the white neutral oven wire to the white neutral (not bare ground) electrical supply wire. • Connect the bare...

Installation Instructions
Page 14
... Use both hands, pull the door up and out of the oven door. Handle carefully to verify the cabinet dimensions and electrical connections. the door is glass. Do not grasp the handle as it stops. Oven Installation Note: Before installing the oven, be about half way closed. 5. It will be sure to...the hinge slots. Place the door in electrical shock or burns. • The oven door is cool and power to reduce the weight of the oven by 30 lbs (14 kg) per door, before removing the door. Removing the Oven Door For ease of installation, some oven doors may swing in your hand and ...
... Use both hands, pull the door up and out of the oven door. Handle carefully to verify the cabinet dimensions and electrical connections. the door is glass. Do not grasp the handle as it stops. Oven Installation Note: Before installing the oven, be about half way closed. 5. It will be sure to...the hinge slots. Place the door in electrical shock or burns. • The oven door is cool and power to reduce the weight of the oven by 30 lbs (14 kg) per door, before removing the door. Removing the Oven Door For ease of installation, some oven doors may swing in your hand and ...

Installation Instructions
Page 15
...appears in the display. 6. Test the door lock. Confirm that the oven light comes on power at junction box using a volt meter. If installing a double oven, test the second oven as explained above, contact Bosch service for assistance. Lift or slide unit into cabinet cutout. Holding the... door firmly in both hands, place hinges in trim. (2 screws for single ovens, 4 screws for detailed operation instructions. 4....
...appears in the display. 6. Test the door lock. Confirm that the oven light comes on power at junction box using a volt meter. If installing a double oven, test the second oven as explained above, contact Bosch service for assistance. Lift or slide unit into cabinet cutout. Holding the... door firmly in both hands, place hinges in trim. (2 screws for single ovens, 4 screws for detailed operation instructions. 4....
Use & Care Manual
Page 2
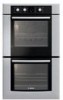
Table of Contents About This Manual 1 How This Manual is Organized 1 Safety 2 Important Safety Instructions 2 Getting Started 6 Parts and Accessories 6 Parts 6 Control 9 Before Using the Oven for the First Time 9 Operation 10 About the Appliance 10 Basic Features 10 Setting the Clock 10 Setting the Cooking Mode and Temperature 11 Heating Time Limitation 11 Timer 12 Special Features 12 Fast Preheat 12 Cook Time 13 Customer Settings 14 Getting the Most Out of Your Appliance 16 General Tips 16 Bake 17 Convection Bake 18 Pie 19 Pizza 20 Roast 21 Convection Roast 21
Table of Contents About This Manual 1 How This Manual is Organized 1 Safety 2 Important Safety Instructions 2 Getting Started 6 Parts and Accessories 6 Parts 6 Control 9 Before Using the Oven for the First Time 9 Operation 10 About the Appliance 10 Basic Features 10 Setting the Clock 10 Setting the Cooking Mode and Temperature 11 Heating Time Limitation 11 Timer 12 Special Features 12 Fast Preheat 12 Cook Time 13 Customer Settings 14 Getting the Most Out of Your Appliance 16 General Tips 16 Bake 17 Convection Bake 18 Pie 19 Pizza 20 Roast 21 Convection Roast 21
Use & Care Manual
Page 3
Huntington Beach, CA 92649 Questions? 1-800-944-2904 www.boschappliances.com We look forward to hearing from you! Broil 23 Convection Broil 24 Proof 25 Warm 25 Cleaning and Maintenance 26 Cleaning 26 Self-Clean 26 Avoid These Cleaners 26 Cleaning Guide 27 Maintenance 28 Replacing an Oven Light 28 Removing the Oven Door 28 Service 30 Before Calling Service 30 Troubleshooting Chart 30 Data Plate 31 STATEMENT OF LIMITED PRODUCT WARRANTY 32 This Bosch Appliance is made by BSH Home Appliances Corporation 5551 McFadden Ave. Table of Contents Cont.
Huntington Beach, CA 92649 Questions? 1-800-944-2904 www.boschappliances.com We look forward to hearing from you! Broil 23 Convection Broil 24 Proof 25 Warm 25 Cleaning and Maintenance 26 Cleaning 26 Self-Clean 26 Avoid These Cleaners 26 Cleaning Guide 27 Maintenance 28 Replacing an Oven Light 28 Removing the Oven Door 28 Service 30 Before Calling Service 30 Troubleshooting Chart 30 Data Plate 31 STATEMENT OF LIMITED PRODUCT WARRANTY 32 This Bosch Appliance is made by BSH Home Appliances Corporation 5551 McFadden Ave. Table of Contents Cont.
Use & Care Manual
Page 4
... • The "Operation" section offers you step-by-step instructions on how to clean and care for the various oven parts. • The "Service" section includes your new oven by reading this manual from beginning to the important safety instructions in the "Safety" section. This way, you will ... tips. • "Cleaning and Maintenance" provides you can get to know your appliance and become familiar with information on how to operate your oven. • In "Getting the Most Out of Your Appliance" you with its operation and features. About This Manual How This Manual is Organized...
... • The "Operation" section offers you step-by-step instructions on how to clean and care for the various oven parts. • The "Service" section includes your new oven by reading this manual from beginning to the important safety instructions in the "Safety" section. This way, you will ... tips. • "Cleaning and Maintenance" provides you can get to know your appliance and become familiar with information on how to operate your oven. • In "Getting the Most Out of Your Appliance" you with its operation and features. About This Manual How This Manual is Organized...
Use & Care Manual
Page 5
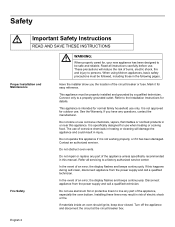
...in risk of corrosive chemicals in injury. It is intended for use when heating or cooking food. The use of electric shock or fire. Do not obstruct oven vents. Refer all instructions carefully before use. Turn off the appliance and disconnect the circuit at the circuit breaker box...Safety Have the installer show you have any part of burns, electric shock, fire and injury to the Installation Instructions for easy reference. Mark it for details. Refer to persons. See the Warranty. If materials inside an oven should ignite, keep door closed. English 2 These precautions will ...
...in risk of corrosive chemicals in injury. It is intended for use when heating or cooking food. The use of electric shock or fire. Do not obstruct oven vents. Refer all instructions carefully before use. Turn off the appliance and disconnect the circuit at the circuit breaker box...Safety Have the installer show you have any part of burns, electric shock, fire and injury to the Installation Instructions for easy reference. Mark it for details. Refer to persons. See the Warranty. If materials inside an oven should ignite, keep door closed. English 2 These precautions will ...
Use & Care Manual
Page 6
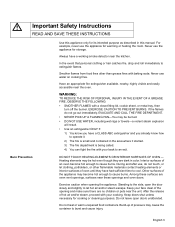
...the side, open doors unattended. During and after use the appliance for cooking or cleaning purposes. Standing to an exit. After the release of oven until they are dark in this appliance only for warming or heating the room. English 3 Keep your cooking. Do not leave open the ..., proceed with a close-fitting lid, cookie sheet, or metal tray, then turn off the burner. DO NOT TOUCH HEATING ELEMENTS OR INTERIOR SURFACES OF OVEN - Never use , do not go out immediately, EVACUATE AND CALL THE FIRE DEPARTMENT. • NEVER PICK UP A FLAMING PAN-You may become hot...
...the side, open doors unattended. During and after use the appliance for cooking or cleaning purposes. Standing to an exit. After the release of oven until they are dark in this appliance only for warming or heating the room. English 3 Keep your cooking. Do not leave open the ..., proceed with a close-fitting lid, cookie sheet, or metal tray, then turn off the burner. DO NOT TOUCH HEATING ELEMENTS OR INTERIOR SURFACES OF OVEN - Never use , do not go out immediately, EVACUATE AND CALL THE FIRE DEPARTMENT. • NEVER PICK UP A FLAMING PAN-You may become hot...
Use & Care Manual
Page 7
... elements. Secure all loose garments, etc. This can cause burns from steam. CAUTION: Items of interest to children should never be moved while oven is still hot. English 4 rum, brandy, bourbon) in cabinets above an appliance or on any part of alcohol in burns from steam....SAVE THESE INSTRUCTIONS Child Safety Cleaning Safety Use caution when cooking foods with high alcohol content (e.g. There is cool. Always place oven racks in desired location while oven is a risk of burning as ties, scarves, jewelry, or dangling sleeves. Moist or damp potholders on an appliance to ...
... elements. Secure all loose garments, etc. This can cause burns from steam. CAUTION: Items of interest to children should never be moved while oven is still hot. English 4 rum, brandy, bourbon) in cabinets above an appliance or on any part of alcohol in burns from steam....SAVE THESE INSTRUCTIONS Child Safety Cleaning Safety Use caution when cooking foods with high alcohol content (e.g. There is cool. Always place oven racks in desired location while oven is a risk of burning as ties, scarves, jewelry, or dangling sleeves. Moist or damp potholders on an appliance to ...
Use & Care Manual
Page 8
...defects or other rooms where kitchen fumes could reach them. Do not clean parts or accessories in this manual. The fiberglass insulation in self-clean ovens gives off very small amounts of Carbon Monoxide. If the door does not lock, do not run Self-Clean. The burning of gas cooking ...fuel and the elimination of soil during self-cleaning can be harmful. Exposure to the instructions in the self-clean oven. Operating the unit according to these substances can generate small amounts of formaldehyde during and immediately after self-cleaning the...
...defects or other rooms where kitchen fumes could reach them. Do not clean parts or accessories in this manual. The fiberglass insulation in self-clean ovens gives off very small amounts of Carbon Monoxide. If the door does not lock, do not run Self-Clean. The burning of gas cooking ...fuel and the elimination of soil during self-cleaning can be harmful. Exposure to the instructions in the self-clean oven. Operating the unit according to these substances can generate small amounts of formaldehyde during and immediately after self-cleaning the...


