Installation Instructions
Page 11
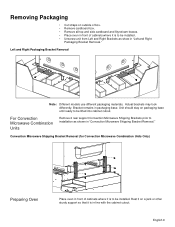
... Preparing Oven Place oven in packaging base. Left and Right Packaging Bracket Removal Note: Different models use different packaging materials. For Convection Microwave Combination Units Remove 2 rear support Convection Microwave Shipping Brackets prior to installation as show in "Left and Right Packaging Bracket Removal." Rest... in front of cabinets where it is to be installed. • Unscrew unit from Left and Right Brackets as shown in "Convection Microwave Shipping Bracket Removal." Unit should stay on a jack or other sturdy support so that it is in line with the cabinet...
... Preparing Oven Place oven in packaging base. Left and Right Packaging Bracket Removal Note: Different models use different packaging materials. For Convection Microwave Combination Units Remove 2 rear support Convection Microwave Shipping Brackets prior to installation as show in "Left and Right Packaging Bracket Removal." Rest... in front of cabinets where it is to be installed. • Unscrew unit from Left and Right Brackets as shown in "Convection Microwave Shipping Bracket Removal." Unit should stay on a jack or other sturdy support so that it is in line with the cabinet...

Installation Instructions
Page 12
... Hz, 4 wire, single-phase power supply. Model Circuit Required 208V, 60 Hz 240V, 60 Hz HBN33, HBL33 25 AMP 30 AMP HBN34, HBL34, HBN54, HBL54 HBL85 30 AMP 30 AMP HBN35, HBL35, HBN56, HBL56, HBL57, HBL8650, HBL8750 40 or 50 Amp circuit. Refer to the white neutral electrical supply wire. Important: Local Codes may vary;
... Hz, 4 wire, single-phase power supply. Model Circuit Required 208V, 60 Hz 240V, 60 Hz HBN33, HBL33 25 AMP 30 AMP HBN34, HBL34, HBN54, HBL54 HBL85 30 AMP 30 AMP HBN35, HBL35, HBN56, HBL56, HBL57, HBL8650, HBL8750 40 or 50 Amp circuit. Refer to the white neutral electrical supply wire. Important: Local Codes may vary;
Installation Instructions
Page 16
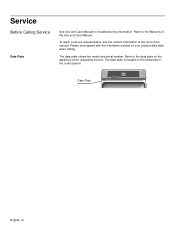
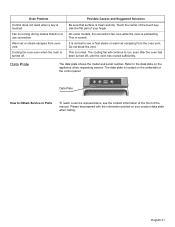
The data plate shows the model and serial number. Refer to the Warranty in the Use and Care Manual. To reach a service representative, see the contact information at the front of the control panel: Data Plate English 14 The data plate is located on the underside of the manual. Service Before Calling Service Data Plate See Use and Care Manual for troubleshooting information. Refer to the data plate on your product data plate when calling. Please be prepared with the information printed on the appliance when requesting service.
The data plate shows the model and serial number. Refer to the Warranty in the Use and Care Manual. To reach a service representative, see the contact information at the front of the control panel: Data Plate English 14 The data plate is located on the underside of the manual. Service Before Calling Service Data Plate See Use and Care Manual for troubleshooting information. Refer to the data plate on your product data plate when calling. Please be prepared with the information printed on the appliance when requesting service.
Use & Care Manual
Page 12
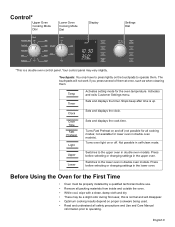
...While cool, wipe with a clean, damp cloth and dry. • There may vary slightly. Temp Timer Activates setting mode for lower oven in double oven models. Activates and exits Customer Settings menu. Cook Time Fast Preheat Light Sets and displays the cook time. Turns oven light on and off . English ...several of them at once, such as when cleaning them . Control* Upper Oven Cooking Mode Dial Lower Oven Cooking Mode Dial Upper Convection Bake Off Conv Broil Conv Roast Pizza Self Clean Pie Lower Bake Off Broil Self Clean Bake Roast Warm Broil Warm Proof Roast ...
...While cool, wipe with a clean, damp cloth and dry. • There may vary slightly. Temp Timer Activates setting mode for lower oven in double oven models. Activates and exits Customer Settings menu. Cook Time Fast Preheat Light Sets and displays the cook time. Turns oven light on and off . English ...several of them at once, such as when cleaning them . Control* Upper Oven Cooking Mode Dial Lower Oven Cooking Mode Dial Upper Convection Bake Off Conv Broil Conv Roast Pizza Self Clean Pie Lower Bake Off Broil Self Clean Bake Roast Warm Broil Warm Proof Roast ...
Use & Care Manual
Page 14
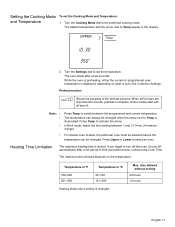
... to activate the arrow. Note: • • • Press Temp to switch between 1 and 3 (1=low, 2=medium, 3=high). • For double oven models, the particular oven must be selected before the temperature can always be changed when the arrow next to Temp appear in ºC 100-200 201...-550 30-120 121-300 Heating stops until a setting is complete. The temperature can be changed . time allowed without activity 24 hours...
... to activate the arrow. Note: • • • Press Temp to switch between 1 and 3 (1=low, 2=medium, 3=high). • For double oven models, the particular oven must be selected before the temperature can always be changed when the arrow next to Temp appear in ºC 100-200 201...-550 30-120 121-300 Heating stops until a setting is complete. The temperature can be changed . time allowed without activity 24 hours...
Use & Care Manual
Page 29
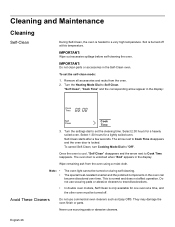
... in the display. Turn the settings dial to Self Clean. Never use scouring pads or abrasive cleaners to treat discolorations. • In double oven models, Self Clean is only available for one oven at this temperature. The oven door is locked. IMPORTANT: Do not clean parts or accessories...Cook Time Self Clean Cook Time 3. They may damage the oven finish or parts. Soil is normal and does not affect operation. Select 1:30 hours for a heavily soiled oven. Do not use scouring pads or abrasive cleaners. Avoid These Cleaners Do not use commercial oven cleaners such as...
... in the display. Turn the settings dial to Self Clean. Never use scouring pads or abrasive cleaners to treat discolorations. • In double oven models, Self Clean is only available for one oven at this temperature. The oven door is locked. IMPORTANT: Do not clean parts or accessories...Cook Time Self Clean Cook Time 3. They may damage the oven finish or parts. Soil is normal and does not affect operation. Select 1:30 hours for a heavily soiled oven. Do not use scouring pads or abrasive cleaners. Avoid These Cleaners Do not use commercial oven cleaners such as...
Use & Care Manual
Page 34
... been turned off . Possible Causes and Suggested Solutions Be sure that do not use convection Warm air or steam escapes from the oven vent. Oven Problem Control does not react when a key is preheating. On some models, the convection fan runs while the oven is touched. Do not block the vent. Data Plate...
... been turned off . Possible Causes and Suggested Solutions Be sure that do not use convection Warm air or steam escapes from the oven vent. Oven Problem Control does not react when a key is preheating. On some models, the convection fan runs while the oven is touched. Do not block the vent. Data Plate...
Use & Care Manual
Page 35
... or product recall. For safety and property damage concerns, Bosch highly recommends that the Product was purchased: • For your Product (upgraded models may be fully liable and responsible for any such event, if you request, Bosch would still pay for customer service and technical ability (note...original part for purposes of this warranty and this warranty period, Bosch or one of its sole option. How Long the Warranty Lasts Bosch warrants that have responsibility, for the Product if it is ", or previously returned model), and not for resale, or commercial use. • ...
... or product recall. For safety and property damage concerns, Bosch highly recommends that the Product was purchased: • For your Product (upgraded models may be fully liable and responsible for any such event, if you request, Bosch would still pay for customer service and technical ability (note...original part for purposes of this warranty and this warranty period, Bosch or one of its sole option. How Long the Warranty Lasts Bosch warrants that have responsibility, for the Product if it is ", or previously returned model), and not for resale, or commercial use. • ...


