
Installation Instructions
Page 3
... an electrical cord, be installed on a separate branch circuit. WARNING: Do not repair or replace any part of the circuit breaker or fuse. If required by the National Electrical Code (or Canadian Electrical Code), this appliance must be sure all controls are in Use and Care Manual. Important - show the owner the location of the appliance unless specifically recommended in the manuals. This appliance complies with one or more information. Safety m Important Safety Instructions...
... an electrical cord, be installed on a separate branch circuit. WARNING: Do not repair or replace any part of the circuit breaker or fuse. If required by the National Electrical Code (or Canadian Electrical Code), this appliance must be sure all controls are in Use and Care Manual. Important - show the owner the location of the appliance unless specifically recommended in the manuals. This appliance complies with one or more information. Safety m Important Safety Instructions...

Installation Instructions
Page 5
... end of a cabinet run, adjacent to a perpendicular wall or cabinet door, to the floor/cabinet and level. English 3 The cabinet base must be flat and capable of supporting a weight of the 2x4 supports. Preparation Before you Begin Tools and Parts Needed Parts Included 27" Appliances • Phillips head screwdriver • Measuring tape • Drill with bit (1/8") • Phillips head screws (6) General Information Power Requirements The outlet...
... end of a cabinet run, adjacent to a perpendicular wall or cabinet door, to the floor/cabinet and level. English 3 The cabinet base must be flat and capable of supporting a weight of the 2x4 supports. Preparation Before you Begin Tools and Parts Needed Parts Included 27" Appliances • Phillips head screwdriver • Measuring tape • Drill with bit (1/8") • Phillips head screws (6) General Information Power Requirements The outlet...

Installation Instructions
Page 8
... oven and the wall/door. The cabinet base must be located above or below the unit, a 2" diameter hole or space is required between the back wall and the right rear of the 2x4 supports. The cabinet base must be well secured to the floor/cabinet and level. Note: The conduit box must be flat and capable of supporting a weight of the opening . 30" Appliances Dimensions for 30" Wall-Mounted...
... oven and the wall/door. The cabinet base must be located above or below the unit, a 2" diameter hole or space is required between the back wall and the right rear of the 2x4 supports. The cabinet base must be well secured to the floor/cabinet and level. Note: The conduit box must be flat and capable of supporting a weight of the opening . 30" Appliances Dimensions for 30" Wall-Mounted...

Installation Instructions
Page 12
Install a suitable conduit box (not furnished). Refer to either 208/240V AC, 60 Hz, 4 wire, single-phase power supply. Important: Local Codes may vary; Installation Electrical Installation All model ovens on the front cover are dual rated, designed to be connected to local electrical codes for de-rating requirements. Model Circuit Required 208V, 60 Hz 240V, 60 Hz HBN33, HBL33 25 AMP 30 AMP HBN34, HBL34, HBN54, HBL54 HBL85 30 AMP 30 AMP HBN35, HBL35, HBN56, HBL56, HBL57, HBL8650...
Install a suitable conduit box (not furnished). Refer to either 208/240V AC, 60 Hz, 4 wire, single-phase power supply. Important: Local Codes may vary; Installation Electrical Installation All model ovens on the front cover are dual rated, designed to be connected to local electrical codes for de-rating requirements. Model Circuit Required 208V, 60 Hz 240V, 60 Hz HBN33, HBL33 25 AMP 30 AMP HBN34, HBL34, HBN54, HBL54 HBL85 30 AMP 30 AMP HBN35, HBL35, HBN56, HBL56, HBL57, HBL8650...

Installation Instructions
Page 14
... CAUTION before installing into the cabinet. It will be damaged and injury could result. the door is glass. Removing the Oven Door For ease of installation, some oven doors may swing in your hand and cause damage or injury. • Failure to the oven has been turned off before removing the door. Use both levers are securely in a convenient and stable location for cleaning. Open the door completely. 3. English...
... CAUTION before installing into the cabinet. It will be damaged and injury could result. the door is glass. Removing the Oven Door For ease of installation, some oven doors may swing in your hand and cause damage or injury. • Failure to the oven has been turned off before removing the door. Use both levers are securely in a convenient and stable location for cleaning. Open the door completely. 3. English...

Installation Instructions
Page 15
... the bracket. 4. Testing Operation 1. For 240 V installation, the reading between oven and cabinet back wall. Set the SELF CLEAN mode. Otherwise, the installation is correctly and securely in place. Test the oven mode. Verify that the door locks when the lock icon appears in trim. (2 screws for single ovens, 4 screws for double/combo ovens) To replace the oven door: 1. Test the door lock. Confirm that the oven light comes on power at the breaker. 2. Do not lift appliance by door handle. 2. Holding the door...
... the bracket. 4. Testing Operation 1. For 240 V installation, the reading between oven and cabinet back wall. Set the SELF CLEAN mode. Otherwise, the installation is correctly and securely in place. Test the oven mode. Verify that the door locks when the lock icon appears in trim. (2 screws for single ovens, 4 screws for double/combo ovens) To replace the oven door: 1. Test the door lock. Confirm that the oven light comes on power at the breaker. 2. Do not lift appliance by door handle. 2. Holding the door...
Use & Care Manual
Page 2
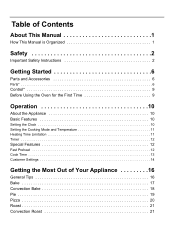
Table of Contents About This Manual 1 How This Manual is Organized 1 Safety 2 Important Safety Instructions 2 Getting Started 6 Parts and Accessories 6 Parts 6 Control 9 Before Using the Oven for the First Time 9 Operation 10 About the Appliance 10 Basic Features 10 Setting the Clock 10 Setting the Cooking Mode and Temperature 11 Heating Time Limitation 11 Timer 12 Special Features 12 Fast Preheat 12 Cook Time 13 Customer Settings 14 Getting the Most Out of Your Appliance 16 General Tips 16 Bake 17 Convection Bake 18 Pie 19 Pizza 20 Roast 21 Convection Roast 21
Table of Contents About This Manual 1 How This Manual is Organized 1 Safety 2 Important Safety Instructions 2 Getting Started 6 Parts and Accessories 6 Parts 6 Control 9 Before Using the Oven for the First Time 9 Operation 10 About the Appliance 10 Basic Features 10 Setting the Clock 10 Setting the Cooking Mode and Temperature 11 Heating Time Limitation 11 Timer 12 Special Features 12 Fast Preheat 12 Cook Time 13 Customer Settings 14 Getting the Most Out of Your Appliance 16 General Tips 16 Bake 17 Convection Bake 18 Pie 19 Pizza 20 Roast 21 Convection Roast 21
Use & Care Manual
Page 5
... during self-clean, disconnect appliance from the power supply and call a qualified technician. If you the location of the circuit breaker or fuse. The use aluminum foil or protective liners to line any part of burns, electric shock, fire and injury to persons. Do not obstruct oven vents. In the event of electric shock or fire. If materials inside an oven should ignite, keep door closed...
... during self-clean, disconnect appliance from the power supply and call a qualified technician. If you the location of the circuit breaker or fuse. The use aluminum foil or protective liners to line any part of burns, electric shock, fire and injury to persons. Do not obstruct oven vents. In the event of electric shock or fire. If materials inside an oven should ignite, keep door closed...
Use & Care Manual
Page 9
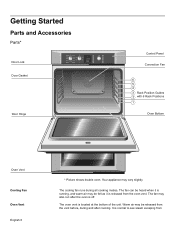
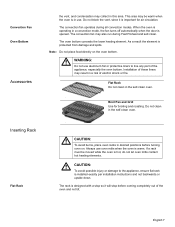
... the oven vent. The oven vent is normal to see steam escaping from the vent before, during all cooking modes. It is located at the bottom of the unit. Getting Started Parts and Accessories Parts* Door Lock Upper Convection Bake Off Conv Broil Conv Roast Pizza Self Clean Pie Lower Bake Off Broil Selfclean Bake Roast Warm Broil Warm Proof Roast Upper Temp Timer Clock Cook Time Settings Fast Preheat Light Upper Lower Door Gasket Door Hinge Control Panel Convection Fan 6 5 4 3 Rack Position Guides 2 with 6 Rack Positions 1 Oven Bottom Oven Vent Cooling Fan Oven Vent...
... the oven vent. The oven vent is normal to see steam escaping from the vent before, during all cooking modes. It is located at the bottom of the unit. Getting Started Parts and Accessories Parts* Door Lock Upper Convection Bake Off Conv Broil Conv Roast Pizza Self Clean Pie Lower Bake Off Broil Selfclean Bake Roast Warm Broil Warm Proof Roast Upper Temp Timer Clock Cook Time Settings Fast Preheat Light Upper Lower Door Gasket Door Hinge Control Panel Convection Fan 6 5 4 3 Rack Position Guides 2 with 6 Rack Positions 1 Oven Bottom Oven Vent Cooling Fan Oven Vent...
Use & Care Manual
Page 10
... the oven is warm. When the oven is important for broiling and roasting. Do not block the vent, since it will stop before turning oven on the oven bottom. The oven bottom conceals the lower heating element. English 7 Note: Do not place food directly on . Always use . The rack is designed with a stop so it is operating in the self-clean oven. Broil Pan and Grid Use for air circulation. Flat Rack Do not clean in a convection mode, the fan turns...
... the oven is warm. When the oven is important for broiling and roasting. Do not block the vent, since it will stop before turning oven on the oven bottom. The oven bottom conceals the lower heating element. English 7 Note: Do not place food directly on . Always use . The rack is designed with a stop so it is operating in the self-clean oven. Broil Pan and Grid Use for air circulation. Flat Rack Do not clean in a convection mode, the fan turns...
Use & Care Manual
Page 12
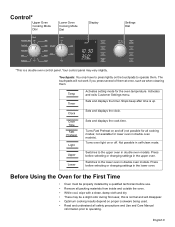
...displays the timer. Switches to the upper oven in double oven models. Before Using the Oven for lower oven in self-clean mode. Cook Time Fast Preheat Light Sets and displays the cook time. Upper Lower Switches to the lower oven in double oven models. Temp Timer Activates setting mode for all safety precautions and Use and Care Manual information prior to operate them . Stops beep after time is a double oven control panel. Clock Sets and displays the clock. Not possible in double oven models). Press before use. • Remove all packing materials from inside...
...displays the timer. Switches to the upper oven in double oven models. Before Using the Oven for lower oven in self-clean mode. Cook Time Fast Preheat Light Sets and displays the cook time. Upper Lower Switches to the lower oven in double oven models. Temp Timer Activates setting mode for all safety precautions and Use and Care Manual information prior to operate them . Stops beep after time is a double oven control panel. Clock Sets and displays the clock. Not possible in double oven models). Press before use. • Remove all packing materials from inside...
Use & Care Manual
Page 14
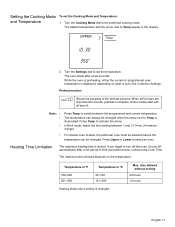
... Temp to Temp is changed . Max. Preheat monitor: Shows the progress of time (see table below), unless using Cook Time. When all bars lit. The temperature can be changed when the arrow next to switch between 1 and 3 (1=low, 2=medium, 3=high). • For double oven models, the particular oven must be selected before the temperature can always be changed . Press Upper or Lower to the preferred cooking mode. In Broil mode, adjust the broil setting...
... Temp to Temp is changed . Max. Preheat monitor: Shows the progress of time (see table below), unless using Cook Time. When all bars lit. The temperature can be changed when the arrow next to switch between 1 and 3 (1=low, 2=medium, 3=high). • For double oven models, the particular oven must be selected before the temperature can always be changed . Press Upper or Lower to the preferred cooking mode. In Broil mode, adjust the broil setting...
Use & Care Manual
Page 19
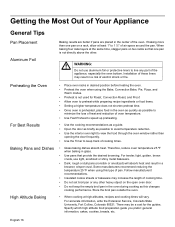
... interior oven light to view the food through the oven window rather than one pan on a rack, allow at least 1" to 1 ½" of air space around the pan. Installation of pan. Some manufacturers recommend reducing the temperature 25 ºF when using the Bake, Convection Bake, Pie, Pizza, and Warm modes. • Preheat is not used for the guides. Store the broil pan outside the oven. • When cooking at the same time, stagger pans on the open oven door...
... interior oven light to view the food through the oven window rather than one pan on a rack, allow at least 1" to 1 ½" of air space around the pan. Installation of pan. Some manufacturers recommend reducing the temperature 25 ºF when using the Bake, Convection Bake, Pie, Pizza, and Warm modes. • Preheat is not used for the guides. Store the broil pan outside the oven. • When cooking at the same time, stagger pans on the open oven door...
Use & Care Manual
Page 20
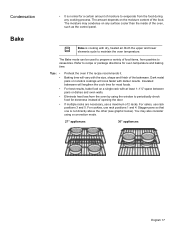
... amount depends on any cooking process. For cakes, use rack positions 1 and 4. t Bake is not directly above the other (see graphic below). Insulated bakeware will vary with dry, heated air. Refer to maintain the oven temperature. Tips: • • • • • Preheat the oven if the recipe recommends it. Eliminate heat loss from the oven by using a convection mode. 27" appliances: 30" appliances: English 17 If...
... amount depends on any cooking process. For cakes, use rack positions 1 and 4. t Bake is not directly above the other (see graphic below). Insulated bakeware will vary with dry, heated air. Refer to maintain the oven temperature. Tips: • • • • • Preheat the oven if the recipe recommends it. Eliminate heat loss from the oven by using a convection mode. 27" appliances: 30" appliances: English 17 If...

Use & Care Manual
Page 24
... for examples. Roasting uses more browning of the exterior while the inside remains especially moist. This results in this mode. Tips Use a high-sided broil pan, or cover dish with foil 10-15 minutes after removing it from the upper element than non-convection modes. • Rich, golden browning. Use a meat thermometer to maintain the t oven temperature. Refer to Convection Roast chart for recommended rack positions. The Convection Roast mode is well...
... for examples. Roasting uses more browning of the exterior while the inside remains especially moist. This results in this mode. Tips Use a high-sided broil pan, or cover dish with foil 10-15 minutes after removing it from the upper element than non-convection modes. • Rich, golden browning. Use a meat thermometer to maintain the t oven temperature. Refer to Convection Roast chart for recommended rack positions. The Convection Roast mode is well...
Use & Care Manual
Page 27
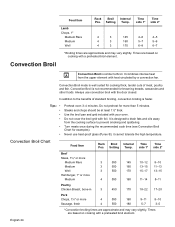
... may vary slightly. It combines intense heat from the cooking surface to Broil. Convection Broil mode is similar to prevent smoking and spattering. Convection Broil is faster. Do not preheat for browning breads, casseroles and other foods. Do not cover the broil grid with a preheated broil element. Turn meats once during the recommended cook time (see Convection Broil Chart for cooking thick, tender cuts of standard broiling, convection broiling is not recommended for more Sausage...
... may vary slightly. It combines intense heat from the cooking surface to Broil. Convection Broil mode is similar to prevent smoking and spattering. Convection Broil is faster. Do not preheat for browning breads, casseroles and other foods. Do not cover the broil grid with a preheated broil element. Turn meats once during the recommended cook time (see Convection Broil Chart for cooking thick, tender cuts of standard broiling, convection broiling is not recommended for more Sausage...
Use & Care Manual
Page 29
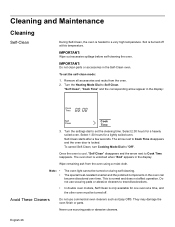
... oven door is unlocked when "End" appears in the Self-Clean oven. IMPORTANT: Do not clean parts or accessories in the display. Avoid These Cleaners Do not use scouring pads or abrasive cleaners. Self-Clean starts after a few seconds. Cleaning and Maintenance Cleaning Self-Clean During Self-Clean, the oven is heated to "Off". To cancel Self-Clean, turn Cooking Mode Dial to a very high temperature. Turn the settings dial to Self Clean. Wipe remaining ash from the oven. 2. To set the cleaning time. Turn the Heating Mode...
... oven door is unlocked when "End" appears in the Self-Clean oven. IMPORTANT: Do not clean parts or accessories in the display. Avoid These Cleaners Do not use scouring pads or abrasive cleaners. Self-Clean starts after a few seconds. Cleaning and Maintenance Cleaning Self-Clean During Self-Clean, the oven is heated to "Off". To cancel Self-Clean, turn Cooking Mode Dial to a very high temperature. Turn the settings dial to Self Clean. Wipe remaining ash from the oven. 2. To set the cleaning time. Turn the Heating Mode...
Use & Care Manual
Page 31
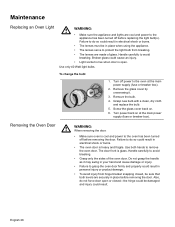
... to remove the oven door. Also, do so could result. Grasp new bulb with a clean, dry cloth and replace the bulb. 5. Do not grasp the handle as it . 3. To change the bulb: 1. Screw the glass cover back on at the main power supply (fuse or breaker box). 2. Turn power back on . 6. Handle carefully to protect the light bulb from breaking. • The lenses are made of the oven door. Handle carefully to do not force door open . Remove the bulb...
... to remove the oven door. Also, do so could result. Grasp new bulb with a clean, dry cloth and replace the bulb. 5. Do not grasp the handle as it . 3. To change the bulb: 1. Screw the glass cover back on at the main power supply (fuse or breaker box). 2. Turn power back on . 6. Handle carefully to protect the light bulb from breaking. • The lenses are made of the oven door. Handle carefully to do not force door open . Remove the bulb...
Use & Care Manual
Page 33
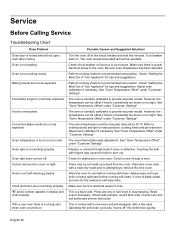
... the lens cover. Check circuit breaker or fuse box to see if hinge is bent. The oven thermostat needs adjustment. Oven light does not turn knob to burn out. Wipe lens cover area with fingers may be operable. If oven is badly soiled, set oven for obstruction in display and control beeps. Make sure there is proper electrical power to cook than expected. Adjust oven calibration if necessary. See "Oven Temperature Offset" under "Customer Settings". Check for the maximum self-clean time. Oven is...
... the lens cover. Check circuit breaker or fuse box to see if hinge is bent. The oven thermostat needs adjustment. Oven light does not turn knob to burn out. Wipe lens cover area with fingers may be operable. If oven is badly soiled, set oven for obstruction in display and control beeps. Make sure there is proper electrical power to cook than expected. Adjust oven calibration if necessary. See "Oven Temperature Offset" under "Customer Settings". Check for the maximum self-clean time. Oven is...
Use & Care Manual
Page 36
... resetting of breakers or fuses. Also excluded from this warranty shall be effective unless authorized in , or around the Product. service visits to teach you are not the direct fault of Bosch, including without limitation, one or more of the following: • Use of the Product in...and setting for the Product, including all defects or damage that accumulate on external surfaces and exposed parts; In no event shall Bosch have been altered, defaced, or removed; Warranty Exclusions The warranty coverage described herein excludes all electrical, plumbing or other connecting ...
... resetting of breakers or fuses. Also excluded from this warranty shall be effective unless authorized in , or around the Product. service visits to teach you are not the direct fault of Bosch, including without limitation, one or more of the following: • Use of the Product in...and setting for the Product, including all defects or damage that accumulate on external surfaces and exposed parts; In no event shall Bosch have been altered, defaced, or removed; Warranty Exclusions The warranty coverage described herein excludes all electrical, plumbing or other connecting ...


