
Installation Instructions
Page 5
...space is required between the side of a cabinet run, adjacent to a perpendicular wall or cabinet door, to allow at least 210 lbs (95 kg). If the conduit box is installed at the end of the oven and the wall/door. English 3 Note: The conduit box must be flat and capable of supporting... a weight of at least 1/4" space between the back wall and the right rear of the opening. Dimensions for 27" Wall-Mounted Units 24" (610mm) 251/2" (648mm) 263/4"...
...space is required between the side of a cabinet run, adjacent to a perpendicular wall or cabinet door, to allow at least 210 lbs (95 kg). If the conduit box is installed at the end of the oven and the wall/door. English 3 Note: The conduit box must be flat and capable of supporting... a weight of at least 1/4" space between the back wall and the right rear of the opening. Dimensions for 27" Wall-Mounted Units 24" (610mm) 251/2" (648mm) 263/4"...

Installation Instructions
Page 6
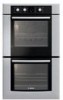
...251/2" (648mm) 50" (1270mm) 263/4" (680mm) 2413/16" (630mm) 491/2" (1257mm) 483/8" (1229mm) 191/2" (500mm) 237/8" (606mm) 22" (559mm) Double Oven 27" It is good practice, when oven is installed at the end of the opening . The supporting base must be well secured to back flush with the bottom and...servicing. The cabinet base must be flat and capable of supporting a weight of at least 1/4" space between the side of the oven and the wall/door. Note: The conduit box must be located above the unit to facilitate connecting and servicing. English 4 The cabinet base ...
...251/2" (648mm) 50" (1270mm) 263/4" (680mm) 2413/16" (630mm) 491/2" (1257mm) 483/8" (1229mm) 191/2" (500mm) 237/8" (606mm) 22" (559mm) Double Oven 27" It is good practice, when oven is installed at the end of the opening . The supporting base must be well secured to back flush with the bottom and...servicing. The cabinet base must be flat and capable of supporting a weight of at least 1/4" space between the side of the oven and the wall/door. Note: The conduit box must be located above the unit to facilitate connecting and servicing. English 4 The cabinet base ...

Installation Instructions
Page 7
..., install 2x4's extending front to back flush with Microwave and Warming Drawer 27" It is good practice, when oven is installed at the end of a cabinet run, adjacent to a perpendicular wall or cabinet door, to facilitate connecting and servicing. The supporting base must be flat and capable of supporting a weight of the...
..., install 2x4's extending front to back flush with Microwave and Warming Drawer 27" It is good practice, when oven is installed at the end of a cabinet run, adjacent to a perpendicular wall or cabinet door, to facilitate connecting and servicing. The supporting base must be flat and capable of supporting a weight of the...

Installation Instructions
Page 8
... space between the side of the oven and the wall/door. If the conduit box is installed below the unit. For oven support, install 2x4's extending front to back flush with the bottom and the side of the opening . Double Oven 30" It is good practice, when oven is required between the side of the... 2x4 supports. The supporting base must be well secured to allow at least 1/4" space between the back wall and the right rear of the oven and the wall/door. The cabinet base must...
... space between the side of the oven and the wall/door. If the conduit box is installed below the unit. For oven support, install 2x4's extending front to back flush with the bottom and the side of the opening . Double Oven 30" It is good practice, when oven is required between the side of the... 2x4 supports. The supporting base must be well secured to allow at least 1/4" space between the back wall and the right rear of the oven and the wall/door. The cabinet base must...

Installation Instructions
Page 9
...22" (559mm) Combo Oven with Microwave 30" It is good practice, when oven is installed at the end of a cabinet run , adjacent to a perpendicular wall or cabinet door, to facilitate connecting and servicing. Combo Oven with Microwave and Warming Drawer 30" It is good practice, when oven is installed at the... end of a cabinet run , adjacent to a perpendicular wall or cabinet door, to back flush...
...22" (559mm) Combo Oven with Microwave 30" It is good practice, when oven is installed at the end of a cabinet run , adjacent to a perpendicular wall or cabinet door, to facilitate connecting and servicing. Combo Oven with Microwave and Warming Drawer 30" It is good practice, when oven is installed at the... end of a cabinet run , adjacent to a perpendicular wall or cabinet door, to back flush...

Installation Instructions
Page 10
Note: The conduit box must be flat and capable of supporting a weight of at least 1/4" space between the side of the oven and the wall/door. The cabinet base must be well secured to the floor/cabinet and level. 24" (610mm) 281/2" (724mm) 293/4" (755mm) 2713/16.../4" (95mm) 20" (508mm) 43/4" (121mm) English 8 237/8" (606mm) 22" (559mm) For oven support, install 2x4's extending front to back flush with Warming Drawer 30" It is good practice, when oven is installed at the end of a cabinet run, adjacent to a perpendicular wall or cabinet door, to facilitate connecting and servicing.
Note: The conduit box must be flat and capable of supporting a weight of at least 1/4" space between the side of the oven and the wall/door. The cabinet base must be well secured to the floor/cabinet and level. 24" (610mm) 281/2" (724mm) 293/4" (755mm) 2713/16.../4" (95mm) 20" (508mm) 43/4" (121mm) English 8 237/8" (606mm) 22" (559mm) For oven support, install 2x4's extending front to back flush with Warming Drawer 30" It is good practice, when oven is installed at the end of a cabinet run, adjacent to a perpendicular wall or cabinet door, to facilitate connecting and servicing.

Installation Instructions
Page 15
...installation, the reading between oven and cabinet back wall. See the Use and Care Manual for assistance. Installing the Oven 1. Open door all the way to 240 volts. Push straight in trim. (2 screws for single ovens, 4 screws for double/combo ovens) To replace the oven door: 1. Close and... should be straight, not crooked. Door must be straight and level, not crooked. 3. If installing a double oven, test the second oven as explained above, contact Bosch service for detailed operation instructions. 4. Set the SELF CLEAN mode. Do not lift appliance by door handle. 2....
...installation, the reading between oven and cabinet back wall. See the Use and Care Manual for assistance. Installing the Oven 1. Open door all the way to 240 volts. Push straight in trim. (2 screws for single ovens, 4 screws for double/combo ovens) To replace the oven door: 1. Close and... should be straight, not crooked. Door must be straight and level, not crooked. 3. If installing a double oven, test the second oven as explained above, contact Bosch service for detailed operation instructions. 4. Set the SELF CLEAN mode. Do not lift appliance by door handle. 2....
Use & Care Manual
Page 20
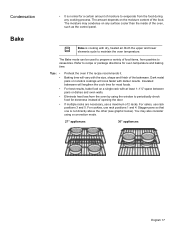
t Bake is cooking with at least 1-1½" space between pans or dishes and oven walls. Refer to maintain the oven temperature. Tips: • • • • • Preheat the oven if the recipe recommends it. If multiple racks are necessary, use rack positions 3 and 5. For cakes, use...from pastries to casseroles. For best results, bake food on any cooking process. Eliminate heat loss from the oven by using a convection mode. 27" appliances: 30" appliances: English 17 The moisture may also consider using the window to periodically check food for doneness instead ...
t Bake is cooking with at least 1-1½" space between pans or dishes and oven walls. Refer to maintain the oven temperature. Tips: • • • • • Preheat the oven if the recipe recommends it. If multiple racks are necessary, use rack positions 3 and 5. For cakes, use...from pastries to casseroles. For best results, bake food on any cooking process. Eliminate heat loss from the oven by using a convection mode. 27" appliances: 30" appliances: English 17 The moisture may also consider using the window to periodically check food for doneness instead ...


