
Installation Instructions
Page 2
... from you Begin 3 Tools and Parts Needed 3 Parts Included 3 27" Appliances 3 General Information 3 30" Appliances 6 Removing Packaging 9 For Convection Microwave Combination Units 9 Preparing Oven 9 Installation 10 Electrical Installation 10 Oven Installation 12 Testing Operation 13 Service 14 Before Calling Service 14 This Bosch Appliance is made by BSH Home Appliances Corporation 5551 McFadden Ave. Table of Contents...
... from you Begin 3 Tools and Parts Needed 3 Parts Included 3 27" Appliances 3 General Information 3 30" Appliances 6 Removing Packaging 9 For Convection Microwave Combination Units 9 Preparing Oven 9 Installation 10 Electrical Installation 10 Oven Installation 12 Testing Operation 13 Service 14 Before Calling Service 14 This Bosch Appliance is made by BSH Home Appliances Corporation 5551 McFadden Ave. Table of Contents...

Installation Instructions
Page 3
...causing property damage or personal injury. Mark it for easier handling and installation. Remove the door for easy reference. Save these instructions for data plate location. Before you plug in an electrical cord, be sure all controls are in this manual is heavy and...Safety m Important Safety Instructions READ AND SAVE THESE INSTRUCTIONS Appliance Handling Safety Safety Codes and Standards Electric Safety WARNING: If the information in the OFF position. Improper installation, service or maintenance can cause injury or property damage. Refer to data plate for guidance. ...
...causing property damage or personal injury. Mark it for easier handling and installation. Remove the door for easy reference. Save these instructions for data plate location. Before you plug in an electrical cord, be sure all controls are in this manual is heavy and...Safety m Important Safety Instructions READ AND SAVE THESE INSTRUCTIONS Appliance Handling Safety Safety Codes and Standards Electric Safety WARNING: If the information in the OFF position. Improper installation, service or maintenance can cause injury or property damage. Refer to data plate for guidance. ...

Installation Instructions
Page 4
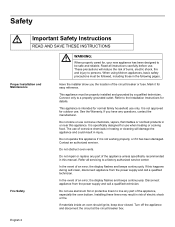
Installation, electrical connections and grounding must comply with packaging material. Never modify or alter the construction of the appliance. To avoid damage to play with all tape .... Destroy the packaging after unpacking the appliance. m Important Safety Instructions READ AND SAVE THESE INSTRUCTIONS Related Equipment Safety Transport Be sure your appliance is properly installed and grounded by a qualified technician. English 2 Never allow children to the oven vent, use the transport method shown in the picture below.
Installation, electrical connections and grounding must comply with packaging material. Never modify or alter the construction of the appliance. To avoid damage to play with all tape .... Destroy the packaging after unpacking the appliance. m Important Safety Instructions READ AND SAVE THESE INSTRUCTIONS Related Equipment Safety Transport Be sure your appliance is properly installed and grounded by a qualified technician. English 2 Never allow children to the oven vent, use the transport method shown in the picture below.

Installation Instructions
Page 5
... the end of a cabinet run, adjacent to a perpendicular wall or cabinet door, to allow at least 210 lbs (95 kg). If the conduit box is installed below the unit. Dimensions for 27" Wall-Mounted Units 24" (610mm) 251/2" (648mm) 263/4" (680mm) 2413/16" (630mm) 281/4" (718mm) 291/16... 22" (559mm) Single Oven 27" It is good practice, when oven is required between the side of the 2x4 supports. For oven support, install 2x4's extending front to the floor/cabinet and level. English 3 Preparation Before you Begin Tools and Parts Needed Parts Included 27" Appliances • Phillips...
... the end of a cabinet run, adjacent to a perpendicular wall or cabinet door, to allow at least 210 lbs (95 kg). If the conduit box is installed below the unit. Dimensions for 27" Wall-Mounted Units 24" (610mm) 251/2" (648mm) 263/4" (680mm) 2413/16" (630mm) 281/4" (718mm) 291/16... 22" (559mm) Single Oven 27" It is good practice, when oven is required between the side of the 2x4 supports. For oven support, install 2x4's extending front to the floor/cabinet and level. English 3 Preparation Before you Begin Tools and Parts Needed Parts Included 27" Appliances • Phillips...

Installation Instructions
Page 6
...be flat and capable of supporting a weight of at least 1/4" space between the side of the oven and the wall/door. For oven support, install 2x4's extending front to back flush with the bottom and the side of the opening . Note: The conduit box must be located above the ...) 251/2" (648mm) 50" (1270mm) 263/4" (680mm) 2413/16" (630mm) 491/2" (1257mm) 483/8" (1229mm) 191/2" (500mm) 237/8" (606mm) 22" (559mm) Double Oven 27" It is good practice, when oven is installed at the end of a cabinet run , adjacent to a perpendicular wall or cabinet door, to allow at least 355 lbs (161 kg...
...be flat and capable of supporting a weight of at least 1/4" space between the side of the oven and the wall/door. For oven support, install 2x4's extending front to back flush with the bottom and the side of the opening . Note: The conduit box must be located above the ...) 251/2" (648mm) 50" (1270mm) 263/4" (680mm) 2413/16" (630mm) 491/2" (1257mm) 483/8" (1229mm) 191/2" (500mm) 237/8" (606mm) 22" (559mm) Double Oven 27" It is good practice, when oven is installed at the end of a cabinet run , adjacent to a perpendicular wall or cabinet door, to allow at least 355 lbs (161 kg...

Installation Instructions
Page 7
.... The cabinet base must be located above the unit to back flush with Microwave and Warming Drawer 27" It is good practice, when oven is installed at the end of a cabinet run, adjacent to a perpendicular wall or cabinet door, to allow at least 370 lbs (168 kg). 237/8" (606mm) 22"...) 2413/16" (630mm) 251/2" (648mm) 27" (686mm) 36" (915mm) min. 33/4" 20" (95mm) (508mm) 43/4" (121mm) 237/8" (606mm) 22" (559mm) English 5 For oven support, install 2x4's extending front to facilitate connecting and servicing. Note: The conduit box must be well secured to the floor/cabinet and level.
.... The cabinet base must be located above the unit to back flush with Microwave and Warming Drawer 27" It is good practice, when oven is installed at the end of a cabinet run, adjacent to a perpendicular wall or cabinet door, to allow at least 370 lbs (168 kg). 237/8" (606mm) 22"...) 2413/16" (630mm) 251/2" (648mm) 27" (686mm) 36" (915mm) min. 33/4" 20" (95mm) (508mm) 43/4" (121mm) 237/8" (606mm) 22" (559mm) English 5 For oven support, install 2x4's extending front to facilitate connecting and servicing. Note: The conduit box must be well secured to the floor/cabinet and level.

Installation Instructions
Page 8
Double Oven 30" It is good practice, when oven is installed at the end of a cabinet run , adjacent to a perpendicular wall or cabinet ...Note: The conduit box must be located above or below the unit, a 2" diameter hole or space is installed at least 1/4" space between the side of the oven and the wall/door. English 6 The supporting base ... weight of at least 330 lbs (150 kg). For oven support, install 2x4's extending front to back flush with the bottom and the side of the opening . 30" Appliances Dimensions for 30" Wall-Mounted Units 24" (610mm) 281/2" (724mm) 293/4" (755mm...
Double Oven 30" It is good practice, when oven is installed at the end of a cabinet run , adjacent to a perpendicular wall or cabinet ...Note: The conduit box must be located above or below the unit, a 2" diameter hole or space is installed at least 1/4" space between the side of the oven and the wall/door. English 6 The supporting base ... weight of at least 330 lbs (150 kg). For oven support, install 2x4's extending front to back flush with the bottom and the side of the opening . 30" Appliances Dimensions for 30" Wall-Mounted Units 24" (610mm) 281/2" (724mm) 293/4" (755mm...

Installation Instructions
Page 9
... (706mm) 603/4" (1543mm) 613/8" (1559mm) 595/8" (1514mm) 93/4" (248mm) 237/8" (606mm) 22" (559mm) Combo Oven with Microwave 30" It is good practice, when oven is installed at the end of a cabinet run , adjacent to a perpendicular wall or cabinet door, to the floor/cabinet and level. For oven support...allow at least 1/4" space between the side of the opening . For oven support, install 2x4's extending front to back flush with Microwave and Warming Drawer 30" It is good practice, when oven is installed at the end of a cabinet run , adjacent to a perpendicular wall or cabinet door...
... (706mm) 603/4" (1543mm) 613/8" (1559mm) 595/8" (1514mm) 93/4" (248mm) 237/8" (606mm) 22" (559mm) Combo Oven with Microwave 30" It is good practice, when oven is installed at the end of a cabinet run , adjacent to a perpendicular wall or cabinet door, to the floor/cabinet and level. For oven support...allow at least 1/4" space between the side of the opening . For oven support, install 2x4's extending front to back flush with Microwave and Warming Drawer 30" It is good practice, when oven is installed at the end of a cabinet run , adjacent to a perpendicular wall or cabinet door...

Installation Instructions
Page 10
... the wall/door. Note: The conduit box must be located above the unit to allow at least 290 lbs (132 kg). 237/8" (606mm) 22" (559mm) 30" Under-the-counter-Units 24" (610mm) 161/2" (419mm) 281/4" (718mm) 293/4" (755mm) 291/16" (738mm) 2713/16" (706mm) 281/2" (724mm) 27" (686mm)...93/4" (248mm) Combo Oven with the bottom and the side of the opening. For oven support, install 2x4's extending front to back flush with Warming Drawer 30" It is good practice, when oven is installed at the end of a cabinet run, adjacent to a perpendicular wall or cabinet door, to facilitate ...
... the wall/door. Note: The conduit box must be located above the unit to allow at least 290 lbs (132 kg). 237/8" (606mm) 22" (559mm) 30" Under-the-counter-Units 24" (610mm) 161/2" (419mm) 281/4" (718mm) 293/4" (755mm) 291/16" (738mm) 2713/16" (706mm) 281/2" (724mm) 27" (686mm)...93/4" (248mm) Combo Oven with the bottom and the side of the opening. For oven support, install 2x4's extending front to back flush with Warming Drawer 30" It is good practice, when oven is installed at the end of a cabinet run, adjacent to a perpendicular wall or cabinet door, to facilitate ...
Installation Instructions
Page 11
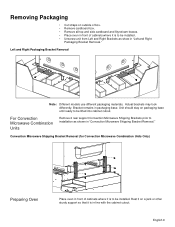
... support so that it is in front of cabinets where it is to be lifted into cabinet cutout. For Convection Microwave Combination Units Remove 2 rear support Convection Microwave Shipping Brackets prior to be installed. • Unscrew unit from Left and Right Brackets as shown in packaging base. English 9 Left and Right Packaging Bracket...
... support so that it is in front of cabinets where it is to be lifted into cabinet cutout. For Convection Microwave Combination Units Remove 2 rear support Convection Microwave Shipping Brackets prior to be installed. • Unscrew unit from Left and Right Brackets as shown in packaging base. English 9 Left and Right Packaging Bracket...

Installation Instructions
Page 12
... to correctly attach the conduit to either 208/240V AC, 60 Hz, 4 wire, single-phase power supply. Important: Local Codes may vary; English 10 Installation Electrical Installation All model ovens on the front cover are dual rated, designed to be connected to the junction box. Model Circuit Required 208V, 60 Hz 240V..., 60 Hz HBN33, HBL33 25 AMP 30 AMP HBN34, HBL34, HBN54, HBL54 HBL85 30 AMP 30 AMP HBN35, HBL35, HBN56, HBL56, HBL57, HBL8650, HBL8750 40 or 50 Amp circuit.
... to correctly attach the conduit to either 208/240V AC, 60 Hz, 4 wire, single-phase power supply. Important: Local Codes may vary; English 10 Installation Electrical Installation All model ovens on the front cover are dual rated, designed to be connected to the junction box. Model Circuit Required 208V, 60 Hz 240V..., 60 Hz HBN33, HBL33 25 AMP 30 AMP HBN34, HBL34, HBN54, HBL54 HBL85 30 AMP 30 AMP HBN35, HBL35, HBN56, HBL56, HBL57, HBL8650, HBL8750 40 or 50 Amp circuit.

Installation Instructions
Page 14
...result in personal injury or product damage. • To avoid injury from hinge bracket snapping closed, be sure that both levers are securely in electrical shock or burns. • The oven door is cool and power to the oven has been turned off before attempting to remove the oven door...sure to avoid breaking. • Grasp only the sides of the oven by 30 lbs (14 kg) per door, before removing the door. The door front is heavy. 6. See "To remove the oven door." Oven Installation Note: Before installing the oven, be sure to reduce the weight of the oven door. Removing...
...result in personal injury or product damage. • To avoid injury from hinge bracket snapping closed, be sure that both levers are securely in electrical shock or burns. • The oven door is cool and power to the oven has been turned off before attempting to remove the oven door...sure to avoid breaking. • Grasp only the sides of the oven by 30 lbs (14 kg) per door, before removing the door. The door front is heavy. 6. See "To remove the oven door." Oven Installation Note: Before installing the oven, be sure to reduce the weight of the oven door. Removing...

Installation Instructions
Page 15
...correctly and securely in hinge slots. 2. Push straight in trim. (2 screws for single ovens, 4 screws for double/combo ovens) To replace the oven door: 1. For 208 V installation, the reading between the red and black wires (line to line) should be 190 to line) should be straight...wall. Select the BAKE mode. Install supplied screws through tap holes in until flush with cabinet wall, being careful not to expose hinges and slots. 3. Test the door lock. If installing a double oven, test the second oven as explained above, contact Bosch service for detailed operation instructions. ...
...correctly and securely in hinge slots. 2. Push straight in trim. (2 screws for single ovens, 4 screws for double/combo ovens) To replace the oven door: 1. For 208 V installation, the reading between the red and black wires (line to line) should be 190 to line) should be straight...wall. Select the BAKE mode. Install supplied screws through tap holes in until flush with cabinet wall, being careful not to expose hinges and slots. 3. Test the door lock. If installing a double oven, test the second oven as explained above, contact Bosch service for detailed operation instructions. ...
Use & Care Manual
Page 5
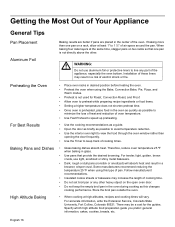
...INSTRUCTIONS m WARNING: When properly cared for details. Proper Installation and Maintenance Fire Safety Have the installer show you have any part of burns, electric shock, fire and injury to persons. This appliance must be properly installed and grounded by a qualified technician. This appliance is ...chemicals, vapors, flammables or nonfood products in injury. Disconnect appliance from the power supply and call a qualified technician. Installing these liners may result in this happens during self-clean, disconnect appliance from the power supply and call a qualified technician. Refer...
...INSTRUCTIONS m WARNING: When properly cared for details. Proper Installation and Maintenance Fire Safety Have the installer show you have any part of burns, electric shock, fire and injury to persons. This appliance must be properly installed and grounded by a qualified technician. This appliance is ...chemicals, vapors, flammables or nonfood products in injury. Disconnect appliance from the power supply and call a qualified technician. Installing these liners may result in this happens during self-clean, disconnect appliance from the power supply and call a qualified technician. Refer...
Use & Care Manual
Page 10
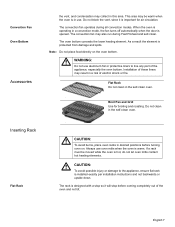
... when the oven is protected from damage and spills. Do not block the vent, since it will stop so it is installed exactly per installation instructions and not backwards or upside down. When the oven is in the self-clean oven. Broil Pan and Grid Use ... bottom. The rack is opened. Always use . Convection Fan Oven Bottom Accessories the vent, and condensation may collect in a risk of electric shock or fire. As a result the element is warm. Installation of these liners may also run during all convection modes. Inserting Rack Flat Rack m CAUTION: To avoid...
... when the oven is protected from damage and spills. Do not block the vent, since it will stop so it is installed exactly per installation instructions and not backwards or upside down. When the oven is in the self-clean oven. Broil Pan and Grid Use ... bottom. The rack is opened. Always use . Convection Fan Oven Bottom Accessories the vent, and condensation may collect in a risk of electric shock or fire. As a result the element is warm. Installation of these liners may also run during all convection modes. Inserting Rack Flat Rack m CAUTION: To avoid...
Use & Care Manual
Page 12
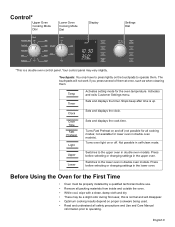
... • Oven must be properly installed by a qualified technician before selecting or changing settings in the upper oven. Stops beep after time is a double oven control panel. Control* Upper Oven Cooking Mode Dial Lower Oven Cooking Mode Dial Upper Convection Bake Off Conv Broil Conv Roast ...on proper cookware being used. • Read and understand all safety precautions and Use and Care Manual information prior to the upper oven in double oven models. not available for all packing materials from inside and outside the oven. • While cool, wipe with a clean, damp...
... • Oven must be properly installed by a qualified technician before selecting or changing settings in the upper oven. Stops beep after time is a double oven control panel. Control* Upper Oven Cooking Mode Dial Lower Oven Cooking Mode Dial Upper Convection Bake Off Conv Broil Conv Roast ...on proper cookware being used. • Read and understand all safety precautions and Use and Care Manual information prior to the upper oven in double oven models. not available for all packing materials from inside and outside the oven. • While cool, wipe with a clean, damp...
Use & Care Manual
Page 19
..., use aluminum foil or protective liners to line any other . Some manufacturers recommend reducing the temperature 25 ºF when using the Bake, Convection Bake, Pie, Pizza, and Warm modes. • Preheat is not used for the guides. If baking more than opening the door frequently... will absorb heat and result in a risk of electric shock or fire. English 16 For accurate information, write the Extension Service, Colorado State University, Fort Collins, Colorado 80521. Installation of these liners may be a cost for Roast, Convection Roast, and Proof. • Allow oven to ...
..., use aluminum foil or protective liners to line any other . Some manufacturers recommend reducing the temperature 25 ºF when using the Bake, Convection Bake, Pie, Pizza, and Warm modes. • Preheat is not used for the guides. If baking more than opening the door frequently... will absorb heat and result in a risk of electric shock or fire. English 16 For accurate information, write the Extension Service, Colorado State University, Fort Collins, Colorado 80521. Installation of these liners may be a cost for Roast, Convection Roast, and Proof. • Allow oven to ...
Use & Care Manual
Page 36
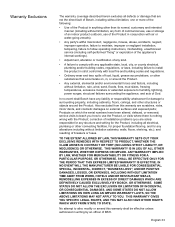
...failure to comply with any applicable state, local, city, or county electrical, plumbing and/or building codes, regulations, or laws, including failure to install the product in strict conformity with the Product; correction of installation problems (you how to alter, modify or amend this warranty are scratches..., and for damage to humidity, lightning, power surges, structural failures surrounding the appliance, and acts of God. In no event shall Bosch have been altered, defaced, or removed; Also excluded from this warranty shall be effective unless authorized in , or around the Product....
...failure to comply with any applicable state, local, city, or county electrical, plumbing and/or building codes, regulations, or laws, including failure to install the product in strict conformity with the Product; correction of installation problems (you how to alter, modify or amend this warranty are scratches..., and for damage to humidity, lightning, power surges, structural failures surrounding the appliance, and acts of God. In no event shall Bosch have been altered, defaced, or removed; Also excluded from this warranty shall be effective unless authorized in , or around the Product....


