
Installation Instructions
Page 6
.../2" (1257mm) 483/8" (1229mm) 191/2" (500mm) 237/8" (606mm) 22" (559mm) Double Oven 27" It is good practice, when oven is installed at the end of the oven and the wall/door. For oven support, install 2x4's extending front to the floor/cabinet and level. Combo Oven with the bottom and the side of the opening . The... supporting base must be flat and capable of supporting a weight of at least 1/4" space between the side of the oven and the wall/door. The cabinet base must be well secured to allow at least 330 lbs (150 kg). The supporting base must be flat...
.../2" (1257mm) 483/8" (1229mm) 191/2" (500mm) 237/8" (606mm) 22" (559mm) Double Oven 27" It is good practice, when oven is installed at the end of the oven and the wall/door. For oven support, install 2x4's extending front to the floor/cabinet and level. Combo Oven with the bottom and the side of the opening . The... supporting base must be flat and capable of supporting a weight of at least 1/4" space between the side of the oven and the wall/door. The cabinet base must be well secured to allow at least 330 lbs (150 kg). The supporting base must be flat...

Installation Instructions
Page 8
... well secured to back flush with the bottom and the side of the opening . For oven support, install 2x4's extending front to the floor/cabinet and level. Double Oven 30" It is good practice, when oven is installed at the end of a cabinet run , adjacent to a perpendicular wall or ...cabinet door, to allow at least 1/4" space between the side of the oven and the wall/door. 30" Appliances Dimensions for 30" Wall-Mounted Units 24"...
... well secured to back flush with the bottom and the side of the opening . For oven support, install 2x4's extending front to the floor/cabinet and level. Double Oven 30" It is good practice, when oven is installed at the end of a cabinet run , adjacent to a perpendicular wall or ...cabinet door, to allow at least 1/4" space between the side of the oven and the wall/door. 30" Appliances Dimensions for 30" Wall-Mounted Units 24"...

Installation Instructions
Page 15
... it is complete at this time. Check power at the breaker. 2. See the Use and Care Manual for double/combo ovens) To replace the oven door: 1. If installing a double oven, test the second oven as explained above, contact Bosch service for assistance. For 208 V installation, the reading between the red and black wires (line to 240 volts...
... it is complete at this time. Check power at the breaker. 2. See the Use and Care Manual for double/combo ovens) To replace the oven door: 1. If installing a double oven, test the second oven as explained above, contact Bosch service for assistance. For 208 V installation, the reading between the red and black wires (line to 240 volts...
Use & Care Manual
Page 9
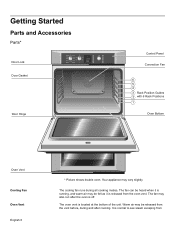
...fan can be felt as it is located at the bottom of the unit. The oven vent is running, and warm air may vary slightly. Getting Started Parts and Accessories Parts* Door Lock Upper Convection Bake Off Conv Broil Conv Roast Pizza Self Clean Pie Lower Bake Off Broil Selfclean... Warm Broil Warm Proof Roast Upper Temp Timer Clock Cook Time Settings Fast Preheat Light Upper Lower Door Gasket Door Hinge Control Panel Convection Fan 6 5 4 3 Rack Position Guides 2 with 6 Rack Positions 1 Oven Bottom Oven Vent Cooling Fan Oven Vent English 6 * Picture shows double oven.
...fan can be felt as it is located at the bottom of the unit. The oven vent is running, and warm air may vary slightly. Getting Started Parts and Accessories Parts* Door Lock Upper Convection Bake Off Conv Broil Conv Roast Pizza Self Clean Pie Lower Bake Off Broil Selfclean... Warm Broil Warm Proof Roast Upper Temp Timer Clock Cook Time Settings Fast Preheat Light Upper Lower Door Gasket Door Hinge Control Panel Convection Fan 6 5 4 3 Rack Position Guides 2 with 6 Rack Positions 1 Oven Bottom Oven Vent Cooling Fan Oven Vent English 6 * Picture shows double oven.
Use & Care Manual
Page 12
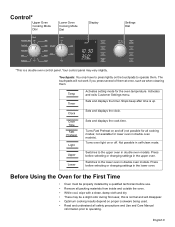
... all safety precautions and Use and Care Manual information prior to the lower oven in double oven models. Stops beep after time is a double oven control panel. Not possible in the upper oven. Control* Upper Oven Cooking Mode Dial Lower Oven Cooking Mode Dial Upper Convection Bake Off Conv Broil Conv Roast Pizza Self Clean Pie Lower Bake Off...
... all safety precautions and Use and Care Manual information prior to the lower oven in double oven models. Stops beep after time is a double oven control panel. Not possible in the upper oven. Control* Upper Oven Cooking Mode Dial Lower Oven Cooking Mode Dial Upper Convection Bake Off Conv Broil Conv Roast Pizza Self Clean Pie Lower Bake Off...
Use & Care Manual
Page 14
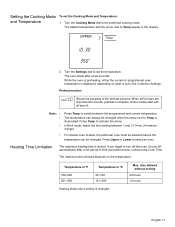
...buzzer sounds, preheat is changed when the arrow next to switch between 1 and 3 (1=low, 2=medium, 3=high). • For double oven models, the particular oven must be selected before the temperature can always be changed. The default temperature and the arrow next to select an... oven. While the oven is preheating, either the current or programmed oven temperature is displayed, depending on the temperature: Temperature in ºF Temperature in ºC 100-200 201-550 30-120 121-300 Heating stops until a setting is complete. Press...
...buzzer sounds, preheat is changed when the arrow next to switch between 1 and 3 (1=low, 2=medium, 3=high). • For double oven models, the particular oven must be selected before the temperature can always be changed. The default temperature and the arrow next to select an... oven. While the oven is preheating, either the current or programmed oven temperature is displayed, depending on the temperature: Temperature in ºF Temperature in ºC 100-200 201-550 30-120 121-300 Heating stops until a setting is complete. Press...
Use & Care Manual
Page 29
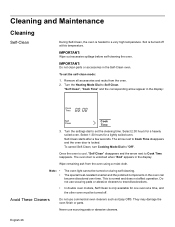
...". "Self Clean", "Cook Time" and the corresponding arrow appear in the oven can become discolored over time. Select 2:30 hours for a lightly soiled oven. Wipe remaining ash from the oven. 2. Do not use scouring pads or abrasive cleaners to treat discolorations. • In double oven models, Self Clean is heated to Cook Time disappears and the...
...". "Self Clean", "Cook Time" and the corresponding arrow appear in the oven can become discolored over time. Select 2:30 hours for a lightly soiled oven. Wipe remaining ash from the oven. 2. Do not use scouring pads or abrasive cleaners to treat discolorations. • In double oven models, Self Clean is heated to Cook Time disappears and the...


