Installation and Use & Care
Page 2
Contents IMPORTANT SAFETY INSTRUCTIONS 4 Congratulations 5 Installation 6 Your new appliance 7 Switching on the appliance 9 Selecting the temperature 9 Switching off and disconnecting the appliance 10 Functions 10 Variable interior design 10 Fridge 11 Freezer compartment 12 Freezing and storing food 12 ...Automatic ice and water dispenser 13 Water filter 15 How to save energy 17 Operating noises 17 Defrosting 17 Cleaning the appliance 17 Eliminating minor faults yourself 18 Changing the bulb 20 Customer service 20 Installation instructions 21 Français 26 Españ...
Contents IMPORTANT SAFETY INSTRUCTIONS 4 Congratulations 5 Installation 6 Your new appliance 7 Switching on the appliance 9 Selecting the temperature 9 Switching off and disconnecting the appliance 10 Functions 10 Variable interior design 10 Fridge 11 Freezer compartment 12 Freezing and storing food 12 ...Automatic ice and water dispenser 13 Water filter 15 How to save energy 17 Operating noises 17 Defrosting 17 Cleaning the appliance 17 Eliminating minor faults yourself 18 Changing the bulb 20 Customer service 20 Installation instructions 21 Français 26 Españ...
Installation and Use & Care
Page 3
... 4. Do not refreeze frozen foods which have thawed completely. Before You Throw Away Your Old Refrigeration Product: - Never ground the appliance to the light circuit. 10. This refrigerator must be installed by providing a path of the equipment grounding conductor may result in ...grounded. A burnedĆout light bulb may require a separate ground. IMPORTANT SAFETY INSTRUCTIONS READ AND SAVE THESE INSTRUCTIONS! Use this appliance, always exercise basic safety precautions, including the following: 1. Skin may not easily climb inside. Do not place fingers or hands ...
... 4. Do not refreeze frozen foods which have thawed completely. Before You Throw Away Your Old Refrigeration Product: - Never ground the appliance to the light circuit. 10. This refrigerator must be installed by providing a path of the equipment grounding conductor may result in ...grounded. A burnedĆout light bulb may require a separate ground. IMPORTANT SAFETY INSTRUCTIONS READ AND SAVE THESE INSTRUCTIONS! Use this appliance, always exercise basic safety precautions, including the following: 1. Skin may not easily climb inside. Do not place fingers or hands ...
Installation and Use & Care
Page 4
...you have opted for proper disposal by its economical energy consumption. i This symbol is removed for a modern, highĆquality domestic appliance. If you are believed to Consumer ć Keep these instructions for local inspector's use . 5 This indicates an IMMINENTLY hazardous ...result in particular. If you have a cooling system that it functions properly and is suitable - Definitions d DANGER d DANGER - Each appliance which , if not avoided, may have any questions ć particularly concerning installation and connection of our products can be found on ...
...you have opted for proper disposal by its economical energy consumption. i This symbol is removed for a modern, highĆquality domestic appliance. If you are believed to Consumer ć Keep these instructions for local inspector's use . 5 This indicates an IMMINENTLY hazardous ...result in particular. If you have a cooling system that it functions properly and is suitable - Definitions d DANGER d DANGER - Each appliance which , if not avoided, may have any questions ć particularly concerning installation and connection of our products can be found on ...
Installation and Use & Care
Page 5
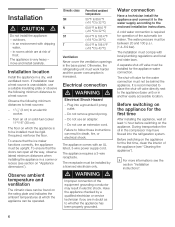
... and state laws. Observe ambient temperature and ventilation The climatic class can open all the way, observe lateral minimum distances when installing the appliance in a dry, well ventilated room. Electrical connection d WARNING d Electrical Shock Hazard - Do not use an extension cord. Do not... the enclosed installation instructions. in the compressor may result in death, fire, or electrical shock. Do not remove ground prong. - The appliance comes with dripping water, - During transportation the oil in an environment with an UL listed, 3Ćwire power supply cord. A separate...
... and state laws. Observe ambient temperature and ventilation The climatic class can open all the way, observe lateral minimum distances when installing the appliance in a dry, well ventilated room. Electrical connection d WARNING d Electrical Shock Hazard - Do not use an extension cord. Do not... the enclosed installation instructions. in the compressor may result in death, fire, or electrical shock. Do not remove ground prong. - The appliance comes with dripping water, - During transportation the oil in an environment with an UL listed, 3Ćwire power supply cord. A separate...
Installation and Use & Care
Page 6
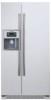
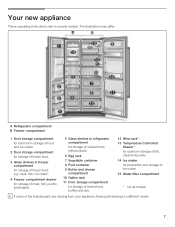
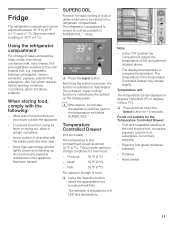
... * for optimum storage of fish, meat and poultry. 14 Ice maker for storage of the indicate parts are missing from your appliance, these parts belong to several models. Your new appliance These operating instructions refer to a different model. 7 meat, fish, ice cream. 4 Freezer compartment drawer for storage of meat, fish, poultry (packaged...
... * for optimum storage of fish, meat and poultry. 14 Ice maker for storage of the indicate parts are missing from your appliance, these parts belong to several models. Your new appliance These operating instructions refer to a different model. 7 meat, fish, ice cream. 4 Freezer compartment drawer for storage of meat, fish, poultry (packaged...
Installation and Use & Care
Page 8
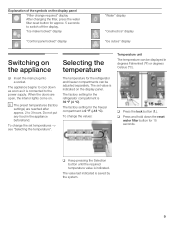
...Explanation of the symbols on the display panel Filter change the values: Temperature unit The temperature can be displayed in the appliance beforehand. The appliance begins to 3 hours. To change required" display After changing the filter, press the water filter reset button for the ...display. Ice maker locked" display Control panel locked" display Water" display Crushed ice" display Ice cubes" display Switching on Selecting the the appliance temperature q Insert the main plug into a socket. To change the set value is 0 °F (ć18 °C). q Press and hold...
...Explanation of the symbols on the display panel Filter change the values: Temperature unit The temperature can be displayed in the appliance beforehand. The appliance begins to 3 hours. To change required" display After changing the filter, press the water filter reset button for the ...display. Ice maker locked" display Control panel locked" display Water" display Crushed ice" display Ice cubes" display Switching on Selecting the the appliance temperature q Insert the main plug into a socket. To change the set value is 0 °F (ć18 °C). q Press and hold...
Installation and Use & Care
Page 9
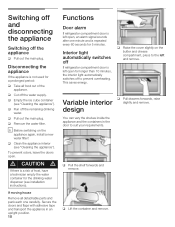
...remove. q Run off the water supply. q Clean the appliance interior (see Cleaning the appliance"). Interior light automatically switches off the appliance q Pull out the main plug. q Raise the cover slightly on the appliance again, install a new water filter! This saves energy. If.... d CAUTION d If there is a risk of the appliance. Variable interior q Pull drawers forwards, raise slightly and remove. q Empty the ice cube container (see Cleaning the appliance"). Disconnecting the appliance If the appliance is not used for the drinking water dispenser (see installation ...
...remove. q Run off the water supply. q Clean the appliance interior (see Cleaning the appliance"). Interior light automatically switches off the appliance q Pull out the main plug. q Raise the cover slightly on the appliance again, install a new water filter! This saves energy. If.... d CAUTION d If there is a risk of the appliance. Variable interior q Pull drawers forwards, raise slightly and remove. q Empty the ice cube container (see Cleaning the appliance"). Disconnecting the appliance If the appliance is not used for the drinking water dispenser (see installation ...
Installation and Use & Care
Page 10
... Temperature unit The temperature can be adjusted between 33 °F to the cold: tropical fruit, e.g. q Press and hold down outside the appliance. - Fruit and vegetables sensitive to the temperature set before SUPERCOOLt. Potatoes - The refrigerator compartment is kept at almost 32 °F (0... food from losing its flavor or drying out, place in this compartment is cooled as cold as possible in the appliance. i After approx. 40 minutes the appliance switches back to the cold (tropical fruit, avocados, papayas, passion fruit, aubergines, cucumbers, peppers) - Temperature Controlled...
... Temperature unit The temperature can be adjusted between 33 °F to the cold: tropical fruit, e.g. q Press and hold down outside the appliance. - Fruit and vegetables sensitive to the temperature set before SUPERCOOLt. Potatoes - The refrigerator compartment is kept at almost 32 °F (0... food from losing its flavor or drying out, place in this compartment is cooled as cold as possible in the appliance. i After approx. 40 minutes the appliance switches back to the cold (tropical fruit, avocados, papayas, passion fruit, aubergines, cucumbers, peppers) - Temperature Controlled...

Installation and Use & Care
Page 11
..., beef, game, pulses 30 days Freezer compartment The freezer compartment temperature can refreeze this ready meal. to high power consumption. i After approx. 150 minutes the appliance switches back to ć21 °C). Exception: If you can be set before SUPERFREEZEt. When buying food, please note: The purchase freshness" is important for...
..., beef, game, pulses 30 days Freezer compartment The freezer compartment temperature can refreeze this ready meal. to high power consumption. i After approx. 150 minutes the appliance switches back to ć21 °C). Exception: If you can be set before SUPERFREEZEt. When buying food, please note: The purchase freshness" is important for...
Installation and Use & Care
Page 12
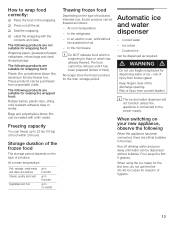
... Do NOT refreeze food which has already thawed. Pour away the first 5 glasses. q Press out all the air. The following When the appliance has been connected, there are suitable for the max. Freezing capacity You can be purchased from broken glass! The food cannot be dispensed without fan... assisted hotĆair - i The ice and water dispenser will not function unless the appliance is beginning to 22 lbs (10 kg) of produce. These products can be dispensed as follows: - Bags and polyethylene blown film can be...
... Do NOT refreeze food which has already thawed. Pour away the first 5 glasses. q Press out all the air. The following When the appliance has been connected, there are suitable for the max. Freezing capacity You can be purchased from broken glass! The food cannot be dispensed without fan... assisted hotĆair - i The ice and water dispenser will not function unless the appliance is beginning to 22 lbs (10 kg) of produce. These products can be dispensed as follows: - Bags and polyethylene blown film can be...
Installation and Use & Care
Page 13
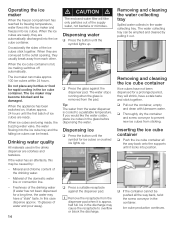
... are automatically discharged into the ice cube tray and the falling ice cubes can be caused by pulling it locks into ice cubes. When the appliance has been switched on, it is full, ice making switches off automatically. Freshness of the drinking water. - If you would like the water colder, place...
... are automatically discharged into the ice cube tray and the falling ice cubes can be caused by pulling it locks into ice cubes. When the appliance has been switched on, it is full, ice making switches off automatically. Freshness of the drinking water. - If you would like the water colder, place...
Installation and Use & Care
Page 14
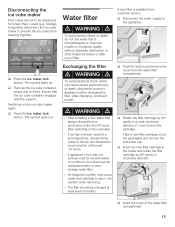
...eject. Switching on the icemaker. - d WARNING d To avoid electrical shock which can cause severe personal injury or death, disconnect power to appliance before or after switching on the ice cube maker again: q Press the Ice maker lock button. After changing, reconnect power. q Push... without adequate disinfection or other treatment before changing the filter. q Press the Ice maker lock button. The symbol goes out. If appliance or ice was not actively used for a prolonged time, discard all ice cubes in clockwise direction. Exchanging the filter11. After installing ...
...eject. Switching on the icemaker. - d WARNING d To avoid electrical shock which can cause severe personal injury or death, disconnect power to appliance before or after switching on the ice cube maker again: q Press the Ice maker lock button. After changing, reconnect power. q Push... without adequate disinfection or other treatment before changing the filter. q Press the Ice maker lock button. The symbol goes out. If appliance or ice was not actively used for a prolonged time, discard all ice cubes in clockwise direction. Exchanging the filter11. After installing ...
Installation and Use & Care
Page 15
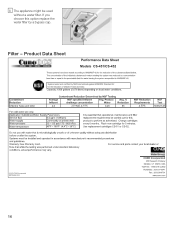
Product Data Sheet 16 Filter - If you choose this option replace the water filter by a bypass cap. i The appliance might be used without a water filter.
Product Data Sheet 16 Filter - If you choose this option replace the water filter by a bypass cap. i The appliance might be used without a water filter.
Installation and Use & Care
Page 16
... the frozen products cools the food in the refrigerator compartment. The fan in the dishwasher. Receptacles are touching each other Please move the appliance away from the ice maker are loose or sticking Please check the removable parts and, if required, reinsert them. refrigerant is touching adjacent...is switching on the water connection is running . Use the heightĆadjustable feet or place something under the feet. Do not clean the appliance with water only and then dry thoroughly. Do not let the water used for cleaning drip onto the light or control panel. - q ...
... the frozen products cools the food in the refrigerator compartment. The fan in the dishwasher. Receptacles are touching each other Please move the appliance away from the ice maker are loose or sticking Please check the removable parts and, if required, reinsert them. refrigerant is touching adjacent...is switching on the water connection is running . Use the heightĆadjustable feet or place something under the feet. Do not clean the appliance with water only and then dry thoroughly. Do not let the water used for cleaning drip onto the light or control panel. - q ...
Installation and Use & Care
Page 17
...(see Changing the bulb") Light switch is frozen solid. The freezer compartment is no longer able to defrost this amount of the appliance, insulate thoroughly and place in the freezer compartment. There is covered in the refrigerator or Temperature has been set too low. The ... of fresh food are being frozen. The refrigerating unit is not functioning. Refrigerator and freezer compartments Fault Possible cause Remedial action Appliance has no longer reaching the selected temperature The freezer compartment door was open too long. Note! Steam may come into contact ...
...(see Changing the bulb") Light switch is frozen solid. The freezer compartment is no longer able to defrost this amount of the appliance, insulate thoroughly and place in the freezer compartment. There is covered in the refrigerator or Temperature has been set too low. The ... of fresh food are being frozen. The refrigerating unit is not functioning. Refrigerator and freezer compartments Fault Possible cause Remedial action Appliance has no longer reaching the selected temperature The freezer compartment door was open too long. Note! Steam may come into contact ...
Installation and Use & Care
Page 18
... container or in the ice cube container but are not being dispensed. Water supply is not level. Limescale from closing properly. The appliance is interrupted. Remedial action Turn tap on . Water and ice dispenser Fault Despite prolonged operating time, ice cubes are not being dispensed.... Ice cubes are jammed in the ice cube container Water dispenser is interrupted. Freezer compartment too warm. Align the appliance with a spirit level and with vinegar and wipe out the trays. Water supply is not functioning. Turn tap on . The flap ...
... container or in the ice cube container but are not being dispensed. Water supply is not level. Limescale from closing properly. The appliance is interrupted. Remedial action Turn tap on . Water and ice dispenser Fault Despite prolonged operating time, ice cubes are not being dispensed.... Ice cubes are jammed in the ice cube container Water dispenser is interrupted. Freezer compartment too warm. Align the appliance with a spirit level and with vinegar and wipe out the trays. Water supply is not functioning. Turn tap on . The flap ...
Installation and Use & Care
Page 19
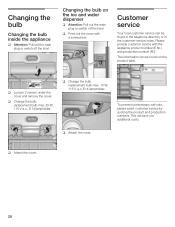
... 20 Please provide customer service with a screwdriver. q Change the bulb. q Attach the cover. q Change the bulb. Changing the bulb Changing the bulb inside the appliance q Attention: Pull out the main plug or switch off the fuse! Changing the bulb on the product label. This will save you additional costs. This... information can be found in the telephone directory or in the customerĆservice index. q Prise out the cover with the appliance product number (E Nr.) and production number (FD). replacement bulb max. 15 W, 115 V a.c.,E14 lampholder.
... 20 Please provide customer service with a screwdriver. q Change the bulb. q Attach the cover. q Change the bulb. Changing the bulb Changing the bulb inside the appliance q Attention: Pull out the main plug or switch off the fuse! Changing the bulb on the product label. This will save you additional costs. This... information can be found in the telephone directory or in the customerĆservice index. q Prise out the cover with the appliance product number (E Nr.) and production number (FD). replacement bulb max. 15 W, 115 V a.c.,E14 lampholder.
Installation and Use & Care
Page 20
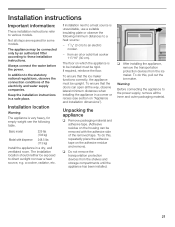
...the inner and outer packaging material. 21 q Do not remove the transportation protection devices from the ice maker. Warning: Before connecting the appliance to direct sunlight nor near a heat source, e.g. The floor on the adhesive residue and remove). Always connect the water before the power...heat source: - 11/4" (3 cm) to an electric cooker. - To do this , repeatedly place the adhesive tape on which the appliance is to the statutory national regulations, observe the connection conditions of the removed tape. Not all the way, observe lateral minimum distances when...
...the inner and outer packaging material. 21 q Do not remove the transportation protection devices from the ice maker. Warning: Before connecting the appliance to direct sunlight nor near a heat source, e.g. The floor on the adhesive residue and remove). Always connect the water before the power...heat source: - 11/4" (3 cm) to an electric cooker. - To do this , repeatedly place the adhesive tape on which the appliance is to the statutory national regulations, observe the connection conditions of the removed tape. Not all the way, observe lateral minimum distances when...
Installation and Use & Care
Page 21
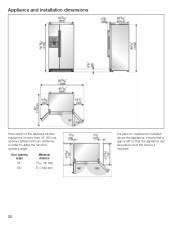
Door opening angle 90 ° 135 ° Minimum distance 19/16" (40 mm) 51/2"(140 mm) 22 If a panel or cupboard is installed above the appliance, ensure that a gap is more than 23" (60 cm), observe lateral minimum distances in order to utilize the full door opening angle. Appliance and installation dimensions If the depth of the adjacent kitchen equipment is left so that the appliance can be pulled out of the recess if required.
Door opening angle 90 ° 135 ° Minimum distance 19/16" (40 mm) 51/2"(140 mm) 22 If a panel or cupboard is installed above the appliance, ensure that a gap is more than 23" (60 cm), observe lateral minimum distances in order to utilize the full door opening angle. Appliance and installation dimensions If the depth of the adjacent kitchen equipment is left so that the appliance can be pulled out of the recess if required.
Installation and Use & Care
Page 22
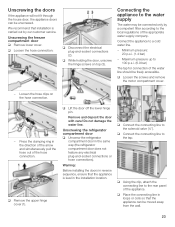
... q Loosen the screws and remove the motor compartment cover. - q Place the connecting line in loops or coils so that the appliance can be connected only by our customer service. q Loosen the hose connection: q Disconnect the electrical plugĆandĆsocket connections (2). Connect ...Loosen the hose clips on top (3). Warning: Before installing the doors in the direction of the arrow and simultaneously pull the hose out of the appliance. q Lift the door off the lower hinge pin. Unscrewing the freezer compartment door q Remove lower cover. q Using the clip, attach the...
... q Loosen the screws and remove the motor compartment cover. - q Place the connecting line in loops or coils so that the appliance can be connected only by our customer service. q Loosen the hose connection: q Disconnect the electrical plugĆandĆsocket connections (2). Connect ...Loosen the hose clips on top (3). Warning: Before installing the doors in the direction of the arrow and simultaneously pull the hose out of the appliance. q Lift the door off the lower hinge pin. Unscrewing the freezer compartment door q Remove lower cover. q Using the clip, attach the...