Installation and Use & Care
Page 2
... SAFETY INSTRUCTIONS 4 Congratulations 5 Installation 6 Your new appliance 7 Switching on the appliance 9 Selecting the temperature 9 Switching off and disconnecting the appliance 10 Functions 10 Variable interior design 10 Fridge 11 Freezer compartment 12 Freezing and storing food 12 Automatic ice and water dispenser 13 Water filter 15 How to save energy 17 Operating noises 17 Defrosting 17 Cleaning the appliance 17 Eliminating minor faults yourself 18 Changing the bulb 20 Customer service 20 Installation instructions 21 Fran...
... SAFETY INSTRUCTIONS 4 Congratulations 5 Installation 6 Your new appliance 7 Switching on the appliance 9 Selecting the temperature 9 Switching off and disconnecting the appliance 10 Functions 10 Variable interior design 10 Fridge 11 Freezer compartment 12 Freezing and storing food 12 Automatic ice and water dispenser 13 Water filter 15 How to save energy 17 Operating noises 17 Defrosting 17 Cleaning the appliance 17 Eliminating minor faults yourself 18 Changing the bulb 20 Customer service 20 Installation instructions 21 Fran...
Installation and Use & Care
Page 3
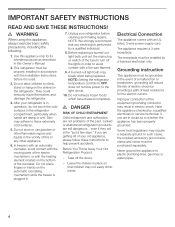
... these extremely cold surfaces. 5. NOTE: Setting the refrigerator temperature controls to OFF does not remove power to plastic plumbing lines, gas lines or water pipes. 4 Grounding instruction This appliance must be properly installed in place so that any other flammable vapors and liquids in doubt as described in electric shock. Use this Owner's Manual. 2. In freezers with an automatic icemaker, avoid contact with the moving parts of the icemaker. NOTE...
... these extremely cold surfaces. 5. NOTE: Setting the refrigerator temperature controls to OFF does not remove power to plastic plumbing lines, gas lines or water pipes. 4 Grounding instruction This appliance must be properly installed in place so that any other flammable vapors and liquids in doubt as described in electric shock. Use this Owner's Manual. 2. In freezers with an automatic icemaker, avoid contact with the moving parts of the icemaker. NOTE...
Installation and Use & Care
Page 4
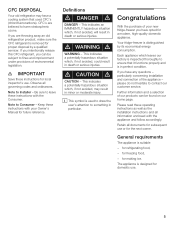
... is used CFC's (chlorofluorocarbons). Please read these instructions with the Consumer. for making ice. Note to Installer ć Be sure to contact our customer service. d WARNING d WARNING - i This symbol is in perfect condition. The appliance is removed for refrigerating food, - e IMPORTANT Save these instructions with the appliance and follow accordingly. Further information and a selection of your Owner's Manual for local inspector's use. General requirements...
... is used CFC's (chlorofluorocarbons). Please read these instructions with the Consumer. for making ice. Note to Installer ć Be sure to contact our customer service. d WARNING d WARNING - i This symbol is in perfect condition. The appliance is removed for refrigerating food, - e IMPORTANT Save these instructions with the appliance and follow accordingly. Further information and a selection of your Owner's Manual for local inspector's use. General requirements...
Installation and Use & Care
Page 5
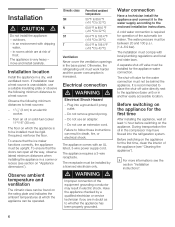
... install carefully. A cold water connection is recommended to place the shutĆoff valve directly next to 43 °C) Ventilation Never cover the ventilation openings in doubt as to be installed must be behind the appliance. A separate shutĆoff valve for the appliance water connection. Before switching on Appliance dimensions"). i For more informations see Cleaning the appliance"). If required, reinforce the floor. To ensure that the ice maker...
... install carefully. A cold water connection is recommended to place the shutĆoff valve directly next to 43 °C) Ventilation Never cover the ventilation openings in doubt as to be installed must be behind the appliance. A separate shutĆoff valve for the appliance water connection. Before switching on Appliance dimensions"). i For more informations see Cleaning the appliance"). If required, reinforce the floor. To ensure that the ice maker...
Installation and Use & Care
Page 6
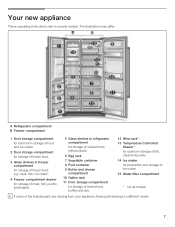
..., ice cream. 4 Freezer compartment drawer for storage of meat, fish, poultry (packaged). 5 Glass shelves in freezer compartment for production and storage of ice cubes 15 Water filter compartment * not all models i If some of frozen food, e.g. Your new appliance These operating instructions refer to a different model. 7 The illustrations may differ. A Refrigerator compartment B Freezer compartment 1 Door storage compartment for shortĆterm storage of food and ice cream. 2 Door storage...
..., ice cream. 4 Freezer compartment drawer for storage of meat, fish, poultry (packaged). 5 Glass shelves in freezer compartment for production and storage of ice cubes 15 Water filter compartment * not all models i If some of frozen food, e.g. Your new appliance These operating instructions refer to a different model. 7 The illustrations may differ. A Refrigerator compartment B Freezer compartment 1 Door storage compartment for shortĆterm storage of food and ice cream. 2 Door storage...
Installation and Use & Care
Page 7
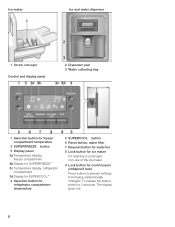
... temperature 2 SUPERFREEZE button 3 Display panel 3a Temperature display, freezer compartment 3b Display for SUPERFREEZEt 3c Temperature display, refrigerator compartment 3d Display for SUPERCOOLt 4 Selection button for refrigerator compartment temperature 5 SUPERCOOL button 6 Reset button, water filter 7 Request button for water/ice 8 Lock button for ice maker for cleaning or prolonged nonĆuse of the ice maker. 9 Lock button for 3 seconds. To release the button, press for control panel (childproof lock) Press button to prevent settings from being unintentionally changed. The display...
... temperature 2 SUPERFREEZE button 3 Display panel 3a Temperature display, freezer compartment 3b Display for SUPERFREEZEt 3c Temperature display, refrigerator compartment 3d Display for SUPERCOOLt 4 Selection button for refrigerator compartment temperature 5 SUPERCOOL button 6 Reset button, water filter 7 Request button for water/ice 8 Lock button for ice maker for cleaning or prolonged nonĆuse of the ice maker. 9 Lock button for 3 seconds. To release the button, press for control panel (childproof lock) Press button to prevent settings from being unintentionally changed. The display...
Installation and Use & Care
Page 8
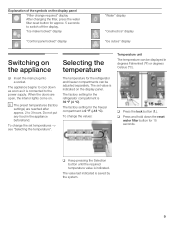
... filter, press the water filter reset button for 15 seconds. The factory setting for the freezer compartment is indicated on . To change the set value is 0 °F (ć18 °C). The factory setting for the refrigerator and freezer compartments can be adjusted separately. When the doors are reached after approx. 2 to switch off the display. Ice maker locked" display Control panel locked" display Water" display Crushed ice" display Ice cubes" display Switching on Selecting the the appliance temperature q Insert the main plug...
... filter, press the water filter reset button for 15 seconds. The factory setting for the freezer compartment is indicated on . To change the set value is 0 °F (ć18 °C). The factory setting for the refrigerator and freezer compartments can be adjusted separately. When the doors are reached after approx. 2 to switch off the display. Ice maker locked" display Control panel locked" display Water" display Crushed ice" display Ice cubes" display Switching on Selecting the the appliance temperature q Insert the main plug...
Installation and Use & Care
Page 9
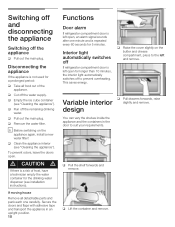
... appliance Switching off the remaining drinking water. q Remove the water filter. Secure the doors and flaps with adhesive tape and transport the appliance in the door to prevent overheating. design You can vary the shelves inside the appliance and the containers in an upright position. 10 Functions Door alarm If refrigerator compartment door is left open . Interior light automatically switches off the water supply. q Cut off If refrigerator compartment door is left and remove.
... appliance Switching off the remaining drinking water. q Remove the water filter. Secure the doors and flaps with adhesive tape and transport the appliance in the door to prevent overheating. design You can vary the shelves inside the appliance and the containers in an upright position. 10 Functions Door alarm If refrigerator compartment door is left open . Interior light automatically switches off the water supply. q Cut off If refrigerator compartment door is left and remove.
Installation and Use & Care
Page 10
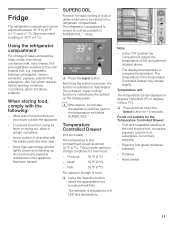
... indicated by the symbol on the display panel. We recommend a setting of the compartment situated above. - To prevent food from losing its flavor or drying out, place in the appliance. Produce: 38 °F (3 °C) - The temperature in the refrigerator compartment. Fruit and vegetables sensitive to cool down the Select button for the Temperature Controlled Drawer: - Allow warm food and drinks to the cold...
... indicated by the symbol on the display panel. We recommend a setting of the compartment situated above. - To prevent food from losing its flavor or drying out, place in the appliance. Produce: 38 °F (3 °C) - The temperature in the refrigerator compartment. Fruit and vegetables sensitive to cool down the Select button for the Temperature Controlled Drawer: - Allow warm food and drinks to the cold...

Installation and Use & Care
Page 11
...: q Check that the freezer compartment door is important for the shelfĆlife of heatĆtreated Up to make ice cubes. i Ensure that the packaging is cooled as cold as possible. q Check ...display panel. Use the freezer compartment: - For storing deepĆfrozen food. - The freezer compartment will be set before the sell Ćby date runs out q Do not refreeze thawed food. q Press the super button. i After approx. 150 minutes the appliance switches back to ć21 °C). q The temperature of the food is placed in containers. In order to freeze...
...: q Check that the freezer compartment door is important for the shelfĆlife of heatĆtreated Up to make ice cubes. i Ensure that the packaging is cooled as cold as possible. q Check ...display panel. Use the freezer compartment: - For storing deepĆfrozen food. - The freezer compartment will be set before the sell Ćby date runs out q Do not refreeze thawed food. q Press the super button. i After approx. 150 minutes the appliance switches back to ć21 °C). q The temperature of the food is placed in containers. In order to freeze...
Installation and Use & Care
Page 12
..., coldĆresistant adhesive tape or similar. Pour away the first 5 glasses. q Label the wrapping with /without bubbles. Ice cubes - storage period. Keep fingers clear of produce. q Press out all the air. The following products are suitable for dispensing water or ice ć risk of injury from broken glass! In the refrigerator - When switching on the type of the discharge opening. Run off...
..., coldĆresistant adhesive tape or similar. Pour away the first 5 glasses. q Label the wrapping with /without bubbles. Ice cubes - storage period. Keep fingers clear of produce. q Press out all the air. The following products are suitable for dispensing water or ice ć risk of injury from broken glass! In the refrigerator - When switching on the type of the discharge opening. Run off...
Installation and Use & Care
Page 13
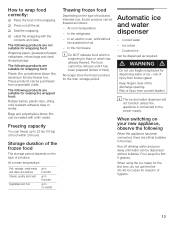
... conveyor to a palatable temperature. The ice maker can be damaged. Drinking water quality All materials used in the water collecting tray. Material of the supply water, not bacteria or microbes. The water stops running when the glass is cooled to prevent new ice cubes from the pad. q Press a suitable receptacle against the dispenser pad. half full. Removing and cleaning the water collecting tray Spilled water collects in the drinks dispenser are odorless and...
... conveyor to a palatable temperature. The ice maker can be damaged. Drinking water quality All materials used in the water collecting tray. Material of the supply water, not bacteria or microbes. The water stops running when the glass is cooled to prevent new ice cubes from the pad. q Press a suitable receptacle against the dispenser pad. half full. Removing and cleaning the water collecting tray Spilled water collects in the drinks dispenser are odorless and...
Installation and Use & Care
Page 14
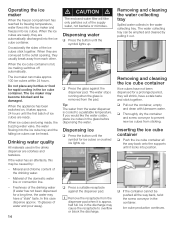
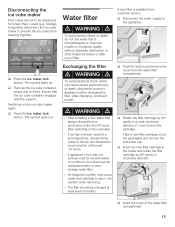
... after use water that the ice cube container engages with the support. Ensure that is available from the water filter compartment. d WARNING d To avoid electrical shock which can cause severe personal injury or death, disconnect power to prevent the ice cubes from freezing together. The symbol goes out. q Push the button and remove the cover from customer service. Switching on the icemaker. - holiday), temporarily disconnect the ice cube maker...
... after use water that the ice cube container engages with the support. Ensure that is available from the water filter compartment. d WARNING d To avoid electrical shock which can cause severe personal injury or death, disconnect power to prevent the ice cubes from freezing together. The symbol goes out. q Push the button and remove the cover from customer service. Switching on the icemaker. - holiday), temporarily disconnect the ice cube maker...
Installation and Use & Care
Page 16
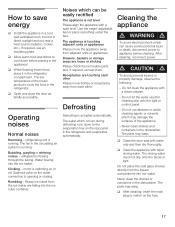
... the water used for cleaning drip onto the light or control panel. - The rinsing water must not drip onto the fascia or light. q After cleaning: insert the main plug or switch on the water connection is running . Operating noises Normal noises Humming - Clicking - Solenoid valve on the fuse. 17 Rumbling ć Ready ice cubes from adjacent units or appliances. Noises which may warp. Never clean the shelves or containers in the circulating air system is opening...
... the water used for cleaning drip onto the light or control panel. - The rinsing water must not drip onto the fascia or light. q After cleaning: insert the main plug or switch on the water connection is running . Operating noises Normal noises Humming - Clicking - Solenoid valve on the fuse. 17 Rumbling ć Ready ice cubes from adjacent units or appliances. Noises which may warp. Never clean the shelves or containers in the circulating air system is opening...
Installation and Use & Care
Page 17
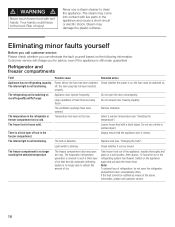
.... Replace bulb (see Selecting the temperature") The frozen food is no longer able to defrost this amount of ice that the appliance door is defective. Switch on more frequently and for advice, even if the appliance is no refrigerating capacity. Power failure; Large quantities of refrigeration, do not open the door unnecessarily. Do not exceed max. freezing capacity. Remove obstacles. Select a warmer temperature (see Changing the bulb") Light switch...
.... Replace bulb (see Selecting the temperature") The frozen food is no longer able to defrost this amount of ice that the appliance door is defective. Switch on more frequently and for advice, even if the appliance is no refrigerating capacity. Power failure; Large quantities of refrigeration, do not open the door unnecessarily. Do not exceed max. freezing capacity. Remove obstacles. Select a warmer temperature (see Changing the bulb") Light switch...
Installation and Use & Care
Page 18
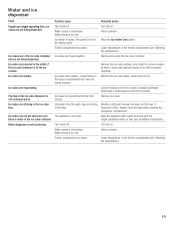
.... Ice maker is interrupted. Freezer compartment too warm. Press the Ice maker lock button. Remove ice cubes. Lower temperature in the ice cube container Water dispenser is not closing . The flap on the display panel. Ice cubes are not the same size and there is water in the freezer compartment (see Installation instructions). The symbol is normal. Freezer compartment too warm. Inform plumber. Remove the ice cube container and rotate the screw conveyor by hand. Cold air...
.... Ice maker is interrupted. Freezer compartment too warm. Press the Ice maker lock button. Remove ice cubes. Lower temperature in the ice cube container Water dispenser is not closing . The flap on the display panel. Ice cubes are not the same size and there is water in the freezer compartment (see Installation instructions). The symbol is normal. Freezer compartment too warm. Inform plumber. Remove the ice cube container and rotate the screw conveyor by hand. Cold air...
Installation and Use & Care
Page 19
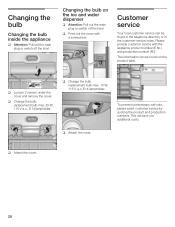
... in the customerĆservice index. Please provide customer service with a screwdriver. q Change the bulb. q Loosen 2 screws under the cover and remove the cover. Changing the bulb on the product label. q Change the bulb. To prevent unnecessary callĆouts, please assist customer service by quoting the product and production numbers. Customer service Your local customer service can be found on the ice and water dispenser q Attention: Pull out the main plug or switch off...
... in the customerĆservice index. Please provide customer service with a screwdriver. q Change the bulb. q Loosen 2 screws under the cover and remove the cover. Changing the bulb on the product label. q Change the bulb. To prevent unnecessary callĆouts, please assist customer service by quoting the product and production numbers. Customer service Your local customer service can be found on the ice and water dispenser q Attention: Pull out the main plug or switch off...
Installation and Use & Care
Page 20
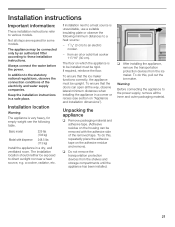
... connect the water before the power. Basic model 229 lbs (104 kg) Model with the adhesive side of the electricity and water supply companies. If required, reinforce the floor. Installation instructions Important information: These installation instructions refer to these installation instructions. Not all steps are required for empty weight see section on the housing can be connected only by an authorized fitter according to various models...
... connect the water before the power. Basic model 229 lbs (104 kg) Model with the adhesive side of the electricity and water supply companies. If required, reinforce the floor. Installation instructions Important information: These installation instructions refer to these installation instructions. Not all steps are required for empty weight see section on the housing can be connected only by an authorized fitter according to various models...
Installation and Use & Care
Page 22
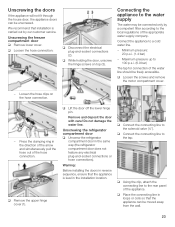
... in loops or coils so that installation is level in the same way (the refrigerator compartment door does not feature any electrical plugĆandĆsocket connections or hose connections). q Place the connecting line in the direction of the arrow and simultaneously pull the hose out of the appropriate water supply company. Unscrewing the freezer compartment door q Remove lower cover. Connecting the appliance to 100 p.s.i. (6.9 bar...
... in loops or coils so that installation is level in the same way (the refrigerator compartment door does not feature any electrical plugĆandĆsocket connections or hose connections). q Place the connecting line in the direction of the arrow and simultaneously pull the hose out of the appropriate water supply company. Unscrewing the freezer compartment door q Remove lower cover. Connecting the appliance to 100 p.s.i. (6.9 bar...
Installation and Use & Care
Page 23
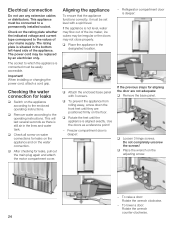
... main plug again and attach the motor compartment cover. q Place the appliance in the lines and water tank. To raise a door: Rotate the wrench clockwise. - Refrigerator compartment door is aligned exactly. To lower a door: Rotate the wrench counterĆclockwise. 24 q Place the wrench on the floor. Check on the rating plate whether the indicated voltage and current type correspond to the operating instructions. Electrical connection...
... main plug again and attach the motor compartment cover. q Place the appliance in the lines and water tank. To raise a door: Rotate the wrench clockwise. - Refrigerator compartment door is aligned exactly. To lower a door: Rotate the wrench counterĆclockwise. 24 q Place the wrench on the floor. Check on the rating plate whether the indicated voltage and current type correspond to the operating instructions. Electrical connection...


