Bosch B24IR70SRS Support and Manuals
Get Help and Manuals for this Bosch item
View All Support Options Below
Free Bosch B24IR70SRS manuals!
Problems with Bosch B24IR70SRS?
Ask a Question
Free Bosch B24IR70SRS manuals!
Problems with Bosch B24IR70SRS?
Ask a Question
Popular Bosch B24IR70SRS Manual Pages
Installation Instructions - Page 3

... 7 Base 7
Connecting the power 8 Additional grounding procedure 8 Grounding instruction 8
Connecting the water 8 Installation dimensions 9
Single installation 9 SideĆbyĆSide installation 10 Water connection 11 Appliance dimensions 12 1. 18" Appliance (Freezer/Freezer with Ice and Water dispenser 12 2. 18" Appliance (Wine unit 13 3. 24" Appliance (Refrigerator/Freezer/Freezer...
Installation Instructions - Page 5
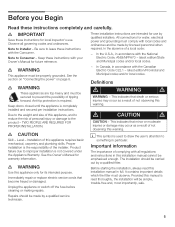
... instructions in accordance with local codes and ordinances and be made by a qualified service technician.
5 Keep doors closed until the appliance is required. Proper installation is not covered under the Appliance Warranty.
Unplug the appliance or switch off the fuse before cleaning or making repairs.
- This indicates that become frayed or damaged. Provided this installation manual...
Installation Instructions - Page 7

... ensure that the appliance is screwed securely to direct sunlight and not placed near a heat source, such as the rest of toe kick panel must be 5/8" (16 mm).
A thickness of a fully loaded appliance, a loadĆbearing base is important to observe the specified dimensions of the installation cavity for a troubleĆfree installation of the cavity...
Installation Instructions - Page 8
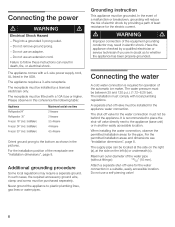
... or service technician if you are in a suitable, easily accessible location.
The shutĆoff valve for the electric current. Do not use an adapter.
- Connecting the power2. The appliance requires a 3Ćwire receptacle.
Never ground the appliance to follow these instructions can be grounded. d
WARNING
d
Improper connection of the receptacle see Installation dimensions...
Installation Instructions - Page 9
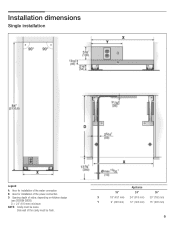
Legend:
A Area for installation of the water connection B Area for installation of the power connection D Opening depth of the cavity must be flush. Appliance
18"
24"
30"
X
18" (457 mm) 24 (610 mm) 30" (762 mm)
Y
9" (229 mm) 12" (305 mm) 15" (381 mm)
9
Side wall of niche, depending on kitchen design
(see DESIGN GUIDE) D = 24" (610 mm) minimum...
Installation Instructions - Page 10
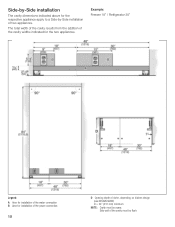
... for installation of the power connection
10
D Opening depth of niche, depending on kitchen design (see DESIGN GUIDE) D = 24" (610 mm) minimum
NOTE: Cavity must be suare. Side wall of the cavity must be flush. The total width of the cavity results from the addition of the cavity widths indicated for the respective appliance apply...
Installation Instructions - Page 18
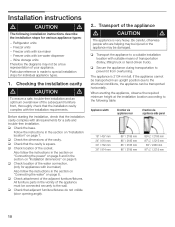
... securely to the following installation instructions describe the installation steps for a safe and troubleĆfree installation.
Checking the installation cavity
d
CAUTION
d
To ensure a safe, troubleĆfree installation and an optimum overall view of transportation (trolley, lifting truck or handĆdriven truck). q Check location of your appliance. Particular...
Installation Instructions - Page 32

...in the appliance with weights in order to ensure that the gap width is the most important means of
adjusting the furniture front. i Using the positioning aid, set both ...furniture door parallel. Recommendations:
18" Appliance 22 lbs / 10 kg
24" Appliance 33 lbs / 15 kg
30" Appliance 44 lbs / 20 kg
q Unscrew the installation support part from customer service as possible. i If only one...
Use & Care Manual - Page 3
... 5 Your new appliance 6 Installation 7 Installing and connecting the appliance 7 Connection to the power supply 7 Additional grounding procedure 8 Grounding instruction 8 Switching on the appliance 8 Switching off and disconnecting the appliance 8 Functions 8 Variable interior design 9 Control panel 10 Setting the temperature 11 Super function 11 Setup mode 11 Settings which can be...
Use & Care Manual - Page 4
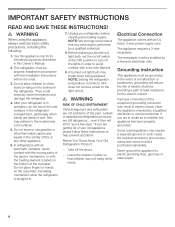
... purpose as to avoid contact with the Installation Instructions before cleaning and making repairs. The receptacle must be installed by a qualified electrician or service technician if you are in doubt as described in electric shock. Some local regulations may break when being replaced. This refrigerator must be properly installed in the refrigerator. They could seriously injure...
Use & Care Manual - Page 7
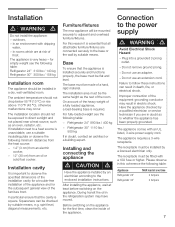
.... The installation location should not drop below 55 °F (13 °C) or rise above 110 °F (43 °C), otherwise malfunctions may have moved.
Furniture/fixtures
The new appliance will be exposed to the power supply
d WARNING d
Avoid Electrical Shock Hazard
- Refrigerator 24" 890 lbs / 400 kg
- The ambient temperature should not be mounted securely to...
Use & Care Manual - Page 11
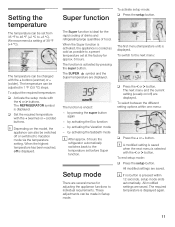
...the + buttons (warmer) or ć (colder).
The next menu and the current setting (usually on the model, the appliance can be changed with the < or > button.
The first menu (temperature unit) ... setting. The temperature can be made in 1 °F (0.5 °C) steps.
The function is displayed again.
11 To end setup mode: q Press the setup button. All modified settings are...
Use & Care Manual - Page 14
... level
Level the appliance with the on the base panel. Receptacles are touching each other
Move bottles or receptacles away from each other. After cleaning, reconnect power. Do not let.... Install the appliance in the dishwasher. The parts may damage the surfaces of the appliance.
-
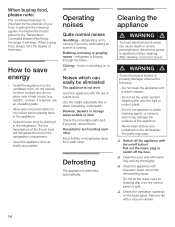
How to direct sunlight and do not expose to save energy
- Allow warm food and drinks to appliance before...
Use & Care Manual - Page 15
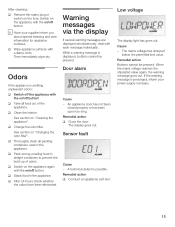
... has not been
closed properly or has been open too long.
While a warning message is emitting unpleasant odors:
q Switch off the appliance with the on Changing the odor filter".
q After 24 hours check whether the odors have been eliminated. When the mains voltage reaches the stipulated value again, the warning message goes out...
Use & Care Manual - Page 16
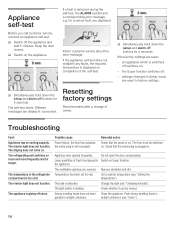
... the selfĆtest, the ALARM symbol and a corresponding error message, e.g. The selfĆtest starts. The display does not come on the appliance.
the fuse has actuated; Check that the power is too cold.
Temperature has been set too low.
q Simultaneously hold down the setup and alarm off odors. The interior light does not...
Bosch B24IR70SRS Reviews
We have not received any reviews for Bosch yet.