Warranty
Page 1
If you need information about repairs or replacement parts, or if you have questions about your area. LIMITED THREE YEAR WARRANTY Subject to state. ET Saturday 9 a.m. - 8 p.m. Some states do not send original.) If you need additional instructions regarding what it may cover, please contact BISSELL Consumer Services by E-mail, telephone, or regular mail as filters, bags, belts, or brushes. This warranty applies to locate a BISSELL Authorized Service Center...
If you need information about repairs or replacement parts, or if you have questions about your area. LIMITED THREE YEAR WARRANTY Subject to state. ET Saturday 9 a.m. - 8 p.m. Some states do not send original.) If you need additional instructions regarding what it may cover, please contact BISSELL Consumer Services by E-mail, telephone, or regular mail as filters, bags, belts, or brushes. This warranty applies to locate a BISSELL Authorized Service Center...
User Guide
Page 1
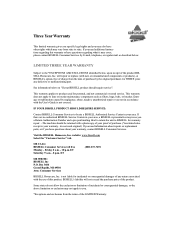
See details on back page USER'S GUIDE 62X5 SERIES 2 Thank You 3 Safety Instructions 4 Product View 5 Assembly 6-8 Operations 8-12 Maintenance and Care 13 Troubleshooting 14 Replacement Parts 14 Accessories 15 Warranty 16 Consumer Services Earn BISSELL Rewards! Register your product today!
See details on back page USER'S GUIDE 62X5 SERIES 2 Thank You 3 Safety Instructions 4 Product View 5 Assembly 6-8 Operations 8-12 Maintenance and Care 13 Troubleshooting 14 Replacement Parts 14 Accessories 15 Warranty 16 Consumer Services Earn BISSELL Rewards! Register your product today!

User Guide
Page 2
....7691 Thanks for buying a BISSELL vacuum We're glad you 'll receive fast, considerate assistance. Thanks again, from all of high quality homecare products like your BISSELL vacuum. We also stand behind it with a knowledgeable, dedicated Consumer Services department, so, should you ever have a problem, you purchased a BISSELL vacuum. Everything we back it with a limited three year warranty. Your BISSELL vacuum is a global...
....7691 Thanks for buying a BISSELL vacuum We're glad you 'll receive fast, considerate assistance. Thanks again, from all of high quality homecare products like your BISSELL vacuum. We also stand behind it with a knowledgeable, dedicated Consumer Services department, so, should you ever have a problem, you purchased a BISSELL vacuum. Everything we back it with a limited three year warranty. Your BISSELL vacuum is a global...
User Guide
Page 3
... maintenance. This model is wider than described in use as a toy. ■ Close attention is running. ■ Hold plug when rewinding onto cord reel. Keep cord away from outlet when not in this appliance has a polarized plug (one way. keep openings free of dust, lint, hair, and anything that may reduce air flow. ■ Keep hair, loose clothing, fingers, and all controls before plugging or unplugging vacuum cleaner. ■ Use...
... maintenance. This model is wider than described in use as a toy. ■ Close attention is running. ■ Hold plug when rewinding onto cord reel. Keep cord away from outlet when not in this appliance has a polarized plug (one way. keep openings free of dust, lint, hair, and anything that may reduce air flow. ■ Keep hair, loose clothing, fingers, and all controls before plugging or unplugging vacuum cleaner. ■ Use...
User Guide
Page 4
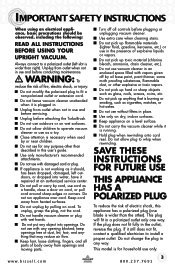
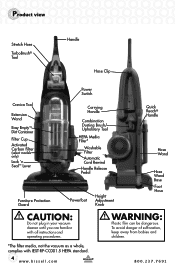
... film can be dangerous. Product view Stretch Hose TurboBrush® Tool Handle Hose Clip Power Switch Crevice Tool Extension Wand Easy Empty™ Dirt Container Filter Cup Activated Carbon Filter (select models only) Lock 'n Seal™ Lever Carrying Handle Combination Dusting Brush/ Upholstery Tool HEPA Media Filter* Washable Filter Automatic Cord Rewind Handle Release Pedal Furniture Protection Guard Powerfoot Height Adjustment Knob Quick Reach® Handle Hose Wand Hose Wand Base Foot Hose caution: Do not plug in your vacuum cleaner until you are familiar with...
... film can be dangerous. Product view Stretch Hose TurboBrush® Tool Handle Hose Clip Power Switch Crevice Tool Extension Wand Easy Empty™ Dirt Container Filter Cup Activated Carbon Filter (select models only) Lock 'n Seal™ Lever Carrying Handle Combination Dusting Brush/ Upholstery Tool HEPA Media Filter* Washable Filter Automatic Cord Rewind Handle Release Pedal Furniture Protection Guard Powerfoot Height Adjustment Knob Quick Reach® Handle Hose Wand Hose Wand Base Foot Hose caution: Do not plug in your vacuum cleaner until you are familiar with...

User Guide
Page 5
... wand and crevice tool together into the existing hole. Attach the TurboBrush Tool by lining up tabs on handle. 3. Assembly You need: Phillips head screwdriver. 2. www.bissell.com 5 800.237.7691 Attach handle to snap into the hose wand base. Turn the hose to the right to be sure the handle is flush. 4. Check to lock into the grooves at the top of the vacuum body. 4. 3. Stand the vacuum upright...
... wand and crevice tool together into the existing hole. Attach the TurboBrush Tool by lining up tabs on handle. 3. Assembly You need: Phillips head screwdriver. 2. www.bissell.com 5 800.237.7691 Attach handle to snap into the hose wand base. Turn the hose to the right to be sure the handle is flush. 4. Check to lock into the grooves at the top of the vacuum body. 4. 3. Stand the vacuum upright...
User Guide
Page 6
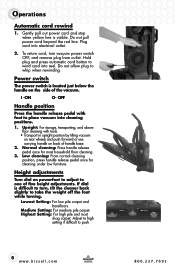
To return cord, turn , tilt the cleaner back slightly to whip when rewinding. I -ON O- Highest Setting: For high pile and most household floor cleaning. 3. Normal cleaning: Press handle release pedal once for cleaning under low furniture. If dial is difficult to turn vacuum power switch OFF, and remove plug from outlet. Medium Setting: For medium pile carpet. Operations Automatic cord rewind 1. Gently pull out power cord and stop when yellow line is located just below the handle on the side...
To return cord, turn , tilt the cleaner back slightly to whip when rewinding. I -ON O- Highest Setting: For high pile and most household floor cleaning. 3. Normal cleaning: Press handle release pedal once for cleaning under low furniture. If dial is difficult to turn vacuum power switch OFF, and remove plug from outlet. Medium Setting: For medium pile carpet. Operations Automatic cord rewind 1. Gently pull out power cord and stop when yellow line is located just below the handle on the side...
User Guide
Page 7
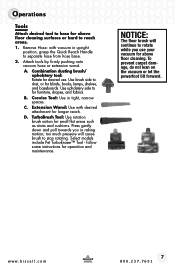
... models include Pet TurboEraser™ Tool - www.bissell.com 7 800.237.7691 Combination dusting brush/ upholstery tool: Rotate for desired use your vacuum for above floor cleaning surfaces or hard to separate hose from hose base. 2. Extension Wand: Use with vacuum in tight, narrow spaces. Attach tools by firmly pushing onto vacuum hose or extension wand. Remove Hose: with desired attachment for longer reach. Operations Tools Attach desired tool to hose for above floor cleaning. TurboBrush Tool: Use rotation brush action for operation and maintenance. Press...
... models include Pet TurboEraser™ Tool - www.bissell.com 7 800.237.7691 Combination dusting brush/ upholstery tool: Rotate for desired use your vacuum for above floor cleaning surfaces or hard to separate hose from hose base. 2. Extension Wand: Use with vacuum in tight, narrow spaces. Attach tools by firmly pushing onto vacuum hose or extension wand. Remove Hose: with desired attachment for longer reach. Operations Tools Attach desired tool to hose for above floor cleaning. TurboBrush Tool: Use rotation brush action for operation and maintenance. Press...
User Guide
Page 8
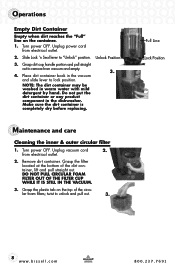
....bissell.com 800.237.7691 Maintenance and care Cleaning the inner & outer circular filter 1. twist to "Unlock" position. Grasp dirt cup handle portion and pull straight out to lock position. lar foam filters; Unlock Position 3. Grasp the filter located at the bottom of the circu- Turn power OFF. Remove dirt container. Make sure the dirt container is completely dry before replacing. from electrical outlet. 2. Operations Empty Dirt Container Empty when dirt...
....bissell.com 800.237.7691 Maintenance and care Cleaning the inner & outer circular filter 1. twist to "Unlock" position. Grasp dirt cup handle portion and pull straight out to lock position. lar foam filters; Unlock Position 3. Grasp the filter located at the bottom of the circu- Turn power OFF. Remove dirt container. Make sure the dirt container is completely dry before replacing. from electrical outlet. 2. Operations Empty Dirt Container Empty when dirt...
User Guide
Page 9
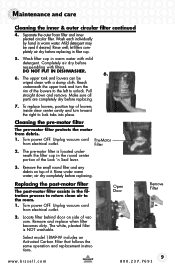
Rinse well; Wash filter cup in filter cup. 5. To replace louvers, position top of louvers inside clear center cavity and turn the rim of vacuum. Turn power OFF. Turn power OFF. Maintenance and care Cleaning the inner & outer circular filter continued 4. Completely air dry before replacing in warm water with mild detergent. Unplug vacuum cord Pre-Motor from debris. 1. Rinse under warm water; Open Door Remove Filter 2. Remove and replace when filter becomes dirty. let filters completely air dry before reassembling with a damp...
Rinse well; Wash filter cup in filter cup. 5. To replace louvers, position top of louvers inside clear center cavity and turn the rim of vacuum. Turn power OFF. Turn power OFF. Maintenance and care Cleaning the inner & outer circular filter continued 4. Completely air dry before replacing in warm water with mild detergent. Unplug vacuum cord Pre-Motor from debris. 1. Rinse under warm water; Open Door Remove Filter 2. Remove and replace when filter becomes dirty. let filters completely air dry before reassembling with a damp...
User Guide
Page 10
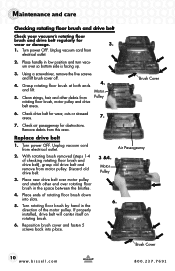
.... 4. Remove debris from electrical outlet. 2. Turn power OFF. Turn rotating floor brush by hand in low position and turn vacuum over so bottom side is facing up. 3. Check air passageway for wear or damage. 3. 1. Place ends of rotating floor brush down into place. If properly installed, drive belt will center itself on rotating brush. 6. Reposition brush cover and fasten 5 screws back into slots. 5. Maintenance and care Checking rotating floor brush and drive belt Check your vacuum's rotating floor brush and drive belt...
.... 4. Remove debris from electrical outlet. 2. Turn power OFF. Turn rotating floor brush by hand in low position and turn vacuum over so bottom side is facing up. 3. Check air passageway for wear or damage. 3. 1. Place ends of rotating floor brush down into place. If properly installed, drive belt will center itself on rotating brush. 6. Reposition brush cover and fasten 5 screws back into slots. 5. Maintenance and care Checking rotating floor brush and drive belt Check your vacuum's rotating floor brush and drive belt...
User Guide
Page 11
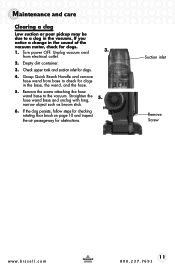
....7691 Turn power OFF. Remove the screw attaching the hose wand base to a clog in the vacuum. Maintenance and care Clearing a clog Low suction or poor pickup may be due to the vacuum. Unplug vacuum cord from base to check for clogs in the sound of the vacuum motor, check for clogs. 1. Empty dirt container. 3. Straighten the hose wand base and unclog with long, narrow object such as broom stick. 6. If you notice a change in...
....7691 Turn power OFF. Remove the screw attaching the hose wand base to a clog in the vacuum. Maintenance and care Clearing a clog Low suction or poor pickup may be due to the vacuum. Unplug vacuum cord from base to check for clogs in the sound of the vacuum motor, check for clogs. 1. Empty dirt container. 3. Straighten the hose wand base and unclog with long, narrow object such as broom stick. 6. If you notice a change in...
User Guide
Page 12
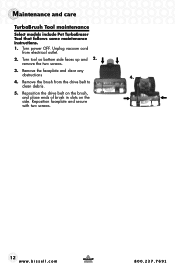
Remove the faceplate and clear any obstructions 4. 4. Remove the brush from electrical outlet. 2. Reposition faceplate and secure with two screws. 12 www.bissell.com 800.237.7691 Turn power OFF. Unplug vacuum cord from the drive belt to clean debris. 5. remove the two screws. 3. Turn tool so bottom side faces up and 2. Reposition the drive belt on the brush, and place ends of brush in slots on the side. Maintenance and care TurboBrush Tool maintenance Select models include Pet TurboEraser Tool that follows same maintenance instructions. 1.
Remove the faceplate and clear any obstructions 4. 4. Remove the brush from electrical outlet. 2. Reposition faceplate and secure with two screws. 12 www.bissell.com 800.237.7691 Turn power OFF. Unplug vacuum cord from the drive belt to clean debris. 5. remove the two screws. 3. Turn tool so bottom side faces up and 2. Reposition the drive belt on the brush, and place ends of brush in slots on the side. Maintenance and care TurboBrush Tool maintenance Select models include Pet TurboEraser Tool that follows same maintenance instructions. 1.
User Guide
Page 13
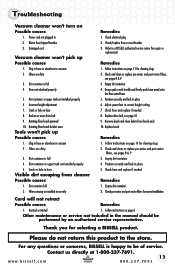
... 1. Troubleshooting Vacuum cleaner won't turn on page 6 Other maintenance or service not included in place 5. Check/replace fuse or reset breaker 3. Dirt container is happy to a BISSELL authorized service center for repair or replacement Vacuum cleaner won 't pick up Possible causes Remedies 1. Hose not attached properly 4. Grasp quick reach handle and firmly push hose wand onto the hose wand base 5. Dirt container or upper tank not installed properly 5. Crack or hole in vacuum 1. Replace drive belt, see page 10 9. Clog in hose or...
... 1. Troubleshooting Vacuum cleaner won't turn on page 6 Other maintenance or service not included in place 5. Check/replace fuse or reset breaker 3. Dirt container is happy to a BISSELL authorized service center for repair or replacement Vacuum cleaner won 't pick up Possible causes Remedies 1. Hose not attached properly 4. Grasp quick reach handle and firmly push hose wand onto the hose wand base 5. Dirt container or upper tank not installed properly 5. Crack or hole in vacuum 1. Replace drive belt, see page 10 9. Clog in hose or...
User Guide
Page 14
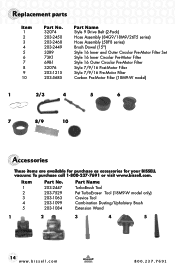
... 203-5685 Part Name Style 9 Drive Belt (2-Pack) Hose Assembly (84G9/18M9/26T5 series) Hose Assembly (58F8 series) Brush Dowel (15") Style 16 Inner and Outer Circular Pre-Motor Filter Set Style 16 Inner Circular Pre-Motor Filter Style 16 Outer Circular Pre-Motor Filter Style 7/9/16 Post-Motor Filter Style 7/9/16 Pre-Motor Filter Carbon Pre-Motor Filter (18M9-W model) 1 2/3 4 5 6 7 8/9 10 Accessories These items are available for purchase as accessories for your BISSELL vacuum: To...
... 203-5685 Part Name Style 9 Drive Belt (2-Pack) Hose Assembly (84G9/18M9/26T5 series) Hose Assembly (58F8 series) Brush Dowel (15") Style 16 Inner and Outer Circular Pre-Motor Filter Set Style 16 Inner Circular Pre-Motor Filter Style 16 Outer Circular Pre-Motor Filter Style 7/9/16 Post-Motor Filter Style 7/9/16 Pre-Motor Filter Carbon Pre-Motor Filter (18M9-W model) 1 2/3 4 5 6 7 8/9 10 Accessories These items are available for purchase as accessories for your BISSELL vacuum: To...
User Guide
Page 15
... Three Year Warranty Subject to product used for three years any defective or malfunctioning part. will repair or replace (with the User's Guide is not covered. This warranty does not apply to fans or routine maintenance components such as described below. PO Box 3606 Grand Rapids, MI 49501 ATTN: Consumer Services BISSELL HOMECARE, INC. If you need additional instruction regarding this warranty or have questions...
... Three Year Warranty Subject to product used for three years any defective or malfunctioning part. will repair or replace (with the User's Guide is not covered. This warranty does not apply to fans or routine maintenance components such as described below. PO Box 3606 Grand Rapids, MI 49501 ATTN: Consumer Services BISSELL HOMECARE, INC. If you need additional instruction regarding this warranty or have questions...

User Guide
Page 16
... warranty, call: BISSELL Consumer Services 1-800-237-7691 Monday - Product Support Reminders and Alerts We'll contact you need to receive notice of cleaner available. ET Saturday 9 a.m. - www.bissell.com When contacting BISSELL, have model number of offers, contests, cleaning tips and more! Visit www.bissell.com/registration now! ET ATTN: Consumer Services Or visit the BISSELL website - See Warranty on page 15 for discounts and free...
... warranty, call: BISSELL Consumer Services 1-800-237-7691 Monday - Product Support Reminders and Alerts We'll contact you need to receive notice of cleaner available. ET Saturday 9 a.m. - www.bissell.com When contacting BISSELL, have model number of offers, contests, cleaning tips and more! Visit www.bissell.com/registration now! ET ATTN: Consumer Services Or visit the BISSELL website - See Warranty on page 15 for discounts and free...


