

Manual
Page 4
... needle Inserting the seam guide LED display Light MthntenanCe 10 20 36 78 26 26 24 38,40 18 Neatening edges whole . removing Presser loot - insening Bobbin - attaching Presser foot Inter Reverse sewing 52 26 44 30 56. 58 66. 66, 70 22 22 13 42 84 76 48 48 14. 16 Safety...
... needle Inserting the seam guide LED display Light MthntenanCe 10 20 36 78 26 26 24 38,40 18 Neatening edges whole . removing Presser loot - insening Bobbin - attaching Presser foot Inter Reverse sewing 52 26 44 30 56. 58 66. 66, 70 22 22 13 42 84 76 48 48 14. 16 Safety...
Manual
Page 5
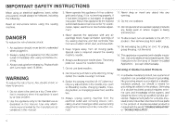
...plug. This appliance is marked with any adjustments in this sewing machine. WARNING To reduce the risk of the sewing machine and foot controller free fromaccumulationollint,dust.andloose cloth. 5. Keep fingers away from all controls to the oft I -01 position, then remove..., lubricating. Switch the sowing machine off IV) when making an other user servicing adjustments mentioned in . 2. threading bobbin, or changing presser foot. Use only identical replacement parts. and should a means for a double-insulated product must be done only by pulling on a doubleinsulated product...
...plug. This appliance is marked with any adjustments in this sewing machine. WARNING To reduce the risk of the sewing machine and foot controller free fromaccumulationollint,dust.andloose cloth. 5. Keep fingers away from all controls to the oft I -01 position, then remove..., lubricating. Switch the sowing machine off IV) when making an other user servicing adjustments mentioned in . 2. threading bobbin, or changing presser foot. Use only identical replacement parts. and should a means for a double-insulated product must be done only by pulling on a doubleinsulated product...
Manual
Page 7
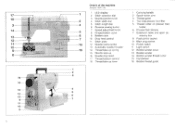
...; Thread take -up spring I5 Needle stop up lever I Carrying handle 2 Spool holder pins 3 Thread guide 4 Two-step presser foot lifter 5 Thread cutter on presser toot holder 6 Presser toot release 7 Extension table and open accessory box 8 Foot control socket 9 Main plug socket I 0 Power switch It Light switch 12 Bobbin winder Cover 13 Bobbin winder 14...
...; Thread take -up spring I5 Needle stop up lever I Carrying handle 2 Spool holder pins 3 Thread guide 4 Two-step presser foot lifter 5 Thread cutter on presser toot holder 6 Presser toot release 7 Extension table and open accessory box 8 Foot control socket 9 Main plug socket I 0 Power switch It Light switch 12 Bobbin winder Cover 13 Bobbin winder 14...
Manual
Page 9
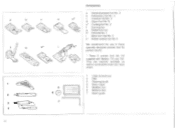
... 4 Seam ripper 5 Needles (3x) 6 Bobbins (3x) 7 Seam guide I i Blind hem loot No. 9 le Button sewing foot No. 6 We recommend the use of these specially designed presser feet for period results. ' Those 3 presser leet am not supplied with Models 715 and 730. a 9 cal' 2 3 IMO iQ 4 C tiCZO 10 Accessories a General purpose fool No. 3 b Embroidery toot No...
... 4 Seam ripper 5 Needles (3x) 6 Bobbins (3x) 7 Seam guide I i Blind hem loot No. 9 le Button sewing foot No. 6 We recommend the use of these specially designed presser feet for period results. ' Those 3 presser leet am not supplied with Models 715 and 730. a 9 cal' 2 3 IMO iQ 4 C tiCZO 10 Accessories a General purpose fool No. 3 b Embroidery toot No...
Manual
Page 15
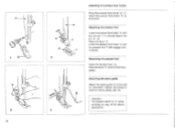
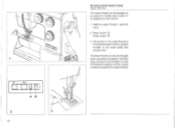
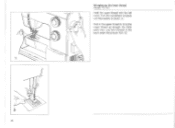
... sewn guide 'cit in the slot as illustrated. etc. (4) Attention: Turn power switch to need for hems, pleats. Lower the presser foot holder 'a' and the presser foot 1' will engage auto maritally. 2 Removing the presser foot Raise the presser foot. (3) Raise thelever's'and thelocitclisen. Adjust according to tr when carrying out any of the above the pin 'd'- (2) Raise the...
... sewn guide 'cit in the slot as illustrated. etc. (4) Attention: Turn power switch to need for hems, pleats. Lower the presser foot holder 'a' and the presser foot 1' will engage auto maritally. 2 Removing the presser foot Raise the presser foot. (3) Raise thelever's'and thelocitclisen. Adjust according to tr when carrying out any of the above the pin 'd'- (2) Raise the...
Manual
Page 23
... until the needle is raised and pull on the upper thread to the back under the presser foot. The lowerthread can be brought up the lower thread. Lay both threads to bring up by lapping the foot control. 1 Hold the upper thread in the left hand 2 Press button 'A" Press button 'B' 3 Pull gently on...
... until the needle is raised and pull on the upper thread to the back under the presser foot. The lowerthread can be brought up the lower thread. Lay both threads to bring up by lapping the foot control. 1 Hold the upper thread in the left hand 2 Press button 'A" Press button 'B' 3 Pull gently on...
Manual
Page 24
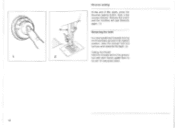
Turn the handvaieel forwards until the needle is raised. (1) Pull on the upper thread to the back under the presser foot. (2) .\\.'"•'" 40 Lay both threads to bring the lower thread up the lower thread (Mule% 715. 730) Hold the upper thread with the left hand. Bringing up through the stitch plate hole.
Turn the handvaieel forwards until the needle is raised. (1) Pull on the upper thread to the back under the presser foot. (2) .\\.'"•'" 40 Lay both threads to bring the lower thread up the lower thread (Mule% 715. 730) Hold the upper thread with the left hand. Bringing up through the stitch plate hole.
Manual
Page 25
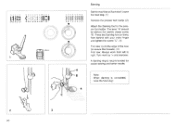
Sew a few reverse stitches. Release the button and the machine will sew forwards again. (1) Removing the work Turn the handwheel fontrardsto bring the thread take-up lever to its highest position, raise the presser foot and remove work towards the back (2) Cutting the thread: Hold the threads behind the presser foot with both hands, guide them to the slit 'A' and press down. 42 I 41 1 2 Reverse sewing At the end of the seam, press the Reverse sewing button.
Sew a few reverse stitches. Release the button and the machine will sew forwards again. (1) Removing the work Turn the handwheel fontrardsto bring the thread take-up lever to its highest position, raise the presser foot and remove work towards the back (2) Cutting the thread: Hold the threads behind the presser foot with both hands, guide them to the slit 'A' and press down. 42 I 41 1 2 Reverse sewing At the end of the seam, press the Reverse sewing button.
Manual
Page 44
Lower the feed dog. (1) Remove the presser foot clamp. (2) Attach the Darning foot to secure the threads). (4) First row: Always work by 'I' and oversew. raise the feed dog! 2 3 80 Turn work from left to right. The lever 'K should ...be behind with your index finger and tighten the screw C. (3) First sew round the edge of the hole (to the presser fool holder. Press the Deming foot on firmly from behind the needle clamp screw 'W. Note: When darning is recommended for easier sewing and better results. A darning ring is completed...
Lower the feed dog. (1) Remove the presser foot clamp. (2) Attach the Darning foot to secure the threads). (4) First row: Always work by 'I' and oversew. raise the feed dog! 2 3 80 Turn work from left to right. The lever 'K should ...be behind with your index finger and tighten the screw C. (3) First sew round the edge of the hole (to the presser fool holder. Press the Deming foot on firmly from behind the needle clamp screw 'W. Note: When darning is recommended for easier sewing and better results. A darning ring is completed...
Manual
Page 45
Lower the fool and continue to sew. (2.3) To sew past the zip pull. depending on which side of the foot you are going to sow. 9 2 82 4:4 3 lower the needle into the fabric, raise the presser loot and push the zip pull behind the presser foot. 0 000 2:122 24 ZIA II 21 0000 c QSOGO NOef61a Own 1 (t) 1 Sewing in zips Set the machine as illustrated. (It The zip foot can be inserted right a left.
Lower the fool and continue to sew. (2.3) To sew past the zip pull. depending on which side of the foot you are going to sow. 9 2 82 4:4 3 lower the needle into the fabric, raise the presser loot and push the zip pull behind the presser foot. 0 000 2:122 24 ZIA II 21 0000 c QSOGO NOef61a Own 1 (t) 1 Sewing in zips Set the machine as illustrated. (It The zip foot can be inserted right a left.
Manual
Page 47
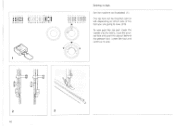
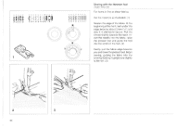
Insert the needle into the fabric, raise the presser foot and guide the fold into the scroll on the loot. (2) Gently pull the labrit edge towards the back. Set the machine as illustrated. (t) Neaten the ...") and Sew 4-5 stitches to the left (3) 2 3 86 000 0 0 ttitt 24 n222110 000000t) •0 0 6 II 1111 M6M OW% "71-t \., 1 00 a a co: f I 7 r f 4 32 1 Sewing with the Hemmer foot mate 704E onfi For hems in fine or sheer fabrics. At the beginning of the fabric.
Insert the needle into the fabric, raise the presser foot and guide the fold into the scroll on the loot. (2) Gently pull the labrit edge towards the back. Set the machine as illustrated. (t) Neaten the ...") and Sew 4-5 stitches to the left (3) 2 3 86 000 0 0 ttitt 24 n222110 000000t) •0 0 6 II 1111 M6M OW% "71-t \., 1 00 a a co: f I 7 r f 4 32 1 Sewing with the Hemmer foot mate 704E onfi For hems in fine or sheer fabrics. At the beginning of the fabric.


