
Manual
Page 4
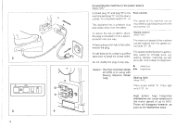
... tool 'Model 740E only) Deming Decorative stitches (Model 740E Only/ Details ol the machine Feed dog - winding Bringing up the lower thread Bulb - attaching Presser foot Inter Reverse sewing 52 26 44 30 56. 58 66. 66, 70 22 22 13 42 84 76 48 48 14. 16 Safety regulations Smocking...
... tool 'Model 740E only) Deming Decorative stitches (Model 740E Only/ Details ol the machine Feed dog - winding Bringing up the lower thread Bulb - attaching Presser foot Inter Reverse sewing 52 26 44 30 56. 58 66. 66, 70 22 22 13 42 84 76 48 48 14. 16 Safety regulations Smocking...
Manual
Page 5
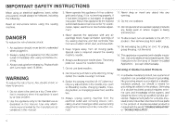
... electrical outlet wen removing covers, lubricating. Replace bulb with double insulation. WARNING To reduce the risk of the sewing machine and foot controller free fromaccumulationollint,dust.andloose cloth. 5. or injury to break. 7. Close attention is necessary when this manual. 3. Use ...needles. 8. It may deflect the needle causing it is required around the sewing machine needle. 6. threading bobbin, or changing presser foot. and the like. 10. Always unplug sewing machine from the electric outlet immediately after using and before using an electrical appliance....
... electrical outlet wen removing covers, lubricating. Replace bulb with double insulation. WARNING To reduce the risk of the sewing machine and foot controller free fromaccumulationollint,dust.andloose cloth. 5. or injury to break. 7. Close attention is necessary when this manual. 3. Use ...needles. 8. It may deflect the needle causing it is required around the sewing machine needle. 6. threading bobbin, or changing presser foot. and the like. 10. Always unplug sewing machine from the electric outlet immediately after using and before using an electrical appliance....
Manual
Page 7
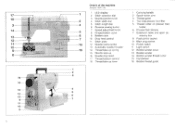
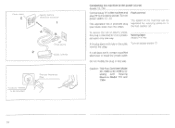
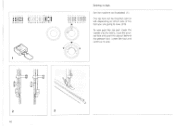
... -up spring I5 Needle stop up lever I Carrying handle 2 Spool holder pins 3 Thread guide 4 Two-step presser foot lifter 5 Thread cutter on presser toot holder 6 Presser toot release 7 Extension table and open accessory box 8 Foot control socket 9 Main plug socket I 0 Power switch It Light switch 12 Bobbin winder Cover 13 Bobbin winder...
... -up spring I5 Needle stop up lever I Carrying handle 2 Spool holder pins 3 Thread guide 4 Two-step presser foot lifter 5 Thread cutter on presser toot holder 6 Presser toot release 7 Extension table and open accessory box 8 Foot control socket 9 Main plug socket I 0 Power switch It Light switch 12 Bobbin winder Cover 13 Bobbin winder...
Manual
Page 9
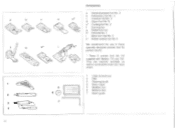
I i Blind hem loot No. 9 le Button sewing foot No. 6 We recommend the use of these specially designed presser feet for period results. ' Those 3 presser leet am not supplied with Models 715 and 730. They are however available as special accessories from your local ...dealer 5 0 7 Large screwdriver 2 Oiler 3 Cleaning brush 4 Seam ripper 5 Needles (3x) 6 Bobbins (3x) 7 Seam guide N et' Cording foot No. 2 f Darning foot g Buttonhole Idol h• Hemmer No. ...
I i Blind hem loot No. 9 le Button sewing foot No. 6 We recommend the use of these specially designed presser feet for period results. ' Those 3 presser leet am not supplied with Models 715 and 730. They are however available as special accessories from your local ...dealer 5 0 7 Large screwdriver 2 Oiler 3 Cleaning brush 4 Seam ripper 5 Needles (3x) 6 Bobbins (3x) 7 Seam guide N et' Cording foot No. 2 f Darning foot g Buttonhole Idol h• Hemmer No. ...
Manual
Page 11
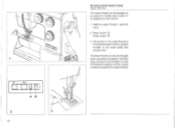
Caution: The Foot Controller Model 4C-3378 is ideal for beginners. ► minimum ►► maximum Sewing light IModel 740E) Press power switch 'A". lady useful for using with ... maximum speed Of the machine can be reduced with Sewing Machine Model 740E. terns etc. These will disappear however, as soon as the interference stops. Foot control The speed of electric shock, this plug is particu. The speed control function is intended to the fool control. (2) To reduce the nsk of...
Caution: The Foot Controller Model 4C-3378 is ideal for beginners. ► minimum ►► maximum Sewing light IModel 740E) Press power switch 'A". lady useful for using with ... maximum speed Of the machine can be reduced with Sewing Machine Model 740E. terns etc. These will disappear however, as soon as the interference stops. Foot control The speed of electric shock, this plug is particu. The speed control function is intended to the fool control. (2) To reduce the nsk of...
Manual
Page 12
... (2) T6 red ea the fisk of electric shock this plug is for using with Sewing Machine Model 715 and 730A 16 Turn on power switch 'C' reverse the plug. The Foot Controller Model 3C-135B or 4C-3168 is intended lo lit in a Wadied outlet only one blade wider than the other). Sewing... light Modces 7.5. 733: If the plug does not fit fully in any way Caution! Foot control The speeo 01 the machine can be regulated by applying pressure to install the proper outlet Do not modify the plug in the Outlet...
... (2) T6 red ea the fisk of electric shock this plug is for using with Sewing Machine Model 715 and 730A 16 Turn on power switch 'C' reverse the plug. The Foot Controller Model 3C-135B or 4C-3168 is intended lo lit in a Wadied outlet only one blade wider than the other). Sewing... light Modces 7.5. 733: If the plug does not fit fully in any way Caution! Foot control The speeo 01 the machine can be regulated by applying pressure to install the proper outlet Do not modify the plug in the Outlet...
Manual
Page 15
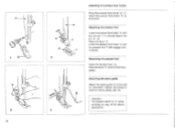
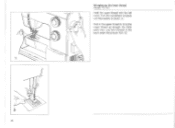
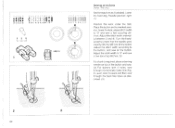
... above the pin 'd'- (2) Raise the lever V. etc. (4) Attention: Turn power switch to need for hems, pleats. 1 3 22 Attaching the presser toot holder Raise the presser foot clamp T. (1) Attach the presser loot holder 'V as illustrated. Attaching the presser foot Lower thepresser footholder'euntil the cut-out is directly above operations! Lower the presser...
... above the pin 'd'- (2) Raise the lever V. etc. (4) Attention: Turn power switch to need for hems, pleats. 1 3 22 Attaching the presser toot holder Raise the presser foot clamp T. (1) Attach the presser loot holder 'V as illustrated. Attaching the presser foot Lower thepresser footholder'euntil the cut-out is directly above operations! Lower the presser...
Manual
Page 16
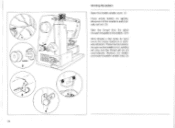
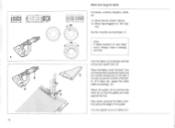
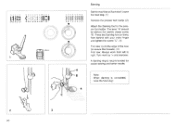
As soon as the bobbinishill. Remove the bobbin aneciose thebobbin winder case. (5) 0 • 5 4 24 wincing will stop and the thread will be cut out. (2) Take the thread from the spool through the guide to the bobbin. (3/4) Wind thread a few times by hand round the empty bobbin in a clockwise direction. Press the foot control. cally cut automatically. 1 0 2 4 5 0 2 Winding the bobbin Open the bobbin winder cover. (1) Place empty bobbin on spindle. 3 Movement of the needle is automati-
As soon as the bobbinishill. Remove the bobbin aneciose thebobbin winder case. (5) 0 • 5 4 24 wincing will stop and the thread will be cut out. (2) Take the thread from the spool through the guide to the bobbin. (3/4) Wind thread a few times by hand round the empty bobbin in a clockwise direction. Press the foot control. cally cut automatically. 1 0 2 4 5 0 2 Winding the bobbin Open the bobbin winder cover. (1) Place empty bobbin on spindle. 3 Movement of the needle is automati-
Manual
Page 23
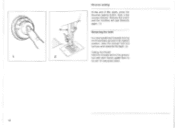
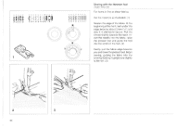
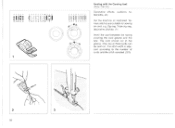
... • 11 A B 38 di Bringing up the lower thread 1'104:101 140E o-h1 The lower thread can also be brought up by lapping the foot control. 1 Hold the upper thread in the left hand 2 Press button 'A" Press button 'B' 3 Pull gently on the upper thread. The lowerthread can be brought up ...
... • 11 A B 38 di Bringing up the lower thread 1'104:101 140E o-h1 The lower thread can also be brought up by lapping the foot control. 1 Hold the upper thread in the left hand 2 Press button 'A" Press button 'B' 3 Pull gently on the upper thread. The lowerthread can be brought up ...
Manual
Page 24
Lay both threads to bring the lower thread up the lower thread (Mule% 715. 730) Hold the upper thread with the left hand. Turn the handvaieel forwards until the needle is raised. (1) Pull on the upper thread to the back under the presser foot. (2) .\\.'"•'" 40 Bringing up through the stitch plate hole.
Lay both threads to bring the lower thread up the lower thread (Mule% 715. 730) Hold the upper thread with the left hand. Turn the handvaieel forwards until the needle is raised. (1) Pull on the upper thread to the back under the presser foot. (2) .\\.'"•'" 40 Bringing up through the stitch plate hole.
Manual
Page 25
Release the button and the machine will sew forwards again. (1) Removing the work Turn the handwheel fontrardsto bring the thread take-up lever to its highest position, raise the presser foot and remove work towards the back (2) Cutting the thread: Hold the threads behind the presser foot with both hands, guide them to the slit 'A' and press down. 42 Sew a few reverse stitches. I 41 1 2 Reverse sewing At the end of the seam, press the Reverse sewing button.
Release the button and the machine will sew forwards again. (1) Removing the work Turn the handwheel fontrardsto bring the thread take-up lever to its highest position, raise the presser foot and remove work towards the back (2) Cutting the thread: Hold the threads behind the presser foot with both hands, guide them to the slit 'A' and press down. 42 Sew a few reverse stitches. I 41 1 2 Reverse sewing At the end of the seam, press the Reverse sewing button.
Manual
Page 43
... Milan 11 • Blind hem lingerie stitch For hems. curtains. Set the machine as illustrated with the wrong side uppermost. (2) Place the fabric under the foot. skids. Sew slowly, guiding the fabric care. Fold the fabric as illustrated. (1) Note: It takes practice to sew blind hems. Always make a sewing test first...
... Milan 11 • Blind hem lingerie stitch For hems. curtains. Set the machine as illustrated with the wrong side uppermost. (2) Place the fabric under the foot. skids. Sew slowly, guiding the fabric care. Fold the fabric as illustrated. (1) Note: It takes practice to sew blind hems. Always make a sewing test first...
Manual
Page 44
... tighten the screw C. (3) First sew round the edge of the hole (to secure the threads). (4) First row: Always work by 'I' and oversew. Press the Deming foot on firmly from left to the presser fool holder. Note: When darning is recommended for easier sewing and better results. A darning ring is completed. raise...
... tighten the screw C. (3) First sew round the edge of the hole (to secure the threads). (4) First row: Always work by 'I' and oversew. Press the Deming foot on firmly from left to the presser fool holder. Note: When darning is recommended for easier sewing and better results. A darning ring is completed. raise...
Manual
Page 45
Lower the fool and continue to sew. (2.3) To sew past the zip pull. depending on which side of the foot you are going to sow. 9 2 82 4:4 3 0 000 2:122 24 ZIA II 21 0000 c QSOGO NOef61a Own 1 (t) 1 Sewing in zips Set the machine as illustrated. (It The zip foot can be inserted right a left. lower the needle into the fabric, raise the presser loot and push the zip pull behind the presser foot.
Lower the fool and continue to sew. (2.3) To sew past the zip pull. depending on which side of the foot you are going to sow. 9 2 82 4:4 3 0 000 2:122 24 ZIA II 21 0000 c QSOGO NOef61a Own 1 (t) 1 Sewing in zips Set the machine as illustrated. (It The zip foot can be inserted right a left. lower the needle into the fabric, raise the presser loot and push the zip pull behind the presser foot.
Manual
Page 46
...dog. adjuststtch width to 'V and sew a few securing stitches. (2) If a shank is required. and sew on the marked position. 'ower the foot. Adjust the stitch width to and sew a few securing slit• ches. place adarning needle on buttons Imoce 140E ont, Set the machine as ...described. (3) 2 3 84 push work under the foot. ly between 3 and 4). Adjust the stitch width (noimal. O 2413222120 4 ;ii!h ° 110 ° 1 tl If 6 T4 131211 ,-10-• HMO 1 ...
...dog. adjuststtch width to 'V and sew a few securing stitches. (2) If a shank is required. and sew on the marked position. 'ower the foot. Adjust the stitch width to and sew a few securing slit• ches. place adarning needle on buttons Imoce 140E ont, Set the machine as ...described. (3) 2 3 84 push work under the foot. ly between 3 and 4). Adjust the stitch width (noimal. O 2413222120 4 ;ii!h ° 110 ° 1 tl If 6 T4 131211 ,-10-• HMO 1 ...
Manual
Page 47
At the beginning of the fabric. 000 0 0 ttitt 24 n222110 000000t) •0 0 6 II 1111 M6M OW% "71-t \., 1 00 a a co: f I 7 r f 4 32 1 Sewing with the Hemmer foot mate 704E onfi For hems in fine or sheer fabrics. Pell the thread slightly towards you and rower thepresser fool.Begin sewing, guiding the fabric ... of the hem, turn under the edge Twice by hording it upright and slightly to secure. Insert the needle into the fabric, raise the presser foot and guide the fold into the scroll on the loot. (2) Gently pull the labrit edge towards the back.
At the beginning of the fabric. 000 0 0 ttitt 24 n222110 000000t) •0 0 6 II 1111 M6M OW% "71-t \., 1 00 a a co: f I 7 r f 4 32 1 Sewing with the Hemmer foot mate 704E onfi For hems in fine or sheer fabrics. Pell the thread slightly towards you and rower thepresser fool.Begin sewing, guiding the fabric ... of the hem, turn under the edge Twice by hording it upright and slightly to secure. Insert the needle into the fabric, raise the presser foot and guide the fold into the scroll on the loot. (2) Gently pull the labrit edge towards the back.
Manual
Page 48
tablecloths, etc. e.g. 00000 I I II :inn ill 90009209999 it S eM11 It 6 14 VII "II- , 1 999 120009 MISR 5 5 1 5 5 5 311 jr 721 :t., , '"\ h Sewing with the Cording foot dawn ROE 01919 Decorative effects. Various stitches are suitable for sewing on . decorative stitches. (1) Insert the cord between the spring covering the cord groove and ...
tablecloths, etc. e.g. 00000 I I II :inn ill 90009209999 it S eM11 It 6 14 VII "II- , 1 999 120009 MISR 5 5 1 5 5 5 311 jr 721 :t., , '"\ h Sewing with the Cording foot dawn ROE 01919 Decorative effects. Various stitches are suitable for sewing on . decorative stitches. (1) Insert the cord between the spring covering the cord groove and ...


