
Bernina Bernette 715 Support Question
Bernina Bernette 715 Support Question
Find answers below for this question about Bernina Bernette 715.Need a Bernina Bernette 715 manual? We have 1 online manual for this item!
Question posted by katehayne on September 19th, 2013
Blind Hem Foot For Bernette 715
Hi there, I have a bernette 715, and was sold a bernina blind hem foot (the sales lady gave me a #5 blindstich foot.) is this the correct tool? Also, I bought a Bernina #4, and a Bernina #10 foot. Are these also correct for my machine? Thanks very much!
Current Answers
Related Bernina Bernette 715 Manual Pages
Manual - Page 3

l'intatet du progrilis technique.
vooruitgang voorbehouden.
L 1992 Fritz Gegauf Ltd. Bernina Sewing Machines CH43266 Steckbern (Switzerland)
1992 Fritz Gegaut SA Faboque de machines a coudre Bernina CH-8266 Steckborn (Suisse)
1992 Fritz Gegauf AG Bernina Naaimachinefabtiek CH-8266 Steckbom (Zwitserland)
We reserve the right to make technical changes in Sous reserve des modifications ...
Manual - Page 4
...needle Inserting the seam guide
LED display Light
MthntenanCe
10
20
36
78 26 26 24
38,40 18
Neatening edges whole . attaching Presser foot Inter
Reverse sewing
52 26 44 30
56. 58
66. 66... 740E only 44
Zips sewing in
82
48 .14, 16
90 changing Buttons sewing on
(Model 740E onlyl Buttonholes
Colour code green and blue Colour code red and yellow COnneding the machine wrong tool
'Model 740E only)...
Manual - Page 5
...10. Replacement parts for Servicing of Double-Insulated Appliances (except USA/Canada)
Servicing of plug. A double-insulated product is provided with any opening.
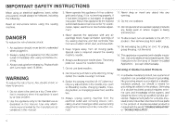
12 Do not use as threading needle, changing needle. IMPORTANT SAFETY INSTRUCTIONS
When using this sewing machine...
To reduce the risk of the sewing machine and foot controller free fromaccumulationollint,dust.andloose cloth....
Manual - Page 7
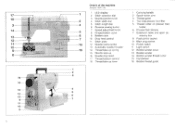
... 4 Two-step presser foot lifter 5 Thread cutter on presser toot
holder 6 Presser toot release
7 Extension table and open accessory box
8 Foot control socket 9 Main ...10
9 8
18 15
12 14 13
9 11 10
6
isaral
ni••
1 2 4 5 -6 7 -15 16
1 2 3
Details of the machine
IA0F.7301
1 LED display 2 Stitch selection dial 3 Needle position knob 4 Stitch width dial 5 Stitch length dial 6 Reverse sewing...
Manual - Page 9
a 9
cal'
2
3 IMO
iQ
4
C tiCZO
10
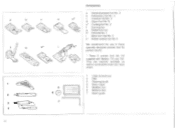
Accessories
a General purpose fool No. 3
b Embroidery toot No. 4
e"
c Overlock foot No 8
d Zipper foot No. I
i Blind hem loot No. 9
le Button sewing foot No. 6
We recommend the use of these specially designed presser feet for period results.
' Those 3 presser leet am not supplied with Models 715 and 730. They are however available as special ...
Manual - Page 11
... for intricate work. lady useful for beginners.
► minimum ►► maximum
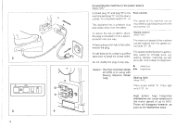
Sewing light IModel 740E)
Press power switch 'A". sewing corners. terns etc.
e.g. Do not modify the plug in the outlet.
and is intended to the fool control. (2)
To reduce the nsk of up pat. Foot control
The speed of the machine can cause variations...
Manual - Page 12
... fisk of electric shock this plug is for using with Sewing
Machine Model 715 and
730A
16 Foot control
The speeo 01 the machine can be regulated by applying pressure to install the proper ...
lu
Pane, .50.:10e
2
SONG OrIfdiet
0
Ca.J.cc illenC100 10 5e Groat3e:1
Pulo•vcd totarpm
Flt
Connecting the machine to the power source (Modeie 715 720)
Conned plug "A' to the mains socket. to the...
Manual - Page 15
... V. etc. (4)
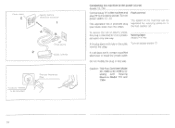
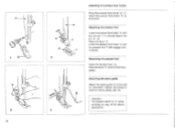
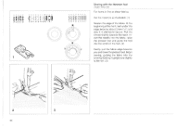
Attention: Turn power switch to need for hems, pleats. Attaching the presser foot
Lower thepresser footholder'euntil the cut-out is directly above operations! Lower the presser foot holder 'a' and the presser foot 1' will engage auto maritally.
2
Removing the presser foot
Raise the presser foot. (3) Raise thelever's'and thelocitclisen.
gages_
Attaching the seam guide...
Manual - Page 24
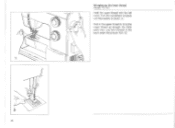
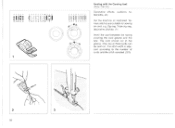
Lay both threads to bring the lower thread up the lower thread (Mule% 715. 730) Hold the upper thread with the left hand. Turn the handvaieel forwards until the needle is raised. (1) Pull on the upper thread to the back under the presser foot. (2)
.\\.'"•'" 40 Bringing up through the stitch plate hole.
Manual - Page 25
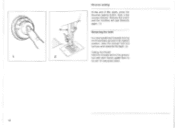
... the end of the seam, press the Reverse sewing button. Release the button and the machine will sew forwards again. (1)
Removing the work
Turn the handwheel fontrardsto bring the thread take-up lever to its highest position, raise the presser foot and remove work towards the back (2)
Cutting the thread: Hold the threads behind...
Manual - Page 33
... over
1
the edge of the fabric.
cs
540,AM::
58 t0
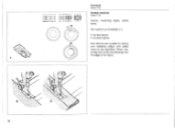
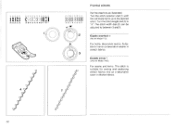
E for fine fabrics C for thick fabrics
Both stitches aro suitable for sewing
and neatening edges and visible
•
hems in ono operation. 0 0 0 0 0 0 0 9 1 t 0 0 00*
OIM I1till UD
11111012 II •
r 7 1 1 41 2 1-1
Overlock
(IOUS 230)
Stretch warlock
(Model 2301
Seams, neatening edges, visible...
Manual - Page 34
...
0 0 0 fa 0 e • 9 I I 6 4 3 21
rTh
1
715/730 740 E
I
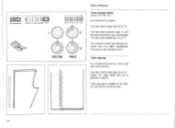
Stitch selection
Triple straight stitch (Models 733740E on y)
For hardwearing seams.
Turn the stitch length dial (3) to '0'. Triple zlisag
For hardwearing seams, hems and decorators seams.
Turn the stitch length dial (3) to between 3 and 5. Adjust the stitch width dial (2) to ' . The machine sews two stitches forwards and...
Manual - Page 35
I
rr
to
• o
Stitch selection
Triple straight stitch llkdel 715 only) For hardwearing seams.
Set the machine as denim, corduroy. etc.
62
The machine sews two stitches forward and one stitch backwards. This gives triple reinforcement. Triple zig-zag tiloded ris only)
For hardwearing seams. hems and decorative seams.
Triple zig-zag is ideal for firm fabrics such as illustrated.
Manual - Page 38
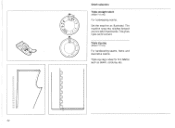
... between 3 and 5.
Turn the stitchlength dial(31to A. Elastic overlock 4 eau for lAodel 715)
For hems. decorative seams. Suitable for hems or decorative seams in StralCh fabrics.
•
Double arrow 7
lorty for Model 740E)
For seams and hems. Tins stitch is suitable for sewing and neatening stretch fabrics and as Illustrated. so c.i5r itl i ii 0 00...
Manual - Page 43
Set the machine as illustrated with the wrong side uppermost. (2)
Place the fabric under the foot.
If it does not, adjust the stitch width accordingly. (3)
Adjust the guide (4) by turning the knob (5) so that the guide just rests against the fond.
Turn the speed control to sew blind hems. Always make a sewing test first.
fully along the...
Manual - Page 45
... into the fabric, raise the presser loot and push the zip pull behind the presser foot. Lower the fool and continue to sew. (2.3)
To sew past the zip pull. 0 000
2:122
24 ZIA II 21
0000 c QSOGO
NOef61a Own
1 (t)
1
Sewing in zips
Set the machine as illustrated. (It
The zip foot can be inserted right a left.
Manual - Page 46
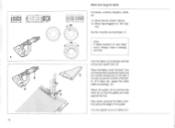
... width (noimal. ly between 3 and 4). and sew on the marked position. 'ower the foot. Adjust the stitch width to and sew a few securing slit• ches. adjuststtch width to 'V and sew a few securing stitches. (2)
If a shank is required. place adarning needle on buttons Imoce 140E ont,
Set the machine as described. (3)
2
3
84 Needle position right...
Manual - Page 47
... left (3)
2
3
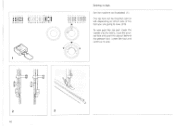
86 Set the machine as illustrated. (t)
Neaten the edge of the hem, turn under the edge Twice by hording it upright and slightly to secure. 000 0 0
ttitt
24 n222110
000000t)
•0 0 6
II 1111 M6M OW% "71-t
\., 1
00 a a co: f I 7 r f 4 32 1
Sewing with the Hemmer foot mate 704E onfi
For hems in fine or sheer fabrics.
Manual - Page 48
...
90009209999
it S
eM11 It 6 14 VII "II- ,
1
999 120009
MISR 5 5 1 5 5 5 311
jr 721 :t., , '"\ h
Sewing with the Cording foot dawn ROE 01919
Decorative effects. Triple zig-zag. The stitch width is adjusted according to the number of cords and the stitch selected. (2/3)
2
3
88...two or three cords can be sewn on cord. e.g. tablecloths, etc. Set the machine as illustrated. cushions.
Manual - Page 49
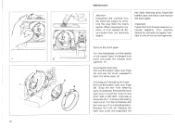
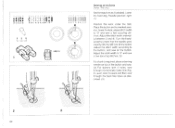
... the two hook retaining arms (31outwards. When cleaning the machine. Lubricate at one of our service agencies. 1
2
7
90
Maintenance
Attention: Disconnect the machine from the electricity supply by removing the plug from the electricity supply.
--- - Remove the hook race cover (4) and the hook (5) and clean with sewing machine oil.
Your machine should be removed regularly.
Similar Questions

Bernette 66 Sewing Machine
How do I thread a Bernette 66 sewing machine?
How do I thread a Bernette 66 sewing machine?
(Posted by stringpam 8 years ago)


Bernina 1090 S Sewing Machine Manual
I Dont See The User Manual For This Machine For Free Downloading.what User Manual Are The Same As Th...
I Dont See The User Manual For This Machine For Free Downloading.what User Manual Are The Same As Th...
(Posted by cynthianel 10 years ago)

What Would The Selling Price On A Bernette 715 Manual Date 1992
(Posted by genedot2 11 years ago)

How Do You Bring Up The Lower Thread On Bernette 715,
i have cleaned out the bobbin mechanism and now the lower thread wont come up, all i need is a true ...
i have cleaned out the bobbin mechanism and now the lower thread wont come up, all i need is a true ...
(Posted by smfurn 11 years ago)