

Manual
Page 4
... COnneding the machine wrong tool 'Model 740E only) Deming Decorative stitches (Model 740E Only/ Details ol the machine Feed dog - tension Bobbin - lowenng Fool control Hemmer loot Inserting the needle Inserting the seam guide LED display Light MthntenanCe 10 20 36 78 26 26 24...Tension - List of contents Accessories Automatic needle stop (Model 740E only) Athematic needle threader IM0001 7406 only' Band hemlingene stitch Bobbin - insening Bobbin - winding Bringing up the lower thread Bulb - inserting Needle positrons Wadies/bread table Overlock stitches Practical stitChes PreSSOr lOOt -
... COnneding the machine wrong tool 'Model 740E only) Deming Decorative stitches (Model 740E Only/ Details ol the machine Feed dog - tension Bobbin - lowenng Fool control Hemmer loot Inserting the needle Inserting the seam guide LED display Light MthntenanCe 10 20 36 78 26 26 24...Tension - List of contents Accessories Automatic needle stop (Model 740E only) Athematic needle threader IM0001 7406 only' Band hemlingene stitch Bobbin - insening Bobbin - winding Bringing up the lower thread Bulb - inserting Needle positrons Wadies/bread table Overlock stitches Practical stitChes PreSSOr lOOt -
Manual
Page 5
.... or injury to break. 7. Use only attach. Return the appliance to those parts in this appliance from the electrical outlet wen removing covers, lubricating. threading bobbin, or changing presser foot. basic safety precautions should never be followed, including the following: Read all moving pans. Replace bulb with double insulation. or dropped...
.... or injury to break. 7. Use only attach. Return the appliance to those parts in this appliance from the electrical outlet wen removing covers, lubricating. threading bobbin, or changing presser foot. basic safety precautions should never be followed, including the following: Read all moving pans. Replace bulb with double insulation. or dropped...
Manual
Page 7
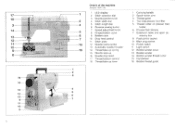
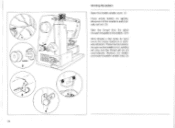
... knob 4 Stitch width dial 5 Stitch length dial 6 Reverse sewing button 7 Speed adjustment knob 8 Hinged bobbin cover 9 Bobbin case I0 Drop feed control I I 0 Power switch It Light switch 12 Bobbin winder Cover 13 Bobbin winder 14 Bobbin winder thread cutter 15 Handwheel 16 Bobbin thread guide 4 5 6 7 Thread take-up lever I Carrying handle 2 Spool holder pins 3 Thread guide...
... knob 4 Stitch width dial 5 Stitch length dial 6 Reverse sewing button 7 Speed adjustment knob 8 Hinged bobbin cover 9 Bobbin case I0 Drop feed control I I 0 Power switch It Light switch 12 Bobbin winder Cover 13 Bobbin winder 14 Bobbin winder thread cutter 15 Handwheel 16 Bobbin thread guide 4 5 6 7 Thread take-up lever I Carrying handle 2 Spool holder pins 3 Thread guide...
Manual
Page 8
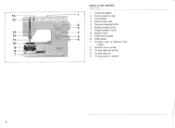
15 14 13-- 1 12 11 10 9 8 7 I . -..: I Details of the machine 1.10001 r1}) 1 1 Carrying handle 2 Stitch selection dial 3 Handwheel 4 Stitch length dial 2 5 Reverse sowing button 3 6 Bobbin winder cover 7 Hinged bobbin cover 4 8 Bobbin case 5 9 Drop feed control 6 10 Stich plate II Thread cutter on presser fool holder 12 Needle clamp screw 13 Thread take-up spring 14 Thread take.up 15 Thread tension control 8
15 14 13-- 1 12 11 10 9 8 7 I . -..: I Details of the machine 1.10001 r1}) 1 1 Carrying handle 2 Stitch selection dial 3 Handwheel 4 Stitch length dial 2 5 Reverse sowing button 3 6 Bobbin winder cover 7 Hinged bobbin cover 4 8 Bobbin case 5 9 Drop feed control 6 10 Stich plate II Thread cutter on presser fool holder 12 Needle clamp screw 13 Thread take-up spring 14 Thread take.up 15 Thread tension control 8
Manual
Page 9
...No. They are however available as special accessories from your local dealer 5 0 7 Large screwdriver 2 Oiler 3 Cleaning brush 4 Seam ripper 5 Needles (3x) 6 Bobbins (3x) 7 Seam guide I i Blind hem loot No. 9 le Button sewing foot No. 6 We recommend the use of these specially designed presser feet for period... results. ' Those 3 presser leet am not supplied with Models 715 and 730. a 9 cal' 2 3 IMO iQ 4 C tiCZO 10 Accessories a General purpose fool No. 3 b Embroidery toot No. 4 e" c Overlock foot No...
...No. They are however available as special accessories from your local dealer 5 0 7 Large screwdriver 2 Oiler 3 Cleaning brush 4 Seam ripper 5 Needles (3x) 6 Bobbins (3x) 7 Seam guide I i Blind hem loot No. 9 le Button sewing foot No. 6 We recommend the use of these specially designed presser feet for period... results. ' Those 3 presser leet am not supplied with Models 715 and 730. a 9 cal' 2 3 IMO iQ 4 C tiCZO 10 Accessories a General purpose fool No. 3 b Embroidery toot No. 4 e" c Overlock foot No...
Manual
Page 16
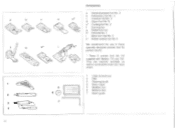
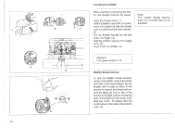
Remove the bobbin aneciose thebobbin winder case. (5) 0 • 5 4 24 Press the foot control. wincing will stop and the thread will be cut out. (2) Take the thread from the spool through the guide to the bobbin. (3/4) Wind thread a few times by hand round the empty bobbin in a clockwise direction. As soon as the bobbinishill. 1 0 2 4 5 0 2 Winding the bobbin Open the bobbin winder cover. (1) Place empty bobbin on spindle. 3 Movement of the needle is automati- cally cut automatically.
Remove the bobbin aneciose thebobbin winder case. (5) 0 • 5 4 24 Press the foot control. wincing will stop and the thread will be cut out. (2) Take the thread from the spool through the guide to the bobbin. (3/4) Wind thread a few times by hand round the empty bobbin in a clockwise direction. As soon as the bobbinishill. 1 0 2 4 5 0 2 Winding the bobbin Open the bobbin winder cover. (1) Place empty bobbin on spindle. 3 Movement of the needle is automati- cally cut automatically.
Manual
Page 17
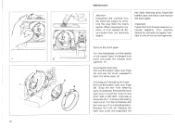
... too tight,itdoes not unwind at all.It the tension is too loose, it once or twice. •" i 2 • 5 coo Inserting the bobbin When inserting or removing the bob- adjusted. II the tension Is correct, the thread will drop too much. s. To adjust, turn the small screw on... the side of the bobbin case. (6) 26 Insert the bobbin so that the thread 3 runs in a clockwise direction (arrow). (2) Pull the thread through the slit and under the finger. (3) Hold ...
... too tight,itdoes not unwind at all.It the tension is too loose, it once or twice. •" i 2 • 5 coo Inserting the bobbin When inserting or removing the bob- adjusted. II the tension Is correct, the thread will drop too much. s. To adjust, turn the small screw on... the side of the bobbin case. (6) 26 Insert the bobbin so that the thread 3 runs in a clockwise direction (arrow). (2) Pull the thread through the slit and under the finger. (3) Hold ...
Manual
Page 49
... (see Page 26) and use the brush supplied to dean the whole area. (2) Cleaning and lubricating the hook: Remove the bobbin case (see Page 26). Snap the two hook retaining arms (31outwards. Remove the hook race cover (4) and the hook (5) and clean with sewing machine oil. ... machine. if must be disconnected from the mains socket. Replace the hook race cover and snap back the two hook retaining arms. Insert the bobbin case and bobbin and replace the stitch plate. Your machine should be serviced at regular intervats at the points (6) (1-2 drops) with a soft cloth. Lubricate...
... (see Page 26) and use the brush supplied to dean the whole area. (2) Cleaning and lubricating the hook: Remove the bobbin case (see Page 26). Snap the two hook retaining arms (31outwards. Remove the hook race cover (4) and the hook (5) and clean with sewing machine oil. ... machine. if must be disconnected from the mains socket. Replace the hook race cover and snap back the two hook retaining arms. Insert the bobbin case and bobbin and replace the stitch plate. Your machine should be serviced at regular intervats at the points (6) (1-2 drops) with a soft cloth. Lubricate...
Manual
Page 50
... quality semno machine dl 90 4 Replace the needs 28 I . The th read tension is not moaned cocrethly 2. The needle Is damaged I . The bobbin case is too tghl 3. The loot is not COrteCtiy threaded 3. Moog made size for the fare 4. Reduce the thread [enlace Dower number) 34 3.... Replace the needle 28 1. The thread shourd pU easily 26 2. The bobbin ease is not slatted cerreaty I. Thread is too thick lei We needle 4. The thread is mug M In the hook AtMOW& Desconnecl machine from deraddly...
... quality semno machine dl 90 4 Replace the needs 28 I . The th read tension is not moaned cocrethly 2. The needle Is damaged I . The bobbin case is too tghl 3. The loot is not COrteCtiy threaded 3. Moog made size for the fare 4. Reduce the thread [enlace Dower number) 34 3.... Replace the needle 28 1. The thread shourd pU easily 26 2. The bobbin ease is not slatted cerreaty I. Thread is too thick lei We needle 4. The thread is mug M In the hook AtMOW& Desconnecl machine from deraddly...


