Instruction Manual
Page 20
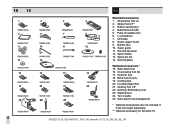
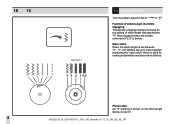
Button sewing foot 4. Oil bottle 8. Bobbin (3x) 10. Spool pin felt 14. Darning plate Optional accessories * 15. Buttonhole foot (B) 5. Seam ripper/ brush 9. Hemmer foot 18. Darning/ Embroidery foot 23. 1 6 10 12 EN Accessories Standard accessories 1. L-screwdriver 7.... 22. Walking foot 24. Twin needle 25. Seam guide 11. Second spool pin 12. It must be bought separately. ** Optional accessory for bernette 10. 502020.75.24_021V4D0101_1010_IM_bernette 10 12 15_EN_DE_NL_FR Blind hem foot (L) 19. Overcasting foot (G) 17. Cording foot 20. All purpose foot (J) 2....
Button sewing foot 4. Oil bottle 8. Bobbin (3x) 10. Spool pin felt 14. Darning plate Optional accessories * 15. Buttonhole foot (B) 5. Seam ripper/ brush 9. Hemmer foot 18. Darning/ Embroidery foot 23. 1 6 10 12 EN Accessories Standard accessories 1. L-screwdriver 7.... 22. Walking foot 24. Twin needle 25. Seam guide 11. Second spool pin 12. It must be bought separately. ** Optional accessory for bernette 10. 502020.75.24_021V4D0101_1010_IM_bernette 10 12 15_EN_DE_NL_FR Blind hem foot (L) 19. Overcasting foot (G) 17. Cording foot 20. All purpose foot (J) 2....
Instruction Manual
Page 22
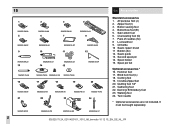
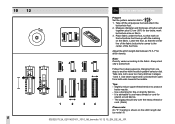
... 4. Cording foot 19. Invisible Zipperfoot 20. Gathering foot 22. All purpose foot (J) 2. Seam guide 13. Second spool pin 14. Spool holder 15. Quilting foot 1/4" 21. Pack of needles (3x) 8 L-screwdriver 9. Buttonhole foot (B) 5. Oil bottle 10 Seam ripper/ brush 11 Bobbin (3x) 12. Spool pin felt Optional accessories * 16. Walking foot 24. Overcasting...
... 4. Cording foot 19. Invisible Zipperfoot 20. Gathering foot 22. All purpose foot (J) 2. Seam guide 13. Second spool pin 14. Spool holder 15. Quilting foot 1/4" 21. Pack of needles (3x) 8 L-screwdriver 9. Buttonhole foot (B) 5. Oil bottle 10 Seam ripper/ brush 11 Bobbin (3x) 12. Spool pin felt Optional accessories * 16. Walking foot 24. Overcasting...
Instruction Manual
Page 52
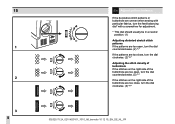
15 EN Adjust pattern balance If the decorative stitch patterns or buttonhole are uneven when sewing with particular fabrics, turn the feed balancing dial* with a screwdriver for adjustment. * This dial should usually be in a neutral position. (1) Adjusting ... If the patterns are too open, turn the dial counterclockwise. (2) "-" If the patterns are too close, turn the dial clockwise. (2) "+" Adjusting the stitch density of buttonhole If the stitches on the right side of the buttonhole are too open, turn the dial counterclockwise. (3) "-" If the stitches on the right side of the...
15 EN Adjust pattern balance If the decorative stitch patterns or buttonhole are uneven when sewing with particular fabrics, turn the feed balancing dial* with a screwdriver for adjustment. * This dial should usually be in a neutral position. (1) Adjusting ... If the patterns are too open, turn the dial counterclockwise. (2) "-" If the patterns are too close, turn the dial clockwise. (2) "+" Adjusting the stitch density of buttonhole If the stitches on the right side of the buttonhole are too open, turn the dial counterclockwise. (3) "-" If the stitches on the right side of the...
Instruction Manual
Page 68
"1", the stitches are usually achieved at "2.5" or below. Neat zigzag stitches are very close together producing the "satin stitch" which is used for making buttonholes and decorative stitches. Satin stitch When the stitch length is shown on the stitch length dial by model 10. 502020.75.24_021V4D0101_1010_IM_bernette 10 12 15_EN_DE_NL_FR ...
"1", the stitches are usually achieved at "2.5" or below. Neat zigzag stitches are very close together producing the "satin stitch" which is used for making buttonholes and decorative stitches. Satin stitch When the stitch length is shown on the stitch length dial by model 10. 502020.75.24_021V4D0101_1010_IM_bernette 10 12 15_EN_DE_NL_FR ...

Instruction Manual
Page 70
15 EN Zigzag stitching Function of stitch length dial approaches "0". For twin needle sewing, never set between "0" - however, the width can be reduced on any patterns. ... "0" - "1", the stitches are usually achieved at "2.5" or below. "5". The width increases as the setting of stitch width dial The maximum zigzag stitch width for making buttonholes and decorative stitches. 66 502020.75.24_021V4D0101_1010_IM_bernette 10 12 15_EN_DE_NL_FR Satin stitch When the stitch length is "5"; Neat zigzag stitches are very close together producing...
15 EN Zigzag stitching Function of stitch length dial approaches "0". For twin needle sewing, never set between "0" - however, the width can be reduced on any patterns. ... "0" - "1", the stitches are usually achieved at "2.5" or below. "5". The width increases as the setting of stitch width dial The maximum zigzag stitch width for making buttonholes and decorative stitches. 66 502020.75.24_021V4D0101_1010_IM_bernette 10 12 15_EN_DE_NL_FR Satin stitch When the stitch length is "5"; Neat zigzag stitches are very close together producing...
Instruction Manual
Page 80
... thread tension to use heavy thread or cord for bar tacks; Take off the all purpose foot and attach the buttonhole foot. 2. Always test sew a buttonhole. Use a backing for stitch density. It is shown on the stitch length dial by model 10. 502020.75....24_021V4D0101_1010_IM_bernette 10 12 15_EN_DE_NL_FR Adjust the stitch length dial between "0.5-1" for fine or stretchy fabrics. - 76 10 12 EN How to sew buttonholes Prepare Set the pattern selector dial to " ". 1. Place fabric under the foot, so that the center line of button add together plus ...
... thread tension to use heavy thread or cord for bar tacks; Take off the all purpose foot and attach the buttonhole foot. 2. Always test sew a buttonhole. Use a backing for stitch density. It is shown on the stitch length dial by model 10. 502020.75....24_021V4D0101_1010_IM_bernette 10 12 15_EN_DE_NL_FR Adjust the stitch length dial between "0.5-1" for fine or stretchy fabrics. - 76 10 12 EN How to sew buttonholes Prepare Set the pattern selector dial to " ". 1. Place fabric under the foot, so that the center line of button add together plus ...
Instruction Manual
Page 82
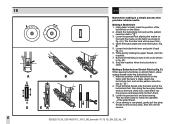
... gently holding the upper thread, start sewing. *Set the stitch width to the front of the buttonhole on the fabric with the marks on the fabric. 2. Once sewing is sewn. Making a Buttonhole 1. Lower the buttonhole lever and push it back fig. (C). 6. Mark the position of the foot, insert them into... B) 5. Hook the gimp thread onto the back end of the buttonhole foot, then bring the two gimp thread ends to match the diameter of the buttonhole on the fabric as shown in fig. (D). 8. 15 EN How to sew buttonholes Buttonhole-making is done in the order shown in fig. (A). (The ...
... gently holding the upper thread, start sewing. *Set the stitch width to the front of the buttonhole on the fabric with the marks on the fabric. 2. Once sewing is sewn. Making a Buttonhole 1. Lower the buttonhole lever and push it back fig. (C). 6. Mark the position of the foot, insert them into... B) 5. Hook the gimp thread onto the back end of the buttonhole foot, then bring the two gimp thread ends to match the diameter of the buttonhole on the fabric as shown in fig. (D). 8. 15 EN How to sew buttonholes Buttonhole-making is done in the order shown in fig. (A). (The ...
Instruction Manual
Page 132
... D Darning 100 Darning Plate 44 Decorative stitches 98 F Free motion darning 92, 94 G Gathering 116 H Hemmer foot How to drop feed dog How to sew buttonholes 82 46 76, 78 I Importent savety Instructions 1, 2 Inserting bobbin 30 Inserting the needle 32 Invisible zipper foot 114 L Light bulb replacement 122 M Maintenance 120 Monogramming...
... D Darning 100 Darning Plate 44 Decorative stitches 98 F Free motion darning 92, 94 G Gathering 116 H Hemmer foot How to drop feed dog How to sew buttonholes 82 46 76, 78 I Importent savety Instructions 1, 2 Inserting bobbin 30 Inserting the needle 32 Invisible zipper foot 114 L Light bulb replacement 122 M Maintenance 120 Monogramming...


