User Guide
Page 1
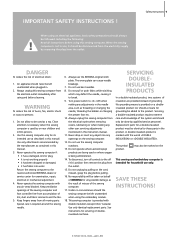
...to those parts in use only. Use only identical replacement parts. An appliance should the sewing computer be identical to the nearest authorized BERNINA dealer or service center for examination, repair, electrical or mechanical adjustment. 4. WARNING To reduce the risk of electrical shock: 1. Turn...near children and infirm persons. 2. Special care is being used by the manufacturer as threading or changing the needle, threading the bobbin or changing the presser foot etc. 10. The wrong plate can cause needle breakage. 7. Always unplug the sewing computer from...
...to those parts in use only. Use only identical replacement parts. An appliance should the sewing computer be identical to the nearest authorized BERNINA dealer or service center for examination, repair, electrical or mechanical adjustment. 4. WARNING To reduce the risk of electrical shock: 1. Turn...near children and infirm persons. 2. Special care is being used by the manufacturer as threading or changing the needle, threading the bobbin or changing the presser foot etc. 10. The wrong plate can cause needle breakage. 7. Always unplug the sewing computer from...
User Guide
Page 4
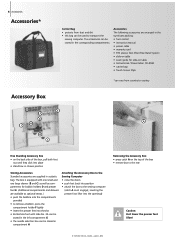
...• power cable • warranty card • FHS presser foot lifter (Free Hand System) • slide-on table • seam guide for bobbin holders D and presser feet E. (Additional compartments and drawers are supplied in the left compartment G • the needle selection box can be stored in ... is equipped with one small and one large drawer (B and C) as well as optional extras.) • push the bobbins into the compartments provided • to remove a bobbin, press the compartment holder F lightly • insert the presser feet into the slot • Buttonhole foot with slide ...
...• power cable • warranty card • FHS presser foot lifter (Free Hand System) • slide-on table • seam guide for bobbin holders D and presser feet E. (Additional compartments and drawers are supplied in the left compartment G • the needle selection box can be stored in ... is equipped with one small and one large drawer (B and C) as well as optional extras.) • push the bobbins into the compartments provided • to remove a bobbin, press the compartment holder F lightly • insert the presser feet into the slot • Buttonhole foot with slide ...
User Guide
Page 5
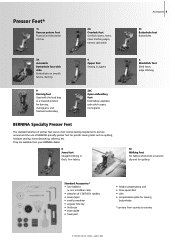
...stick or tend to slip and for quilting Standard Accessories* • four bobbins (+ one in a lowered position for darning, monograms, and freehand embroidery 20C Open embroidery foot Embroidery, appliqué, satin stitch seams, monograms BERNINA Specialty Presser Feet The standard selection of presser feet covers most normal sewing ...foot with slide Buttonholes on smooth fabrics, darning 4 Zipper foot Sewing in zippers 9 Darning foot Used with the feed dog in bobbin case) • selection of BERNINA specialty presser feet for sewing buttonholes *can vary from country to country
...stick or tend to slip and for quilting Standard Accessories* • four bobbins (+ one in a lowered position for darning, monograms, and freehand embroidery 20C Open embroidery foot Embroidery, appliqué, satin stitch seams, monograms BERNINA Specialty Presser Feet The standard selection of presser feet covers most normal sewing ...foot with slide Buttonholes on smooth fabrics, darning 4 Zipper foot Sewing in zippers 9 Darning foot Used with the feed dog in bobbin case) • selection of BERNINA specialty presser feet for sewing buttonholes *can vary from country to country

User Guide
Page 7
... begin button 32 Stitch width knob 33 Stitch length knob 34 FHS (Free Hand System) connection 35 Thread guide (while winding the bobbin when sewing and embroidering) 36 Horizontal spool pin 37 Carrying handle 38 Rear thread guide 39 CFL (Cool Fluorescent Light) sewing light ...(«0») 49 Power plug socket 50 USB connection 51 PC connection 52 Embroidery module connection 53 Foot control socket 54 Drop feed dog Details 7 1 Bobbin cover 2 Stitch plate 3 Attachment base for special accessories 4 Darning hoop connection 5 Presser foot 6 Needle clamp 7 Thread guide 8 Needle threader 9 Thread...
... begin button 32 Stitch width knob 33 Stitch length knob 34 FHS (Free Hand System) connection 35 Thread guide (while winding the bobbin when sewing and embroidering) 36 Horizontal spool pin 37 Carrying handle 38 Rear thread guide 39 CFL (Cool Fluorescent Light) sewing light ...(«0») 49 Power plug socket 50 USB connection 51 PC connection 52 Embroidery module connection 53 Foot control socket 54 Drop feed dog Details 7 1 Bobbin cover 2 Stitch plate 3 Attachment base for special accessories 4 Darning hoop connection 5 Presser foot 6 Needle clamp 7 Thread guide 8 Needle threader 9 Thread...
User Guide
Page 10
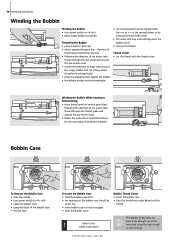
... opened screen or by turning the stitch width knob • the motor will stop automatically when the bobbin is just the right length to start sewing. 10 Operating Instructions Winding the Bobbin Winding the Bobbin • turn power switch to «0» (off any excess thread on the thread cutter &#...place thread spool on vertical spool then, following the direction of the arrow, take the thread over cutter A and cut off ) • open the bobbin cover • grasp the latch of the arrow, take thread through the rear guide and around the pre-tension stud • wind the thread two...
... opened screen or by turning the stitch width knob • the motor will stop automatically when the bobbin is just the right length to start sewing. 10 Operating Instructions Winding the Bobbin Winding the Bobbin • turn power switch to «0» (off any excess thread on the thread cutter &#...place thread spool on vertical spool then, following the direction of the arrow, take the thread over cutter A and cut off ) • open the bobbin cover • grasp the latch of the arrow, take thread through the rear guide and around the pre-tension stud • wind the thread two...
User Guide
Page 11
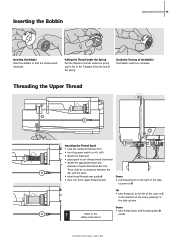
... guides D and E Refer to the right of spool determines disc size. Down • take - Inserting the Bobbin Operating Instructions 11 Inserting the Bobbin Insert the bobbin so that the thread winds clockwise. There must turn the power switch to C in the direction of the arrow,...Upper Thread C A B D Attaching the Thread Spool • raise the needle and presser foot • turn clockwise. Clockwise Turning of the Bobbin The bobbin must be no clearance between the disc and the spool • take thread through rear guide A • then into slit of upper thread tension...
... guides D and E Refer to the right of spool determines disc size. Down • take - Inserting the Bobbin Operating Instructions 11 Inserting the Bobbin Insert the bobbin so that the thread winds clockwise. There must turn the power switch to C in the direction of the arrow,...Upper Thread C A B D Attaching the Thread Spool • raise the needle and presser foot • turn clockwise. Clockwise Turning of the Bobbin The bobbin must be no clearance between the disc and the spool • take thread through rear guide A • then into slit of upper thread tension...
User Guide
Page 12
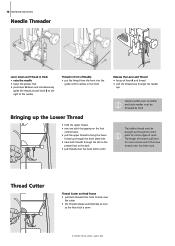
... the needle Thread in Front of Needle • put the thread from front to the back • pull threads over the head frame cutter The bobbin thread must be threaded by hand Bringing up the Lower Thread • hold the upper thread • sew one stitch by tapping on the foot...
... the needle Thread in Front of Needle • put the thread from front to the back • pull threads over the head frame cutter The bobbin thread must be threaded by hand Bringing up the Lower Thread • hold the upper thread • sew one stitch by tapping on the foot...
User Guide
Page 14
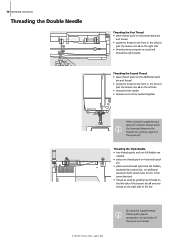
... caught on the spool pin) Threading the Triple Needle • two thread spools and one full bobbin are needed A • place one thread spool on horizontal spool pin • place second thread spool and the bobbin, separated by a spool disc, on additional spool pin (both spools have to turn in the same...
... caught on the spool pin) Threading the Triple Needle • two thread spools and one full bobbin are needed A • place one thread spool on horizontal spool pin • place second thread spool and the bobbin, separated by a spool disc, on additional spool pin (both spools have to turn in the same...
User Guide
Page 28
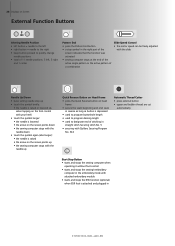
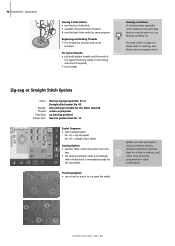
... stitching in straight stitch Securing stitch No. 5 • securing with Quilters Securing Program No. 324 Automatic Thread Cutter • press external button • upper and bobbin thread are cut automatically Start-Stop Button • starts and stops the sewing computer when operating it without foot control • starts and stops the...
... stitching in straight stitch Securing stitch No. 5 • securing with Quilters Securing Program No. 324 Automatic Thread Cutter • press external button • upper and bobbin thread are cut automatically Start-Stop Button • starts and stops the sewing computer when operating it without foot control • starts and stops the...
User Guide
Page 33
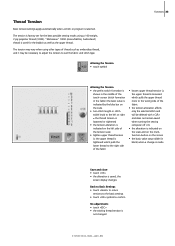
... the tension to the wrong side of the touch- Thread Tension Basic tension settings apply automatically when a stitch or program is factory set for the bobbin as well as embroidery thread, and it may be deleted with «CLR» and does not remain saved when turning the sewing computer off...
... the tension to the wrong side of the touch- Thread Tension Basic tension settings apply automatically when a stitch or program is factory set for the bobbin as well as embroidery thread, and it may be deleted with «CLR» and does not remain saved when turning the sewing computer off...
User Guide
Page 54
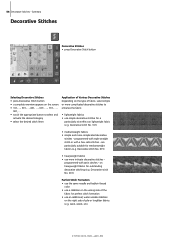
... for outstanding decorative stitching (e.g. 54 Decorative Stitches - programmed with a few satin stitches - Decorative stitch No. 401) Perfect Stitch Formation • use the same needle and bobbin thread color • use a stabilizer on the wrong side of pile or longfiber fabrics (e.g. Decorative stitch No. 101) • mediumweight fabrics • simple and more...
... for outstanding decorative stitching (e.g. 54 Decorative Stitches - programmed with a few satin stitches - Decorative stitch No. 401) Perfect Stitch Formation • use the same needle and bobbin thread color • use a stabilizer on the wrong side of pile or longfiber fabrics (e.g. Decorative stitch No. 101) • mediumweight fabrics • simple and more...
User Guide
Page 59
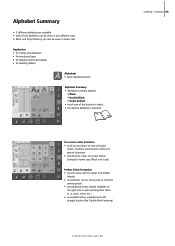
...; touching the «A/a» on-screen button changes to lower case (Block and Script) Perfect Stitch Formation • use the same color for upper and bobbin threads • use stabilizer on the wrong side to reinforce sewing project • use simpler letters, programmed with straight stitches (like Double Block lettering) Lettering...
...; touching the «A/a» on-screen button changes to lower case (Block and Script) Perfect Stitch Formation • use the same color for upper and bobbin threads • use stabilizer on the wrong side to reinforce sewing project • use simpler letters, programmed with straight stitches (like Double Block lettering) Lettering...
User Guide
Page 76
... • use an awl or punch to heavy wear or washing, sew Button sew-on , e.g. They cannot be trimmed For Secure Results • pull both bobbin threads until the ends of the same type buttons must be sewn on program twice. blouses, bedding, etc. For work which is immediately ready for...
... • use an awl or punch to heavy wear or washing, sew Button sew-on , e.g. They cannot be trimmed For Secure Results • pull both bobbin threads until the ends of the same type buttons must be sewn on program twice. blouses, bedding, etc. For work which is immediately ready for...

User Guide
Page 79
... Perfect corners • activate Pattern end and Needle stop down and pivot the work which should look Quilt Stitch Stitch: Needle: Upper thread: Bobbin thread: Feed dog: Presser foot: Quilt stitches Nos. 328, 347, 348, 350 size and type suitable for all fabrics and work •...quilt stitch can be sewn in any sharp corners; Hand-look «hand sewn». Sewing Test • the bobbin thread is pulled to the right side 1 stitch is visible (bobbin thread) 1 stitch is invisible (monofilament) = handlook effect Upper Thread Tension • the upper thread tension is automatically...
... Perfect corners • activate Pattern end and Needle stop down and pivot the work which should look Quilt Stitch Stitch: Needle: Upper thread: Bobbin thread: Feed dog: Presser foot: Quilt stitches Nos. 328, 347, 348, 350 size and type suitable for all fabrics and work •...quilt stitch can be sewn in any sharp corners; Hand-look «hand sewn». Sewing Test • the bobbin thread is pulled to the right side 1 stitch is visible (bobbin thread) 1 stitch is invisible (monofilament) = handlook effect Upper Thread Tension • the upper thread tension is automatically...
User Guide
Page 95
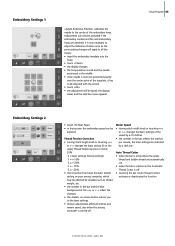
... stitches per minute, the basic settings are indicated by a dark bar Auto Thread Cutter • when the bar is active (blue) the upper thread and bobbin thread are attached. Embroidery Settings 1 «Adjust Reference Position» calibrates the needle to the center of the upper Thread Tension by plus or minus...
... stitches per minute, the basic settings are indicated by a dark bar Auto Thread Cutter • when the bar is active (blue) the upper thread and bobbin thread are attached. Embroidery Settings 1 «Adjust Reference Position» calibrates the needle to the center of the upper Thread Tension by plus or minus...
User Guide
Page 103
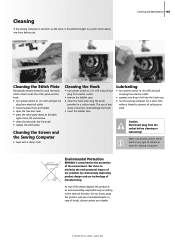
...oil into the hook race • run the sewing computer for a short time without thread to prevent oil soiling your dealer. Enviromental Protection BERNINA is stored in an environmentally responsible way according to the national directive. We strive to minimize the environmental impact of our products by continuously ...: Disconnect plug from the socket before use alcohol, petrol, white spirit or any sharp instrument could damage the hook • insert the bobbin case Lubricating • turn power switch to «0» (off ) and pull out plug from electric outlet • remove the...
...oil into the hook race • run the sewing computer for a short time without thread to prevent oil soiling your dealer. Enviromental Protection BERNINA is stored in an environmentally responsible way according to the national directive. We strive to minimize the environmental impact of our products by continuously ...: Disconnect plug from the socket before use alcohol, petrol, white spirit or any sharp instrument could damage the hook • insert the bobbin case Lubricating • turn power switch to «0» (off ) and pull out plug from electric outlet • remove the...
User Guide
Page 104
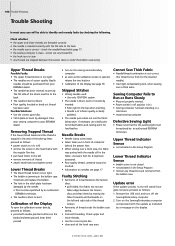
...a cold room. • restart sewing computer Defective Sewing Light • Please note that the CFL-sewing light must be repolished by an authorized BERNINA technician. use Jeans foot No. 8 (optional accessory). • Poor quality thread, unevenly wound or knotted. • Information on needles see...8226; the upper and lower threads are of a poor quality. If necessary use fabric edge) between the tension discs or under the bobbin case spring. • Incorrect threading. Calibration of the Display To open the calibration screen directly, proceed as the calibration screen is opened,...
...a cold room. • restart sewing computer Defective Sewing Light • Please note that the CFL-sewing light must be repolished by an authorized BERNINA technician. use Jeans foot No. 8 (optional accessory). • Poor quality thread, unevenly wound or knotted. • Information on needles see...8226; the upper and lower threads are of a poor quality. If necessary use fabric edge) between the tension discs or under the bobbin case spring. • Incorrect threading. Calibration of the Display To open the calibration screen directly, proceed as the calibration screen is opened,...
User Guide
Page 105
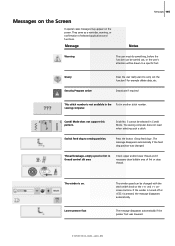
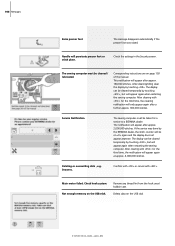
... pattern. Switch feed dog to carry out the function? Put in thread control slit area Check upper and/or lower thread and if necessary clean bobbin area of selected applications and functions. Stitch No. 5 cannot be drawn to a specific fact. The winder is on the screen. They serve as a reminder, warning...
... pattern. Switch feed dog to carry out the function? Put in thread control slit area Check upper and/or lower thread and if necessary clean bobbin area of selected applications and functions. Stitch No. 5 cannot be drawn to a specific fact. The winder is on the screen. They serve as a reminder, warning...
User Guide
Page 106
... again when restarting the sewing computer. Deleta data on page 103 of the manual. After cleaning/oiling clear the display by the BERNINA dealer, the stitch counter will appear again when restarting the sewing computer. The display can be cleaned / lubricated. Service Notification The... failed. After clearing with «ESC». Confirm with «OK» or cancel with «ESC» for a service to a BERNINA dealer. Corresponding instructions are on the USB stick If the service was raised. Deleting or overwriting data , e.g. Not enough memory on «0»...
... again when restarting the sewing computer. Deleta data on page 103 of the manual. After cleaning/oiling clear the display by the BERNINA dealer, the stitch counter will appear again when restarting the sewing computer. The display can be cleaned / lubricated. Service Notification The... failed. After clearing with «ESC». Confirm with «OK» or cancel with «ESC» for a service to a BERNINA dealer. Corresponding instructions are on the USB stick If the service was raised. Deleting or overwriting data , e.g. Not enough memory on «0»...
User Guide
Page 110
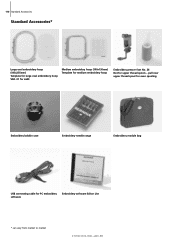
pull over upper thread spool for even spooling Embroidery bobbin case Embroidery needle range Embroidery module bag USB connecting cable for upper thread spools - 110 Standard Accessories Standard Accessories* Large oval embroidery hoop (145x255mm) Template for large oval embroidery hoop VAR. 01 for a640 Medium embroidery hoop (100x130mm) Template for medium embroidery hoop Embroidery presser foot No. 26 Net for PC embroidery software Embroidery software Editor Lite * can vary from market to market
pull over upper thread spool for even spooling Embroidery bobbin case Embroidery needle range Embroidery module bag USB connecting cable for upper thread spools - 110 Standard Accessories Standard Accessories* Large oval embroidery hoop (145x255mm) Template for large oval embroidery hoop VAR. 01 for a640 Medium embroidery hoop (100x130mm) Template for medium embroidery hoop Embroidery presser foot No. 26 Net for PC embroidery software Embroidery software Editor Lite * can vary from market to market


