Manual
Page 3
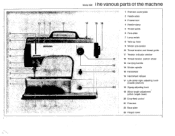
... the machine 14 15 16 1 Free-arm cover-plate 2 Needle-plate 3 Presser-foot 4 Needle-clamp 5 Thread guide 6 Face-plate 7 Lamp switch 8 8 Take-up lever BERNINA' 01 9 9 Winder pre-tension 10 Thread tension and thread guide 11 Tension indicator window 17 12 Thread tension control wheel 13 Carrying handle 18 14 Winder spindle 9 15 Handwheel 16 Handwheel release...
... the machine 14 15 16 1 Free-arm cover-plate 2 Needle-plate 3 Presser-foot 4 Needle-clamp 5 Thread guide 6 Face-plate 7 Lamp switch 8 8 Take-up lever BERNINA' 01 9 9 Winder pre-tension 10 Thread tension and thread guide 11 Tension indicator window 17 12 Thread tension control wheel 13 Carrying handle 18 14 Winder spindle 9 15 Handwheel 16 Handwheel release...

Manual
Page 7
... again down to the slot of the take -up through the thread guide (5) up to the needle eye. With the right hand hold the spool steady. For your guidance: Normal tension = Black line in center = Looser tension. Hold needle thread loosely. Loosen the needle clamp screw half a turn knob to... the needle in its highest position. Now draw thread through the needle hole. The tension centering wheel (12) can be lowered. • Darning. BERNINA L4 I the zigzag and straight stitch sign. 7 Now turn the hand wheel towards you until the...
... again down to the slot of the take -up through the thread guide (5) up to the needle eye. With the right hand hold the spool steady. For your guidance: Normal tension = Black line in center = Looser tension. Hold needle thread loosely. Loosen the needle clamp screw half a turn knob to... the needle in its highest position. Now draw thread through the needle hole. The tension centering wheel (12) can be lowered. • Darning. BERNINA L4 I the zigzag and straight stitch sign. 7 Now turn the hand wheel towards you until the...
Manual
Page 10
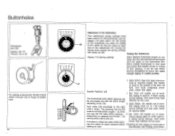
...2. by hand. Hold work . few stitches, still holding work . By turning the zigzag knob slightly the spring settings can set with the guide on to 1,75 (using The buttonhole satin stitch spacing can be felt. hole to the right until it stops. Bar Tack: Lift needle...needle out of work It is vertical (stitch length = 0). Sewing the Buttonhole Zigzag 1,75 (Spring setting) Mark desired buttonhole length on material and thread - Lift foot. The marking line on 0 and sew a starting to middle of foot opening. ing on a piece of spare material before Finishing...
...2. by hand. Hold work . few stitches, still holding work . By turning the zigzag knob slightly the spring settings can set with the guide on to 1,75 (using The buttonhole satin stitch spacing can be felt. hole to the right until it stops. Bar Tack: Lift needle...needle out of work It is vertical (stitch length = 0). Sewing the Buttonhole Zigzag 1,75 (Spring setting) Mark desired buttonhole length on material and thread - Lift foot. The marking line on 0 and sew a starting to middle of foot opening. ing on a piece of spare material before Finishing...
Manual
Page 12
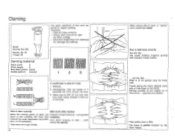
Hold the hoop correctly. - Same way as 2nd run of stitching. How to be guided must be firmly held. this . but only over hole itself losing threads in 2nd run but like this... Selvedgeway. (Not too dense or it becomes too thick around the hole. ... Darning Small darning foot 285 Needle: 80-70 Thread: 50 e7) Darning material Stitch width: 0 Stitch length: 0 Drop feed control: center Needle position: lowered The quick mastering of this work depends on top) - on regular guiding. What is guided however by the outer fingers. Thumb facing the ...
Hold the hoop correctly. - Same way as 2nd run of stitching. How to be guided must be firmly held. this . but only over hole itself losing threads in 2nd run but like this... Selvedgeway. (Not too dense or it becomes too thick around the hole. ... Darning Small darning foot 285 Needle: 80-70 Thread: 50 e7) Darning material Stitch width: 0 Stitch length: 0 Drop feed control: center Needle position: lowered The quick mastering of this work depends on top) - on regular guiding. What is guided however by the outer fingers. Thumb facing the ...


