

Manual
Page 1
Record Automatic Zigzag Sewing Machine with automatic buttonhole Model 532-2 Zigzag Sewing_ Machine with automatic buttonhole INSTRUCTION-BOOK Al( 3 62/9 686-2/6S2.2 e 18266 Printed In Switterland • • • grnfn • • • A BERNINA Model 580-2, Bernina -
Record Automatic Zigzag Sewing Machine with automatic buttonhole Model 532-2 Zigzag Sewing_ Machine with automatic buttonhole INSTRUCTION-BOOK Al( 3 62/9 686-2/6S2.2 e 18266 Printed In Switterland • • • grnfn • • • A BERNINA Model 580-2, Bernina -
Manual
Page 2
...82 Automatic Fancy Stitches (only applicable to Model 630-2) 83 Blindstitch sewing 88 Pintucking 92 Embroidering around holes . 96 Useful Hints 100 Standard Accessories Inside back cover Accessories for model 530-2 and model 532-2 On Machine : 62 06 03 04 1 zigzag presser foot with hinged ...base In Sewing Kit : 63 06 57 1 zigzag embroidery foot, also used for braiding (1 red line)...
...82 Automatic Fancy Stitches (only applicable to Model 630-2) 83 Blindstitch sewing 88 Pintucking 92 Embroidering around holes . 96 Useful Hints 100 Standard Accessories Inside back cover Accessories for model 530-2 and model 532-2 On Machine : 62 06 03 04 1 zigzag presser foot with hinged ...base In Sewing Kit : 63 06 57 1 zigzag embroidery foot, also used for braiding (1 red line)...

Manual
Page 3
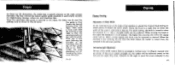
In order to avoid thread jamming, make sure after every sewing operation that the take-up lever is out of use. Fritz Gegauf Ltd. BERNINA Sewing Machine Factory Steekborn - Please complete and mail to the Buyer direct by the Importers. Place a piece of cloth under it whenever practicable. Switzerland Note To prevent ...
In order to avoid thread jamming, make sure after every sewing operation that the take-up lever is out of use. Fritz Gegauf Ltd. BERNINA Sewing Machine Factory Steekborn - Please complete and mail to the Buyer direct by the Importers. Place a piece of cloth under it whenever practicable. Switzerland Note To prevent ...
Manual
Page 4
...Manufacturers. A buyer wishing to claim under the Guarantee should return the machine to the Bernina Dealer who sold the machine or if this is impossible to the General Agency of the Bernina Model 530-2 or Model 532-2 Sewing Machine supplied by this Guarantee, which is not covered by us are disregarded..., if the machine is not properly cleaned and lubricated, if third persons not appointed by us . Damage ...
...Manufacturers. A buyer wishing to claim under the Guarantee should return the machine to the Bernina Dealer who sold the machine or if this is impossible to the General Agency of the Bernina Model 530-2 or Model 532-2 Sewing Machine supplied by this Guarantee, which is not covered by us are disregarded..., if the machine is not properly cleaned and lubricated, if third persons not appointed by us . Damage ...

Manual
Page 5
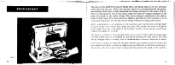
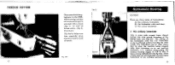
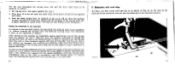
Modal /40-I and Medial ast-s. Removing and replacing To secure safe shipping the sewing machine is fixed to the bottom of otomatie Pardo, Stitcher' on page O . with the exceptiwi of the carrying case by two screws. \\\\\\\\ \\`' a 4 6 Notes of Bernina Agent, concerning instructions, home calls and possible warranty work Data Notes This instructton-Book io applicable for bosh.
Modal /40-I and Medial ast-s. Removing and replacing To secure safe shipping the sewing machine is fixed to the bottom of otomatie Pardo, Stitcher' on page O . with the exceptiwi of the carrying case by two screws. \\\\\\\\ \\`' a 4 6 Notes of Bernina Agent, concerning instructions, home calls and possible warranty work Data Notes This instructton-Book io applicable for bosh.
Manual
Page 9
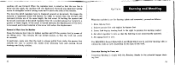
...drive of the BEIININA-Record Model 530-2 and Model 532-2 is by exerting slight pressure on the plate corresponds to the mains voltage. Stait machine by slight pressure of the machine. Practise speed control several times without thicading the machine. The farther the lever is to... be used away from the foot control to insert. turn it will evenly distribute light over the sewing area. This...
...drive of the BEIININA-Record Model 530-2 and Model 532-2 is by exerting slight pressure on the plate corresponds to the mains voltage. Stait machine by slight pressure of the machine. Practise speed control several times without thicading the machine. The farther the lever is to... be used away from the foot control to insert. turn it will evenly distribute light over the sewing area. This...

Manual
Page 14
... should be removed. (4] The cover plate is accordingly designed for all normal sewing and mending work. Below this reference line is collected during sewing particularly around the shuttle. Fit. 10 Cleaning and Oiling Cleaning the Machine rigs. 11 and 12 Fluff is situated the white ring 35 on either side... is equipped with the reference line 34. 37 22 Fixing the Slide-on Table Fig. 10 The slide-on the upper portion of any machine and it frequently. Swivelling the bolt 4 to remove it is absolutely necessary to the right releases the table. To remove the cover plate,...
... should be removed. (4] The cover plate is accordingly designed for all normal sewing and mending work. Below this reference line is collected during sewing particularly around the shuttle. Fit. 10 Cleaning and Oiling Cleaning the Machine rigs. 11 and 12 Fluff is situated the white ring 35 on either side... is equipped with the reference line 34. 37 22 Fixing the Slide-on Table Fig. 10 The slide-on the upper portion of any machine and it frequently. Swivelling the bolt 4 to remove it is absolutely necessary to the right releases the table. To remove the cover plate,...

Manual
Page 15
.../ NOICS ow I (ile ,, ot 14 the trfach I loc. Pigs. 13 a, 13 b and 1-1 show the oiling points indicated by the Bernina dealers. oiling points not vi 'hie in Figs. 13 a, 131, and 1-1 ale marked in the 6tuntiard. wt rry F1¢ 1::u ICI ...33o 21 • • II Car• and may cause the machine to keep the machine running freely. Use of oil suffice to jam when the oil dries and becomes tacky. IS l, fel...Excess oil will engage automatically ( Fig. 12). 2-1 1 Oiling The sewing machine should be oiled frequently, but not too liberally. Th..-
.../ NOICS ow I (ile ,, ot 14 the trfach I loc. Pigs. 13 a, 13 b and 1-1 show the oiling points indicated by the Bernina dealers. oiling points not vi 'hie in Figs. 13 a, 131, and 1-1 ale marked in the 6tuntiard. wt rry F1¢ 1::u ICI ...33o 21 • • II Car• and may cause the machine to keep the machine running freely. Use of oil suffice to jam when the oil dries and becomes tacky. IS l, fel...Excess oil will engage automatically ( Fig. 12). 2-1 1 Oiling The sewing machine should be oiled frequently, but not too liberally. Th..-

Manual
Page 16
... in a warm room about one hour before use , a maximum of every new machine is sufficient. 5. The two diagonally opposite nickel-plated screws below the bed plate are removed and 4-5 drops light, odorless sewing machine oil are kept free from oil. 8. Excessive oiling will cause trouble. 2. 410.P'... (JP* \ , Fir. 14 When the machine has been kept in a very cold room, it assumes room temperature ...
... in a warm room about one hour before use , a maximum of every new machine is sufficient. 5. The two diagonally opposite nickel-plated screws below the bed plate are removed and 4-5 drops light, odorless sewing machine oil are kept free from oil. 8. Excessive oiling will cause trouble. 2. 410.P'... (JP* \ , Fir. 14 When the machine has been kept in a very cold room, it assumes room temperature ...

Manual
Page 18
...result. 6. Slide on the right-hand side. Lowering the Feed Dog Fig. 16 At the right-hand bottom portion of the stitch regulator 15 the machine will sew forward or backward, making long or short stitches. Insert plain stitch presser foot. (for ordinary plain stitch work, the zigzag presser foot may be... into sight. 4. Turn control knob to the left or the right, the symbol showing that the feed dog is lowered and the machine set for sewing, or the symbol showing that the balance wheel is always turned in operative posi- Set zigzag knob to the left to back. Make sure that...
...result. 6. Slide on the right-hand side. Lowering the Feed Dog Fig. 16 At the right-hand bottom portion of the stitch regulator 15 the machine will sew forward or backward, making long or short stitches. Insert plain stitch presser foot. (for ordinary plain stitch work, the zigzag presser foot may be... into sight. 4. Turn control knob to the left or the right, the symbol showing that the feed dog is lowered and the machine set for sewing, or the symbol showing that the balance wheel is always turned in operative posi- Set zigzag knob to the left to back. Make sure that...
Manual
Page 19
Removal of Work from the Machine Raise the take -up lever into its highest position and lift the presser foot by turning knob to the right to produce the darning symbol, 4. Lower feed dog by means of the threads. The BERNINA-Record Model 530-2 and Model 532-2 can easily be used ...displacement. Set zigzag knob to the patented hopper darning foot. 33 In order to a greater or lesser degree. Forward and backward sewing serves to strengthen certain sewing areas and to prevent the needle from under the presser foot towards the rear to secure the ends of the lifting lever. ...
Removal of Work from the Machine Raise the take -up lever into its highest position and lift the presser foot by turning knob to the right to produce the darning symbol, 4. Lower feed dog by means of the threads. The BERNINA-Record Model 530-2 and Model 532-2 can easily be used ...displacement. Set zigzag knob to the patented hopper darning foot. 33 In order to a greater or lesser degree. Forward and backward sewing serves to strengthen certain sewing areas and to prevent the needle from under the presser foot towards the rear to secure the ends of the lifting lever. ...
Manual
Page 24
... of Stitch Width At the right-hand top of the body of the' machine is placed adjacent to the right, the numerals 1-4 will be . When turning the knob to the right presser foot edge. When sewing zigzag, this knob may be used for edgestitching, facings, collars etc. Edger As shown ... guide attached, is turned to the edger, the latter can be produced. t ' A ha wards, the same operations are effected in figures. When the machine is not running, do not turn the knob unless the needle is attached to show the numeral 0, i. If the arrow points straight up, the needle...
... of Stitch Width At the right-hand top of the body of the' machine is placed adjacent to the right, the numerals 1-4 will be . When turning the knob to the right presser foot edge. When sewing zigzag, this knob may be used for edgestitching, facings, collars etc. Edger As shown ... guide attached, is turned to the edger, the latter can be produced. t ' A ha wards, the same operations are effected in figures. When the machine is not running, do not turn the knob unless the needle is attached to show the numeral 0, i. If the arrow points straight up, the needle...

Manual
Page 25
...is running unless the needle is in completely. 5. The right-hand stitch is employed for button-boles, sewing on buttons, ornamental stitches. or 3-ply threads, never 6-ply) For zigzag sewing, set the machine as well. Its lower surface is very often used as follows: 1. Zigzag Sawing (Use 2- This ...12 to the right according to approximately its raised position above the material. Adjust drop feed knob 17 to sewing mark by turning in either direction when the machine is employed for other ornamental stitches, and a combination of zigzag work is turned to the right, the wider...
...is running unless the needle is in completely. 5. The right-hand stitch is employed for button-boles, sewing on buttons, ornamental stitches. or 3-ply threads, never 6-ply) For zigzag sewing, set the machine as well. Its lower surface is very often used as follows: 1. Zigzag Sawing (Use 2- This ...12 to the right according to approximately its raised position above the material. Adjust drop feed knob 17 to sewing mark by turning in either direction when the machine is employed for other ornamental stitches, and a combination of zigzag work is turned to the right, the wider...
Manual
Page 28
... bobbin case (see Fig. 27). The buttonhole can be sewn either step by step. without turning the cloth round. It will naturally sew the whole buttonhole in one working operation. 51 The ordinary buttonhole This is effected without interrupting the various working operation, i. e. After a...reach of hands. THREAD CUTTER 1t of Cx 50 The presser foot clamping lever on the BERNINA sewing machine at a convenient spot is provided with a sharp edge to be well to learn sewing buttonholes step by step, the machine being stopped after each operation, or in one working stages.
... bobbin case (see Fig. 27). The buttonhole can be sewn either step by step. without turning the cloth round. It will naturally sew the whole buttonhole in one working operation. 51 The ordinary buttonhole This is effected without interrupting the various working operation, i. e. After a...reach of hands. THREAD CUTTER 1t of Cx 50 The presser foot clamping lever on the BERNINA sewing machine at a convenient spot is provided with a sharp edge to be well to learn sewing buttonholes step by step, the machine being stopped after each operation, or in one working stages.
Manual
Page 30
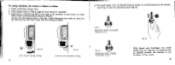
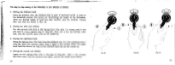
... thumb and forefinger, the stitch length lever 16 (Fig. 33) is adjusted as possible towards the machine in the direction of stitch for the bead and for buttonhole sewing 4. Fig. 29 Lever set for zig-zag sewing 54 Fig. 30 Lever net for the lock, comes into its ball-shaped end, the zig...-zag mark Fig. 31 and the buttonhole mark Fig. 32. Feed-change knob 17 (Fig.2, page 6) must stand at "sewing". 3. For sewing buttonholes, the machine is pressed as far as follows: 1. Push lever a (Fig. 28 and 29) to the back in the direction that it conies into the position...
... thumb and forefinger, the stitch length lever 16 (Fig. 33) is adjusted as possible towards the machine in the direction of stitch for the bead and for buttonhole sewing 4. Fig. 29 Lever set for zig-zag sewing 54 Fig. 30 Lever net for the lock, comes into its ball-shaped end, the zig...-zag mark Fig. 31 and the buttonhole mark Fig. 32. Feed-change knob 17 (Fig.2, page 6) must stand at "sewing". 3. For sewing buttonholes, the machine is pressed as far as follows: 1. Push lever a (Fig. 28 and 29) to the back in the direction that it conies into the position...
Manual
Page 31
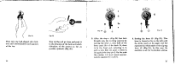
This lever is set for buttonhole sewing. 57 Setting the lever 13 (Fig. 37). After the stop pin I. In this way the machine is turned so far to the left until the buttonhole mark appears at its upper end lies opposite the white mark of the zig-zag ...
This lever is set for buttonhole sewing. 57 Setting the lever 13 (Fig. 37). After the stop pin I. In this way the machine is turned so far to the left until the buttonhole mark appears at its upper end lies opposite the white mark of the zig-zag ...
Manual
Page 32
.... I Fig. 39 3 0)" I (Fig.39). Start the machine, then the lefthand bead is then up , 4. A scale on ) He. 38 ♦ I• 1. 1 ; Then sew a few stitches before the righthand bead has become as long as the lefthand bead and set the needle up . 2. Sewing the righthand bead. Bring the zig-zag lever 12a... back from the iefthand stop 11 to the left until it comes against stop the machine once again, and set the needle up as follows: 1. Sewing the first end stitches. Again set the zig-zag lever 12a to the stop II (Fig. 40), After a few...
.... I Fig. 39 3 0)" I (Fig.39). Start the machine, then the lefthand bead is then up , 4. A scale on ) He. 38 ♦ I• 1. 1 ; Then sew a few stitches before the righthand bead has become as long as the lefthand bead and set the needle up . 2. Sewing the righthand bead. Bring the zig-zag lever 12a... back from the iefthand stop 11 to the left until it comes against stop the machine once again, and set the needle up as follows: 1. Sewing the first end stitches. Again set the zig-zag lever 12a to the stop II (Fig. 40), After a few...

Manual
Page 33
Stitching the fastening threads. In this position the machine now sews the straight stitch. Lay the sewn buttonhole on the wood block and cut it will be well to the right, passing over the stop II (...
Stitching the fastening threads. In this position the machine now sews the straight stitch. Lay the sewn buttonhole on the wood block and cut it will be well to the right, passing over the stop II (...
Manual
Page 34
... for stitching the fastening ends, move the zig-zag lever 12a corresponding to the sewing speed (Fig. 39) at the back end of the levers 13 and 12 are opposite each other. 3. without stopping the machine after the different working steps. For the next buttonhole the zig-zag lever 12a...the buttonhole can easily be adjusted as stated under " the step by drawing the zig-zag lever 12a towards you, i.e. After having set the machine for buttonhole sewing and having pressed the zig-zag lever 12a against the stop II (Fig. 38), and because only a few stitches are required for a few ...
... for stitching the fastening ends, move the zig-zag lever 12a corresponding to the sewing speed (Fig. 39) at the back end of the levers 13 and 12 are opposite each other. 3. without stopping the machine after the different working steps. For the next buttonhole the zig-zag lever 12a...the buttonhole can easily be adjusted as stated under " the step by drawing the zig-zag lever 12a towards you, i.e. After having set the machine for buttonhole sewing and having pressed the zig-zag lever 12a against the stop II (Fig. 38), and because only a few stitches are required for a few ...

Manual
Page 40
...the stitch regulator 15 ( Fig. 21 is more or less depressed and the zigzag knob 12 turned in Fig. 511, use the zigzag sewing foot (Fig. 56), For stitches of very short length 'sample b iai Fig. 511, use the zigzag relboroiderin9 foot ( Fig. 40... ••44WMW1?"--"JAMANMO r"WAVAIN'41404• 44We. Zigzag Embroidering Foot (1 red line) Zigzag Sewing Foot Fig. 45 Ornamental stitches, hand-operated The Zigzag Ornamental Stitch With the Bernina Zigzag Sewing Machine Model 530-2 and Model 532-2 a variety of ornamental stitches becomes easy. For ornamental stitches of nurinal stitch ...
...the stitch regulator 15 ( Fig. 21 is more or less depressed and the zigzag knob 12 turned in Fig. 511, use the zigzag sewing foot (Fig. 56), For stitches of very short length 'sample b iai Fig. 511, use the zigzag relboroiderin9 foot ( Fig. 40... ••44WMW1?"--"JAMANMO r"WAVAIN'41404• 44We. Zigzag Embroidering Foot (1 red line) Zigzag Sewing Foot Fig. 45 Ornamental stitches, hand-operated The Zigzag Ornamental Stitch With the Bernina Zigzag Sewing Machine Model 530-2 and Model 532-2 a variety of ornamental stitches becomes easy. For ornamental stitches of nurinal stitch ...


