
Manual
Page 2
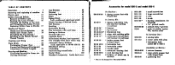
... plain stitch presser foot with plug 1 instruction book model 530-2/ 582-2 58 04 48 01 68 06 44 53 06 46 Available. TABLE OF CONTENTS Guarantee 1 Removing and replacing of machine 6 Electric part 12 Bobbin Case and Bobbin 14 Removal of Bobbin Case . . 14 Spooling the Lower Thread . . 15 Inserting the Bobbin in the Case and Threading the Bobbin Thread Replacing Bobbin Case in Shuttle 17 Needle and Thread Needle and Thread Selection . . 18 Needle and Thread Table . . . 19 Threading the Top Thread / Bringing up the Bobbin Thread 21 Thread Tension 22 Cleaning and Oiling 29...
... plain stitch presser foot with plug 1 instruction book model 530-2/ 582-2 58 04 48 01 68 06 44 53 06 46 Available. TABLE OF CONTENTS Guarantee 1 Removing and replacing of machine 6 Electric part 12 Bobbin Case and Bobbin 14 Removal of Bobbin Case . . 14 Spooling the Lower Thread . . 15 Inserting the Bobbin in the Case and Threading the Bobbin Thread Replacing Bobbin Case in Shuttle 17 Needle and Thread Needle and Thread Selection . . 18 Needle and Thread Table . . . 19 Threading the Top Thread / Bringing up the Bobbin Thread 21 Thread Tension 22 Cleaning and Oiling 29...
Manual
Page 7
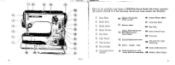
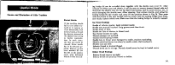
... 12 15 59 Fig. 2 1 Cover Plate 1 Needle Plate 3 Needle Holder 4 Thread Tension Face Plate 6 Light Switch 7 Take-up lever 0 Thread Guide 9 Ornamental Stitch Selector I' 10 Zigzag/ Ornamental Stitch control Balance wheel 16 Bobbin Winder Shaft 17 Drop Feed Knob 10 Bed Plate Zigzag, Plain Stitch and 12 Buttonhole sewing Control knob 19 Knee Control Lever 10 Free Arm 13 Needle Displacement lever 14 Stitch - Stop Set screw for satin stitch atop 59 Satin stitch atop lever 15 Stitch length lever with control knob for buttonhole 60 Balance wheel release 9 the controls referred to in the...
... 12 15 59 Fig. 2 1 Cover Plate 1 Needle Plate 3 Needle Holder 4 Thread Tension Face Plate 6 Light Switch 7 Take-up lever 0 Thread Guide 9 Ornamental Stitch Selector I' 10 Zigzag/ Ornamental Stitch control Balance wheel 16 Bobbin Winder Shaft 17 Drop Feed Knob 10 Bed Plate Zigzag, Plain Stitch and 12 Buttonhole sewing Control knob 19 Knee Control Lever 10 Free Arm 13 Needle Displacement lever 14 Stitch - Stop Set screw for satin stitch atop 59 Satin stitch atop lever 15 Stitch length lever with control knob for buttonhole 60 Balance wheel release 9 the controls referred to in the...
Manual
Page 8
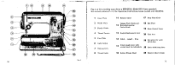
... BERNINA 12 0 a 3 2 14 15 'a • et) :1•72 7 7. 17 18 20 19 Fig. 3 on the preceding page shows a BERNINA Mode) 532-2 knee operated; Length - the controls referred to in the Operating Instructions being marked and identified. 1 Cover Plate 2 Needle Plate 3 Needle Holder 4 Thread Tension 5 Face Plate 6 Light Switch 7 Take-up lever Thread Guide 11 Balance wheel 17 Drop Feed Knob Zigzag, Plain Stitch and 12 Buttonhole sewing Control knob 18 Bed Plate 19 Knee Control Lever 13 Needle Displacement lever 20 Free Arm 14 Stitch...
... BERNINA 12 0 a 3 2 14 15 'a • et) :1•72 7 7. 17 18 20 19 Fig. 3 on the preceding page shows a BERNINA Mode) 532-2 knee operated; Length - the controls referred to in the Operating Instructions being marked and identified. 1 Cover Plate 2 Needle Plate 3 Needle Holder 4 Thread Tension 5 Face Plate 6 Light Switch 7 Take-up lever Thread Guide 11 Balance wheel 17 Drop Feed Knob Zigzag, Plain Stitch and 12 Buttonhole sewing Control knob 18 Bed Plate 19 Knee Control Lever 13 Needle Displacement lever 20 Free Arm 14 Stitch...

Manual
Page 11
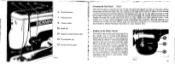
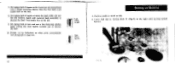
... pressure un the knee lever or foot plate. Insertion of the bobbin tensioning device 24 unto the bobbin 26. winding, turn it will ga. From the thread reel placed on the bobbin shaft engages in Shuttle 1 viz. Now release latch and make sure that the bobbin case finger 30 (Fig. 7) points upward and engages the recess in the shuttle race cover, Then place the bobbin case on the shuttle pin as...
... pressure un the knee lever or foot plate. Insertion of the bobbin tensioning device 24 unto the bobbin 26. winding, turn it will ga. From the thread reel placed on the bobbin shaft engages in Shuttle 1 viz. Now release latch and make sure that the bobbin case finger 30 (Fig. 7) points upward and engages the recess in the shuttle race cover, Then place the bobbin case on the shuttle pin as...

Manual
Page 12
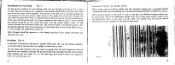
...-100 50-80 30-40 Thread suitable for the work; and six-ply, unglazed For darning: Nos. 50-80, two-ply For zigzag sewing: Nos. 60-90, three-ply only For ornamental stitches: Nos. 30 and 40, two-ply 19 Then tighten needle holder screw by turning it in anticlockwise direction and insert needle as far as guide. 18 The relation between thumb...
...-100 50-80 30-40 Thread suitable for the work; and six-ply, unglazed For darning: Nos. 50-80, two-ply For zigzag sewing: Nos. 60-90, three-ply only For ornamental stitches: Nos. 30 and 40, two-ply 19 Then tighten needle holder screw by turning it in anticlockwise direction and insert needle as far as guide. 18 The relation between thumb...
Manual
Page 13
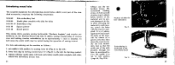
... the presser foot. Fig. 9 21 Bringing up . Make sure that take -up lever 7 and down again behind the thread guide pin 32 and through front eyelet 8 down to come up the Bobbin Thread The end of the top thread projecting from the needle eye is passed between the tension discs in its extreme upper position. Top and bottom threads are in the raised positions when threading the machine. O 8 8 t2...
... the presser foot. Fig. 9 21 Bringing up . Make sure that take -up lever 7 and down again behind the thread guide pin 32 and through front eyelet 8 down to come up the Bobbin Thread The end of the top thread projecting from the needle eye is passed between the tension discs in its extreme upper position. Top and bottom threads are in the raised positions when threading the machine. O 8 8 t2...

Manual
Page 14
... needle plate can be removed. (4] The cover plate is absolutely necessary to time, re- To remove the cover plate, open the hinged 39 plate and depress the releasing lever 40 (cf, Fig. 11) with a reference line 34 on the upper portion of a bolt. Fig. 11 23 When the table is slid onto the free arm, make sure that cleaning and oiling can be effected easily. In order to clamp the table...
... needle plate can be removed. (4] The cover plate is absolutely necessary to time, re- To remove the cover plate, open the hinged 39 plate and depress the releasing lever 40 (cf, Fig. 11) with a reference line 34 on the upper portion of a bolt. Fig. 11 23 When the table is slid onto the free arm, make sure that cleaning and oiling can be effected easily. In order to clamp the table...

Manual
Page 18
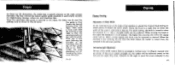
... stitch presser foot. (for 47 darning will sew forward or backward, making long or short stitches. Adjust stitch regulator so that the zero line of the stitch length dial 47 is not quite screwed in the direction of the arrow, i.e towards the operator. If the stitch regulator lever 15 is depressed so that the zero mark of the stitch length dial is lowered and the machine set for ordinary plain stitch work, the zigzag presser foot may be used...
... stitch presser foot. (for 47 darning will sew forward or backward, making long or short stitches. Adjust stitch regulator so that the zero line of the stitch length dial 47 is not quite screwed in the direction of the arrow, i.e towards the operator. If the stitch regulator lever 15 is depressed so that the zero mark of the stitch length dial is lowered and the machine set for ordinary plain stitch work, the zigzag presser foot may be used...
Manual
Page 19
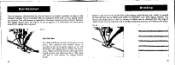
... under the presser foot towards the rear to prevent the needle from the Machine Raise the take -up lever into its highest position and lift the presser foot by means of the work can be removed. The BERNINA-Record Model 530-2 and Model 532-2 can easily be used for Linen, etc. When the regulator lever is raised so that the feed dog is not unnecessarily operated. 5. Remove presser foot and replace by turning...
... under the presser foot towards the rear to prevent the needle from the Machine Raise the take -up lever into its highest position and lift the presser foot by means of the work can be removed. The BERNINA-Record Model 530-2 and Model 532-2 can easily be used for Linen, etc. When the regulator lever is raised so that the feed dog is not unnecessarily operated. 5. Remove presser foot and replace by turning...
Manual
Page 24
... numerals 1-4 will be deflected evenly to the 43 Edger As shown by the illustration, the stitch hole is particularly suitable for quilting work as desired. When sewing zigzag, this knob may be produced. If the arrow points straight up, the needle will appear. and inserting zips. t ' A ha wards, the same operations are effected in which serves to the right presser foot edge.
... numerals 1-4 will be deflected evenly to the 43 Edger As shown by the illustration, the stitch hole is particularly suitable for quilting work as desired. When sewing zigzag, this knob may be produced. If the arrow points straight up, the needle will appear. and inserting zips. t ' A ha wards, the same operations are effected in which serves to the right presser foot edge.

Manual
Page 25
... completely. 5. Set the stitch length regulator between 0 and 4 on sewing table. 45 The zigzag knob should again not be turned to approximately its raised position above the material. This Is possible only if the screw 14 is hollow ground. right will cause the needle to be deflected from the right to sewing mark by turning in anti-clockwise direction. 4. Adjust drop feed knob 17...
... completely. 5. Set the stitch length regulator between 0 and 4 on sewing table. 45 The zigzag knob should again not be turned to approximately its raised position above the material. This Is possible only if the screw 14 is hollow ground. right will cause the needle to be deflected from the right to sewing mark by turning in anti-clockwise direction. 4. Adjust drop feed knob 17...
Manual
Page 27
.... 26 a b hichirdoilohodOokiudtamekletololaiiraole LiheLMAtiolditikdokiliofiohkeimioftilidiaftiesi, 49 Tight top thread tension and large stitch length produce the shell-type effect. The zigzag control knob 12 (Fig. 2) is operated in the same manner as fur roil hemming. The material with zigzag stitches. This shell roll hem is used particularly for edging knitted goods. 43 Braiding Insert a soft cord in the guide hole of the zigzag embroidering foot, which is marked by two red lines...
.... 26 a b hichirdoilohodOokiudtamekletololaiiraole LiheLMAtiolditikdokiliofiohkeimioftilidiaftiesi, 49 Tight top thread tension and large stitch length produce the shell-type effect. The zigzag control knob 12 (Fig. 2) is operated in the same manner as fur roil hemming. The material with zigzag stitches. This shell roll hem is used particularly for edging knitted goods. 43 Braiding Insert a soft cord in the guide hole of the zigzag embroidering foot, which is marked by two red lines...
Manual
Page 32
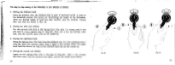
... buttonhole presser foot serves for determining the length of the buttonhole is now effected as follows: 1. Always take hold of the zig-zag lever 12a, give it a strong push to the stop the machine again and set the needle up . 3. Sewing the righthand bead. The step by step sawing of the buttonhole. I Fig. 39 3 0)" I (Fig.39). Then sew a few stitches have been sewn, stop the machine. Sewing...
... buttonhole presser foot serves for determining the length of the buttonhole is now effected as follows: 1. Always take hold of the zig-zag lever 12a, give it a strong push to the stop the machine again and set the needle up . 3. Sewing the righthand bead. The step by step sawing of the buttonhole. I Fig. 39 3 0)" I (Fig.39). Then sew a few stitches have been sewn, stop the machine. Sewing...
Manual
Page 37
... cloth lightly towards you to shorten the feed. 10. Set zigzag knob at twice the bead width and sew the end stitches. Finally cut be buttonhole as when sewn automatically (see paragraph 6, page 61). J1 40 • - _ • or • 5 'Cr Position needle to No. 2 and sew the second bead over a length somewhat shorter than the first bead. Last needle hole on left . 8. 7. Set zigzag knob...
... cloth lightly towards you to shorten the feed. 10. Set zigzag knob at twice the bead width and sew the end stitches. Finally cut be buttonhole as when sewn automatically (see paragraph 6, page 61). J1 40 • - _ • or • 5 'Cr Position needle to No. 2 and sew the second bead over a length somewhat shorter than the first bead. Last needle hole on left . 8. 7. Set zigzag knob...

Manual
Page 38
... between the stitch holes in the hole of the button. To fasten the stitches, leave needle in the button and sew button on its shank and place button under foot according to a • prevent lowered feed dog from being operated unnecessarily. 3. The rows are pulled over the free arm; Adjust zigzag stitch width according to cover the damaged area. With four-hole buttons, shift the cloth with 6-8 stitches. 5. Woollen socks are sewn down. Set zigzag knob 12...
... between the stitch holes in the hole of the button. To fasten the stitches, leave needle in the button and sew button on its shank and place button under foot according to a • prevent lowered feed dog from being operated unnecessarily. 3. The rows are pulled over the free arm; Adjust zigzag stitch width according to cover the damaged area. With four-hole buttons, shift the cloth with 6-8 stitches. 5. Woollen socks are sewn down. Set zigzag knob 12...

Manual
Page 44
... set the control lever and then simply concentrate on guiding the fabric through the machine with both hands free to the left results in a slight increase in the seam being thicker; This defect is used with a larger material feed, e.g. The stop is shortened, which results in the little length so that a seam of the controls. Automatic Fancy Stitches O14 QiPitecthic to Modal 530-5 Every BERNINA Record Machine Model 530-2 is used...
... set the control lever and then simply concentrate on guiding the fabric through the machine with both hands free to the left results in a slight increase in the seam being thicker; This defect is used with a larger material feed, e.g. The stop is shortened, which results in the little length so that a seam of the controls. Automatic Fancy Stitches O14 QiPitecthic to Modal 530-5 Every BERNINA Record Machine Model 530-2 is used...
Manual
Page 50
... To thread the machine for normal sewing. The thread of the left reel is passed through the rear eyelet 8 on the top of the stand, hence to the lower hole in the throat plate between the two needles is passed, from operator below the pin-tucking foot. 94 Ornamental Stitch with two top threads, proceed as for pin-tucking with Double Needle When using u double needle with the two spool pins...
... To thread the machine for normal sewing. The thread of the left reel is passed through the rear eyelet 8 on the top of the stand, hence to the lower hole in the throat plate between the two needles is passed, from operator below the pin-tucking foot. 94 Ornamental Stitch with two top threads, proceed as for pin-tucking with Double Needle When using u double needle with the two spool pins...
Manual
Page 51
lower feed dog by turning control lever 17 (Fig.2) to the left for hole embroidery Pig. 75 Embroidering is to set the machine as follows : 1. replace ordinary needle plate with hole embroidery needle plate complete with the piercers supplied. Only after clamping the material in the embroidery frame Fig. 76 F % 11 4t 96 97 Then place the material under the hole embroidery foot so that the guide pin of sewing around. As mentioned before, the needle is...
lower feed dog by turning control lever 17 (Fig.2) to the left for hole embroidery Pig. 75 Embroidering is to set the machine as follows : 1. replace ordinary needle plate with hole embroidery needle plate complete with the piercers supplied. Only after clamping the material in the embroidery frame Fig. 76 F % 11 4t 96 97 Then place the material under the hole embroidery foot so that the guide pin of sewing around. As mentioned before, the needle is...
Manual
Page 53
... throat plate damaged by needle action (Call mechanic). Thread passages not polished. Shuttle race not oiled. Inferior thread or knotted thread. Thread dried out in relation to thread used, Top thread tension too tight. Do not use hard instruments, such as screw-drivers, etc., to avoid damaging the shuttle race. Make sure that the lock- Then press with an arrow until the locking bridge rams home, and finally replace bobbin case. Needle hole in reverse...
... throat plate damaged by needle action (Call mechanic). Thread passages not polished. Shuttle race not oiled. Inferior thread or knotted thread. Thread dried out in relation to thread used, Top thread tension too tight. Do not use hard instruments, such as screw-drivers, etc., to avoid damaging the shuttle race. Make sure that the lock- Then press with an arrow until the locking bridge rams home, and finally replace bobbin case. Needle hole in reverse...
Manual
Page 54
... sewing Knitted Goods, never pull work to throat plate and feed dog. Needle blunt or bent. Push needle homecompletely. Needle Breakage Needle bent. When the needle performs the first stitch subsequently, it should be pulled away from under the presser foot. Machine blocked by needle, requires repolishing. Use needles System 705. Needle holding screw not properly tightened, Top thread tension excessive. Needle not properly inserted. This may break the needle and even damage the throat plate...
... sewing Knitted Goods, never pull work to throat plate and feed dog. Needle blunt or bent. Push needle homecompletely. Needle Breakage Needle bent. When the needle performs the first stitch subsequently, it should be pulled away from under the presser foot. Machine blocked by needle, requires repolishing. Use needles System 705. Needle holding screw not properly tightened, Top thread tension excessive. Needle not properly inserted. This may break the needle and even damage the throat plate...


