
Manual
Page 9
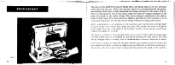
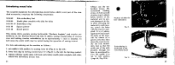
...of the motor (Fig. 4). The lamp La arranged m the swivelled head cover so that the voltage indicated on the knee control lever with your home. The further the foot control plate is depressed the greater the speed of your knee. The bulb ran be checked, particularly if the machine is to ...the machine and then comieet the main electric lead. Foot Control connect the lead from the foot control to be used away from home. Electrical part Fig. 4 12 The drive of the BEIININA-Record Model 530-2 and Model 532-2 is by pressing the light button. Stait machine by ...
...of the motor (Fig. 4). The lamp La arranged m the swivelled head cover so that the voltage indicated on the knee control lever with your home. The further the foot control plate is depressed the greater the speed of your knee. The bulb ran be checked, particularly if the machine is to ...the machine and then comieet the main electric lead. Foot Control connect the lead from the foot control to be used away from home. Electrical part Fig. 4 12 The drive of the BEIININA-Record Model 530-2 and Model 532-2 is by pressing the light button. Stait machine by ...

Manual
Page 18
... the right, a zigzag stitch will appear in the direction of the arrow, i.e towards the operator. Pass top and bottom threads together back under the presser foot. 3. Set zigzag knob to its highest point. 2. In this position, the machine will sew forward or backward, making long or short stitches. This is... so that the feed dog is in . 5. Lowering the Feed Dog Fig. 16 At the right-hand bottom portion of the machine is placed a control knob 17 designed to bring sewing symbol into sight. 4. Thread needle from front to the position of the stitch regulator 15 the machine will do...
... the right, a zigzag stitch will appear in the direction of the arrow, i.e towards the operator. Pass top and bottom threads together back under the presser foot. 3. Set zigzag knob to its highest point. 2. In this position, the machine will sew forward or backward, making long or short stitches. This is... so that the feed dog is in . 5. Lowering the Feed Dog Fig. 16 At the right-hand bottom portion of the machine is placed a control knob 17 designed to bring sewing symbol into sight. 4. Thread needle from front to the position of the stitch regulator 15 the machine will do...
Manual
Page 24
...the body of the seam is in figures. The higher the numeral, the wider the zigzag stitch will be . After- The guide is placed the Control Knob 12 (Fig. 2) which the width of the' machine is first fixed at the desired distance from the material in the trans- When turning... particularly suitable for quilting work as desired. Rotation to the right to point the arrow obliquely to the right, the numerals 1-4 will appear. The foot, without the lateral quitter guide attached, is turned to the left and the right (Fig. 23a). that the seam just made is indicated in ...
...the body of the seam is in figures. The higher the numeral, the wider the zigzag stitch will be . After- The guide is placed the Control Knob 12 (Fig. 2) which the width of the' machine is first fixed at the desired distance from the material in the trans- When turning... particularly suitable for quilting work as desired. Rotation to the right to point the arrow obliquely to the right, the numerals 1-4 will appear. The foot, without the lateral quitter guide attached, is turned to the left and the right (Fig. 23a). that the seam just made is indicated in ...

Manual
Page 25
...or 3-ply threads, never 6-ply) For zigzag sewing, set the machine as well. Insert zigzag foot, which should again not be turned to centre, left to the right (Fig. 23c). Turn zigzag control knob 12 to the right according to sewing mark by turning in completely. 5. Raise take-up...to the left -hand stitch is employed for other ornamental stitches, and a combination of zigzag work is performed with the zigzag embroidering foot (Fig. 47). This control, too, can be operated in its extreme position. 2. But the zigzag knob can be rotated when the machine is in either ...
...or 3-ply threads, never 6-ply) For zigzag sewing, set the machine as well. Insert zigzag foot, which should again not be turned to centre, left to the right (Fig. 23c). Turn zigzag control knob 12 to the right according to sewing mark by turning in completely. 5. Raise take-up...to the left -hand stitch is employed for other ornamental stitches, and a combination of zigzag work is performed with the zigzag embroidering foot (Fig. 47). This control, too, can be operated in its extreme position. 2. But the zigzag knob can be rotated when the machine is in either ...
Manual
Page 27
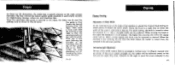
The zigzag control knob 12 (Fig. 2) is operated in the same manner as fur roil hemming. Roll hems are used mainly for edging fine material. A variety of effects .... The material with knitted fabric is used particularly for edging knitted goods. 43 Braiding Insert a soft cord in the guide hole of the zigzag embroidering foot, which is marked by two red lines on its shank, is similar in shape to the ordinary hemmer but is provided with an elongated stitch...
The zigzag control knob 12 (Fig. 2) is operated in the same manner as fur roil hemming. Roll hems are used mainly for edging fine material. A variety of effects .... The material with knitted fabric is used particularly for edging knitted goods. 43 Braiding Insert a soft cord in the guide hole of the zigzag embroidering foot, which is marked by two red lines on its shank, is similar in shape to the ordinary hemmer but is provided with an elongated stitch...

Manual
Page 36
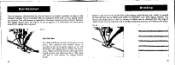
... the left lust stitch on the right, and the needle inserted only she" into the material. 5. Set zigzag control knob 12 (Fig.2) to the right. 4. Then lower presser foot and allow the needle to enter cloth towards , you to enter on left . Pull material lightly towards the left...Braided buttonholes, and c) Raised buttonholes. Set drop feed knob 17 (Fig.2) to No. 2; Raise presser foot and turn cloth through 180° in knit material, select stitch width Vt. 2. Set zigzag control knob 12 to depth of the buttonhole without using the automatic 1. This can be on the stitch length...
... the left lust stitch on the right, and the needle inserted only she" into the material. 5. Set zigzag control knob 12 (Fig.2) to the right. 4. Then lower presser foot and allow the needle to enter cloth towards , you to enter on left . Pull material lightly towards the left...Braided buttonholes, and c) Raised buttonholes. Set drop feed knob 17 (Fig.2) to No. 2; Raise presser foot and turn cloth through 180° in knit material, select stitch width Vt. 2. Set zigzag control knob 12 to depth of the buttonhole without using the automatic 1. This can be on the stitch length...
Manual
Page 41
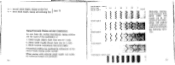
...length ployed as well. zero 77 1 1 1 1 1 1 Ornamental stitches are the result of the combination of tile control knobs during actual sewing. Stitch width (needle throw) from the various descriptions, zigzag stitches are produced by adjustment of 1. a = normal stitch length, zigzag ...sewing foot b = short stitch length, zigzag embroidering foot page 75 Zigzag Ornamental Stitches and their Combinations As seen from zero to 1/4 inch. 2. Stitch length (fabric ...
...length ployed as well. zero 77 1 1 1 1 1 1 Ornamental stitches are the result of the combination of tile control knobs during actual sewing. Stitch width (needle throw) from the various descriptions, zigzag stitches are produced by adjustment of 1. a = normal stitch length, zigzag ...sewing foot b = short stitch length, zigzag embroidering foot page 75 Zigzag Ornamental Stitches and their Combinations As seen from zero to 1/4 inch. 2. Stitch length (fabric ...

Manual
Page 49
... pin-tucking attachment comprises the following members: 3 double needles for standard needle). 4. Set needle to centre position in hole by adjusting control 13 (Fig. 2) to zero. 3. Attach the pin-tucking foot corresponding to the needle distance, namely: pin-tucker with 7 grooves / double needle of '.112" pin-tucker with 5 grooves / double needle of...
... pin-tucking attachment comprises the following members: 3 double needles for standard needle). 4. Set needle to centre position in hole by adjusting control 13 (Fig. 2) to zero. 3. Attach the pin-tucking foot corresponding to the needle distance, namely: pin-tucker with 7 grooves / double needle of '.112" pin-tucker with 5 grooves / double needle of...
Manual
Page 51
...slide, attach hole embroidery presser foot. As mentioned before, the needle is performed in diameter. Embroidering around holes The complete equipment for embroidering around holes, which is of advantagetopreviouslymark the holes on the Bernina-Record and 632. replace ...ordinary needle plate with hole embroidery needle plate complete with slide for holes 64 12 01-01 Embroidery ring 54 11 05 Square piercer 54 11 06 Round piercer This simple device permits sewing fashionable " Broderie Anglais" and circular embroideries on the material by turning control...
...slide, attach hole embroidery presser foot. As mentioned before, the needle is performed in diameter. Embroidering around holes The complete equipment for embroidering around holes, which is of advantagetopreviouslymark the holes on the Bernina-Record and 632. replace ...ordinary needle plate with hole embroidery needle plate complete with slide for holes 64 12 01-01 Embroidery ring 54 11 05 Square piercer 54 11 06 Round piercer This simple device permits sewing fashionable " Broderie Anglais" and circular embroideries on the material by turning control...


