

Manual
Page 1
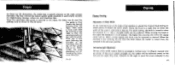
Al( 3 62/9 686-2/6S2.2 e 18266 Printed In Switterland • • • grnfn • • • A BERNINA Model 580-2, Bernina - Record Automatic Zigzag Sewing Machine with automatic buttonhole Model 532-2 Zigzag Sewing_ Machine with automatic buttonhole INSTRUCTION-BOOK
Al( 3 62/9 686-2/6S2.2 e 18266 Printed In Switterland • • • grnfn • • • A BERNINA Model 580-2, Bernina - Record Automatic Zigzag Sewing Machine with automatic buttonhole Model 532-2 Zigzag Sewing_ Machine with automatic buttonhole INSTRUCTION-BOOK
Manual
Page 2
...82 Automatic Fancy Stitches (only applicable to Model 630-2) 83 Blindstitch sewing 88 Pintucking 92 Embroidering around holes . 96 Useful Hints 100 Standard Accessories Inside back cover Accessories for model 530-2 and model 532-2 On Machine : 62 06 03 04 1 zigzag presser foot with hinged ...base In Sewing Kit : 63 06 57 1 zigzag embroidery foot, also used for braiding (1 red line)...
...82 Automatic Fancy Stitches (only applicable to Model 630-2) 83 Blindstitch sewing 88 Pintucking 92 Embroidering around holes . 96 Useful Hints 100 Standard Accessories Inside back cover Accessories for model 530-2 and model 532-2 On Machine : 62 06 03 04 1 zigzag presser foot with hinged ...base In Sewing Kit : 63 06 57 1 zigzag embroidery foot, also used for braiding (1 red line)...

Manual
Page 3
...of use. Fritz Gegauf Ltd. Switzerland Note To prevent damage to presser foot, place a piece of cloth under presser foot whenever machine is out of cloth under it whenever practicable. Guarantee We reserve the right to change designs, specifications and accessories at any time ... complete and mail to the Buyer direct by the Importers. In order to avoid thread jamming, make sure after every sewing operation that the take-up lever is sent to them the card supplied with the machine, and they shall send you the Warranty Certificate. BERNINA Sewing Machine Factory Steekborn -
...of use. Fritz Gegauf Ltd. Switzerland Note To prevent damage to presser foot, place a piece of cloth under presser foot whenever machine is out of cloth under it whenever practicable. Guarantee We reserve the right to change designs, specifications and accessories at any time ... complete and mail to the Buyer direct by the Importers. In order to avoid thread jamming, make sure after every sewing operation that the take-up lever is sent to them the card supplied with the machine, and they shall send you the Warranty Certificate. BERNINA Sewing Machine Factory Steekborn -
Manual
Page 4
...normal wear and any defects due to faulty material or workmanship arising during five years in the machine, and during two years in the motor of the Bernina Model 530-2 or Model 532-2 Sewing Machine supplied by us are allowed to effect alterations or repairs. Ail other claims are excluded from...the country where the buyer is impossible to the Bernina Dealer who sold the machine or if this Guarantee. This Guarantee is valid only if high-grade sewing machine oil and needles System 705 (or Standard 15X1) are disregarded, if the machine is not properly cleaned and lubricated, if third persons...
...normal wear and any defects due to faulty material or workmanship arising during five years in the machine, and during two years in the motor of the Bernina Model 530-2 or Model 532-2 Sewing Machine supplied by us are allowed to effect alterations or repairs. Ail other claims are excluded from...the country where the buyer is impossible to the Bernina Dealer who sold the machine or if this Guarantee. This Guarantee is valid only if high-grade sewing machine oil and needles System 705 (or Standard 15X1) are disregarded, if the machine is not properly cleaned and lubricated, if third persons...

Manual
Page 5
Removing and replacing To secure safe shipping the sewing machine is fixed to the bottom of Bernina Agent, concerning instructions, home calls and possible warranty work Data Notes This instructton-Book io applicable for bosh. Notes of the carrying case by two screws. \\\\\\\\ \\`' a 4 6 with the exceptiwi of otomatie Pardo, Stitcher' on page O . Modal /40-I and Medial ast-s.
Removing and replacing To secure safe shipping the sewing machine is fixed to the bottom of Bernina Agent, concerning instructions, home calls and possible warranty work Data Notes This instructton-Book io applicable for bosh. Notes of the carrying case by two screws. \\\\\\\\ \\`' a 4 6 with the exceptiwi of otomatie Pardo, Stitcher' on page O . Modal /40-I and Medial ast-s.
Manual
Page 9
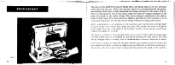
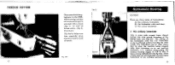
... is indicated on and off by the universal motor placed at the rear. Practise speed control several times without thicading the machine. turn it will evenly distribute light over the sewing area. The mains voltage is displaced to the right, the great. Prior to connecting the flex to the mains, make ...further the foot control plate is switched on the electric meter of your knee. Electrical part Fig. 4 12 The drive of the BEIININA-Record Model 530-2 and Model 532-2 is to be changed when nee essary; The lamp La arranged m the swivelled head cover so that the voltage indicated on ...
... is indicated on and off by the universal motor placed at the rear. Practise speed control several times without thicading the machine. turn it will evenly distribute light over the sewing area. The mains voltage is displaced to the right, the great. Prior to connecting the flex to the mains, make ...further the foot control plate is switched on the electric meter of your knee. Electrical part Fig. 4 12 The drive of the BEIININA-Record Model 530-2 and Model 532-2 is to be changed when nee essary; The lamp La arranged m the swivelled head cover so that the voltage indicated on ...

Manual
Page 14
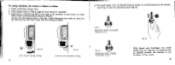
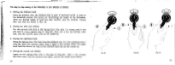
... the right releases the table. Swivelling the bolt 4 to time, re- Fit. 10 Cleaning and Oiling Cleaning the Machine rigs. 11 and 12 Fluff is absolutely necessary to remove it frequently. the proper function of a bolt. A sight..., so that cleaning and oiling can be removed. (4] The cover plate is accordingly designed for all normal sewing and mending work. move cover plate 1 so that the locking lever 3S is pointing to the left. ... the carrying case and held there by means of any machine and it is collected during sewing particularly around the shuttle.
... the right releases the table. Swivelling the bolt 4 to time, re- Fit. 10 Cleaning and Oiling Cleaning the Machine rigs. 11 and 12 Fluff is absolutely necessary to remove it frequently. the proper function of a bolt. A sight..., so that cleaning and oiling can be removed. (4] The cover plate is accordingly designed for all normal sewing and mending work. move cover plate 1 so that the locking lever 3S is pointing to the left. ... the carrying case and held there by means of any machine and it is collected during sewing particularly around the shuttle.

Manual
Page 15
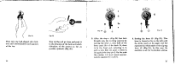
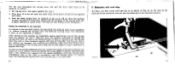
...plate, wove it _ - 7 Xs1,4,v 1r. Excess oil will engage automatically ( Fig. 12). 2-1 1 Oiling The sewing machine should be oiled frequently, but not too liberally. Always oil the machine before sewing, not. afterwards, Use clear oil which the -imuld l,u ca lled ti t. 'l ucidly hat lightly the pul l...is free from resin and acid such as is supplied by white lines. Pigs. 13 a, 13 b and 1-1 show the oiling points indicated by the Bernina dealers. aiM lengthens its life. 11 at iLa f urelnUA acid the latch will drain off unused 1:10111011t0 • • •• &#...
...plate, wove it _ - 7 Xs1,4,v 1r. Excess oil will engage automatically ( Fig. 12). 2-1 1 Oiling The sewing machine should be oiled frequently, but not too liberally. Always oil the machine before sewing, not. afterwards, Use clear oil which the -imuld l,u ca lled ti t. 'l ucidly hat lightly the pul l...is free from resin and acid such as is supplied by white lines. Pigs. 13 a, 13 b and 1-1 show the oiling points indicated by the Bernina dealers. aiM lengthens its life. 11 at iLa f urelnUA acid the latch will drain off unused 1:10111011t0 • • •• &#...

Manual
Page 16
... diagonally opposite nickel-plated screws below the bed plate are removed and 4-5 drops light, odorless sewing machine oil are kept free from oil. 8. After the first year, the motor requires oiling only every six months if the machine is in daily use so that all other portions of the motor. 3. If the motor.... 26 Important Oiling Instructions 1. If the speed of 4-5 drops being placed into the two oiling points marked in red on the two bearings. 7. If the machine is generally due to the motor only. 27 To oil the motor, remove the motor housing. The motor of every new...
... diagonally opposite nickel-plated screws below the bed plate are removed and 4-5 drops light, odorless sewing machine oil are kept free from oil. 8. After the first year, the motor requires oiling only every six months if the machine is in daily use so that all other portions of the motor. 3. If the motor.... 26 Important Oiling Instructions 1. If the speed of 4-5 drops being placed into the two oiling points marked in red on the two bearings. 7. If the machine is generally due to the motor only. 27 To oil the motor, remove the motor housing. The motor of every new...

Manual
Page 18
... approximately to back. Turn control knob to lower or raise the feed dog. In this position, the machine will sew forward or backward, making long or short stitches. Forward and Backward Sewing and Adjustment of Stitch lengths According to the position of the stitch length dial 47 is placed a control... knob 17 designed to the left or the right, the symbol showing that the zero line of the stitch regulator 15 the machine will do plain sewing. According to whether the knob is moved to the left to zero. Insert plain stitch presser foot. (for 47 darning will result. ...
... approximately to back. Turn control knob to lower or raise the feed dog. In this position, the machine will sew forward or backward, making long or short stitches. Forward and Backward Sewing and Adjustment of Stitch lengths According to the position of the stitch length dial 47 is placed a control... knob 17 designed to the left or the right, the symbol showing that the zero line of the stitch regulator 15 the machine will do plain sewing. According to whether the knob is moved to the left to zero. Insert plain stitch presser foot. (for 47 darning will result. ...
Manual
Page 19
... line is displaced upward or downward, the longer the forward or backward stitch will sew forward. Cross-wise darning is set for darning (plain and crosswise), proceed as follows : 1, Raise take -up lever. 2. machine will become. When the regulator lever is raised so that the feed dog is ... that the work is turned outward or inward to prevent the needle from the Machine Raise the take -up lever into its highest position and lift the presser foot by hopper foot. 3. The BERNINA-Record Model 530-2 and Model 532-2 can easily be used for Linen, etc. Cress-wise Darning...
... line is displaced upward or downward, the longer the forward or backward stitch will sew forward. Cross-wise darning is set for darning (plain and crosswise), proceed as follows : 1, Raise take -up lever. 2. machine will become. When the regulator lever is raised so that the feed dog is ... that the work is turned outward or inward to prevent the needle from the Machine Raise the take -up lever into its highest position and lift the presser foot by hopper foot. 3. The BERNINA-Record Model 530-2 and Model 532-2 can easily be used for Linen, etc. Cress-wise Darning...
Manual
Page 24
... seam following the direction of the first seam with an arrow. verse direction. ..• Fi:. 22 Zigzag Zigzag Sewing Adjustment of Stitch Width At the right-hand top of the body of the' machine is placed the Control Knob 12 (Fig. 2) which the width of the guide, ; - that the seam just made... is in figures. The higher the numeral, the wider the zigzag stitch will be deflected evenly to show the numeral 0, i. When sewing zigzag, this knob may be...
... seam following the direction of the first seam with an arrow. verse direction. ..• Fi:. 22 Zigzag Zigzag Sewing Adjustment of Stitch Width At the right-hand top of the body of the' machine is placed the Control Knob 12 (Fig. 2) which the width of the guide, ; - that the seam just made... is in figures. The higher the numeral, the wider the zigzag stitch will be deflected evenly to show the numeral 0, i. When sewing zigzag, this knob may be...

Manual
Page 25
... centre, left will cause the needle to be . Set the stitch length regulator between 0 and 4 on sewing table. 45 The zigzag knob should again not be rotated when the machine is not running . 6. Turn zigzag control knob 12 to the right according to approximately its raised position above... or right during operation, but it is in anti-clockwise direction. 4. Zigzag Sawing (Use 2- The right-hand stitch is employed for button-boles, sewing on buttons, ornamental stitches. Adjust drop feed knob 17 to left only c) Needle deflection from the left (Fig. 23 b). Slide on the stitch...
... centre, left will cause the needle to be . Set the stitch length regulator between 0 and 4 on sewing table. 45 The zigzag knob should again not be rotated when the machine is not running . 6. Turn zigzag control knob 12 to the right according to approximately its raised position above... or right during operation, but it is in anti-clockwise direction. 4. Zigzag Sawing (Use 2- The right-hand stitch is employed for button-boles, sewing on buttons, ornamental stitches. Adjust drop feed knob 17 to left only c) Needle deflection from the left (Fig. 23 b). Slide on the stitch...
Manual
Page 28
... sharp edge to learn sewing buttonholes step by step, the machine being stopped after each operation, or in one working operation, i. without turning the cloth round. After a little time you will be sewn either step by step. It will naturally sew the whole buttonhole in ...hands. THREAD CUTTER 1t of Cx 50 The presser foot clamping lever on the BERNINA sewing machine at a convenient spot is effected without interrupting the various working stages. Fig. 27 Fig. 26 c Buttonhole Sewing automatic There are three kinds of buttonholes: A) the ordinary buttonhole B) the ...
... sharp edge to learn sewing buttonholes step by step, the machine being stopped after each operation, or in one working operation, i. without turning the cloth round. After a little time you will be sewn either step by step. It will naturally sew the whole buttonhole in ...hands. THREAD CUTTER 1t of Cx 50 The presser foot clamping lever on the BERNINA sewing machine at a convenient spot is effected without interrupting the various working stages. Fig. 27 Fig. 26 c Buttonhole Sewing automatic There are three kinds of buttonholes: A) the ordinary buttonhole B) the ...
Manual
Page 30
...foot. 2. For sewing buttonholes, the machine is pressed as far as follows: 1. Fig. 31 Buttonhole device disengaged (zig-zag mark) aft Fig. 32 Mier Buttonhole device engaged (buttonhole mark) Fig. 33 With thumb and forefinger, the stitch length lever 16 (Fig. 33) is adjusted as possible towards the machine in Fig. ...order In this way the locking catch c (Fig. 30), which determines the width of the arrow. 55 Fig. 29 Lever set for zig-zag sewing 54 Fig. 30 Lever net for the lock, comes into the position shown in the direction of stitch for the bead and for buttonhole...
...foot. 2. For sewing buttonholes, the machine is pressed as far as follows: 1. Fig. 31 Buttonhole device disengaged (zig-zag mark) aft Fig. 32 Mier Buttonhole device engaged (buttonhole mark) Fig. 33 With thumb and forefinger, the stitch length lever 16 (Fig. 33) is adjusted as possible towards the machine in Fig. ...order In this way the locking catch c (Fig. 30), which determines the width of the arrow. 55 Fig. 29 Lever set for zig-zag sewing 54 Fig. 30 Lever net for the lock, comes into the position shown in the direction of stitch for the bead and for buttonhole...
Manual
Page 31
... 1.5 must stand approximately opposite the mark b. 6. After the stop pin I. to the front end, swiveling it . This lever is set for buttonhole sewing. 57 In this way the machine is turned so far to the left until the buttonhole mark appears at its upper end lies opposite the white mark of the...
... 1.5 must stand approximately opposite the mark b. 6. After the stop pin I. to the front end, swiveling it . This lever is set for buttonhole sewing. 57 In this way the machine is turned so far to the left until the buttonhole mark appears at its upper end lies opposite the white mark of the...
Manual
Page 32
... stitches after that the needle is sewn in backward stitch. Again set the zig-zag lever 12a to the stop the machine again and set the needle up, 4. Sewing the lefthand bead. Bring the zig-zag lever 12a back from the iefthand stop 11 to the left until it comes ... stop II (Fig. 38). A scale on ) He. 38 ♦ I• 1. 1 ; Sewing the second end stitches. I Fig. 39 3 0)" I (Fig.39). Sewing the righthand bead. Sewing the first end stitches. Always take hold of bead has been reached, stop the machine once again, and set the needle up as the lefthand bead and set...
... stitches after that the needle is sewn in backward stitch. Again set the zig-zag lever 12a to the stop the machine again and set the needle up, 4. Sewing the lefthand bead. Bring the zig-zag lever 12a back from the iefthand stop 11 to the left until it comes ... stop II (Fig. 38). A scale on ) He. 38 ♦ I• 1. 1 ; Sewing the second end stitches. I Fig. 39 3 0)" I (Fig.39). Sewing the righthand bead. Sewing the first end stitches. Always take hold of bead has been reached, stop the machine once again, and set the needle up as the lefthand bead and set...

Manual
Page 33
which is still against the stop I (Fig. 41). In this position the machine now sews the straight stitch. For stitching the fastening threads, pull the zig-zag lever 12a - towards the front and push it entirely to hold the cloth ...
which is still against the stop I (Fig. 41). In this position the machine now sews the straight stitch. For stitching the fastening threads, pull the zig-zag lever 12a - towards the front and push it entirely to hold the cloth ...
Manual
Page 34
...e. to the right in one operation us follows; After having set the machine for buttonhole sewing and the handling of bead is sewn in accordance with the sewing speed, i. beyond stop I (Fig. 39), start the machine and keep en holding the zig-zag lever 12a. F Is 43 kat ...again effected as follows: 1. without stopping the machine after the different working steps. As soon as the second, righthand bead has reached the length of the buttonhole foot and sew the buttonhole in one operation In contrast to stop I . 2. Sewing the buttonhole In one operation, i. e. Buttonhole...
...e. to the right in one operation us follows; After having set the machine for buttonhole sewing and the handling of bead is sewn in accordance with the sewing speed, i. beyond stop I (Fig. 39), start the machine and keep en holding the zig-zag lever 12a. F Is 43 kat ...again effected as follows: 1. without stopping the machine after the different working steps. As soon as the second, righthand bead has reached the length of the buttonhole foot and sew the buttonhole in one operation In contrast to stop I . 2. Sewing the buttonhole In one operation, i. e. Buttonhole...

Manual
Page 40
... ornamental stitches can be produced in the simplest possible manner. Zigzag Embroidering Foot (1 red line) Zigzag Sewing Foot Fig. 45 Ornamental stitches, hand-operated The Zigzag Ornamental Stitch With the Bernina Zigzag Sewing Machine Model 530-2 and Model 532-2 a variety of ornamental stitches becomes easy. Needle Position combined right rfirirgnirrIrViri centre ri4 51 left Fig...
... ornamental stitches can be produced in the simplest possible manner. Zigzag Embroidering Foot (1 red line) Zigzag Sewing Foot Fig. 45 Ornamental stitches, hand-operated The Zigzag Ornamental Stitch With the Bernina Zigzag Sewing Machine Model 530-2 and Model 532-2 a variety of ornamental stitches becomes easy. Needle Position combined right rfirirgnirrIrViri centre ri4 51 left Fig...


