
Manual
Page 2
... the cord. 10. Always use the proper needle plate. The wrong plate can cause the needle to place thread in for its intended use outdoors. 7. Always replace bulb with any adjustments in the needle area, such as described in this overlock machine only for easy threading. SAVE THESE INSTRUCTIONS HELPFUL HINTS 1. To adjust stitch width, turn all moving parts. Never drop or insert any other user servicing adjustments mentioned in the instruction manual. 16. Unplug your overlock machine from...
... the cord. 10. Always use the proper needle plate. The wrong plate can cause the needle to place thread in for its intended use outdoors. 7. Always replace bulb with any adjustments in the needle area, such as described in this overlock machine only for easy threading. SAVE THESE INSTRUCTIONS HELPFUL HINTS 1. To adjust stitch width, turn all moving parts. Never drop or insert any other user servicing adjustments mentioned in the instruction manual. 16. Unplug your overlock machine from...

Manual
Page 3
NAMES AND FUNCTION 2. PREPARATION FOR THREADING 5. REPLACING THE CUTTING BLADE 13. GATHERING/STRETCHING/PINTUCKING/SEWING IN TAPE 20. ACCESSORIES 3. ADJUSTING THREAD TENSIONS 8. SEWING APPLICATIONS 15. SETTING UP YOUR MACHINE 4. THREADING YOUR MACHINE 6. CHART FOR TENSION ADJUSTMENT 9. ADJUSTING OVERLOCK STITCH WIDTH 10. ADJUSTING STITCH LENGTH 11. SEWING APPLICATIONS 16. TRIAL SEWING 7. CHANGING THE THROAT PLATE (FOR ROLLED OR NARROW HEM) 17. DIFFERENTIAL FEED (DF-TYPE ONLY) 19. PROBLEMS AND CAUSES Page 2 3 4 5 6 8 9 11 12 13 14 15 16 17 18 19 20 21...
NAMES AND FUNCTION 2. PREPARATION FOR THREADING 5. REPLACING THE CUTTING BLADE 13. GATHERING/STRETCHING/PINTUCKING/SEWING IN TAPE 20. ACCESSORIES 3. ADJUSTING THREAD TENSIONS 8. SEWING APPLICATIONS 15. SETTING UP YOUR MACHINE 4. THREADING YOUR MACHINE 6. CHART FOR TENSION ADJUSTMENT 9. ADJUSTING OVERLOCK STITCH WIDTH 10. ADJUSTING STITCH LENGTH 11. SEWING APPLICATIONS 16. TRIAL SEWING 7. CHANGING THE THROAT PLATE (FOR ROLLED OR NARROW HEM) 17. DIFFERENTIAL FEED (DF-TYPE ONLY) 19. PROBLEMS AND CAUSES Page 2 3 4 5 6 8 9 11 12 13 14 15 16 17 18 19 20 21...

Manual
Page 4
... kinds of fabric, both light and heavy, including cotton, wool, rayon, tricot, jersey, and knits. Make sure to turn the same direction as a household sewing machine (toward the sewer). • SPECIFICATION Description Number of threads Number of needles Sewing speed Stitch width Stitch length Differential feed ratio Lift of 1,400 s.p.m. INTRODUCTION • THANK YOU FOR CHOOSING OUR OVERLOCKING MACHINE This overlooking machine can stitch dependable seams on the sewing materials. 2. You do not need a special table...
... kinds of fabric, both light and heavy, including cotton, wool, rayon, tricot, jersey, and knits. Make sure to turn the same direction as a household sewing machine (toward the sewer). • SPECIFICATION Description Number of threads Number of needles Sewing speed Stitch width Stitch length Differential feed ratio Lift of 1,400 s.p.m. INTRODUCTION • THANK YOU FOR CHOOSING OUR OVERLOCKING MACHINE This overlooking machine can stitch dependable seams on the sewing materials. 2. You do not need a special table...
Manual
Page 5
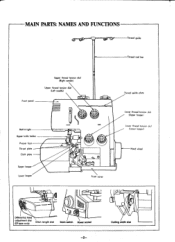
MAIN PARTS: NAMES AND FUNCTIONS Thread guide Thread reel bar Front panel Upper thread tension dial (Right needle) Upper thread tension dial (Left needle) Built in light Upper knife holder Presser foot Throat plate ----e Cloth plate Upper looper Lower looper • IYI /slime Front cover Thread guide plate Lower thread tension dial (Upper looper) Lower thread tension dial (Lower looper) Hand wheel 0 791/ 4 0 Differential feed adjustment dial (DF-type only) Stitch length dial Main switch Power socket -2- Cutting width dial
MAIN PARTS: NAMES AND FUNCTIONS Thread guide Thread reel bar Front panel Upper thread tension dial (Right needle) Upper thread tension dial (Left needle) Built in light Upper knife holder Presser foot Throat plate ----e Cloth plate Upper looper Lower looper • IYI /slime Front cover Thread guide plate Lower thread tension dial (Upper looper) Lower thread tension dial (Lower looper) Hand wheel 0 791/ 4 0 Differential feed adjustment dial (DF-type only) Stitch length dial Main switch Power socket -2- Cutting width dial
Manual
Page 7
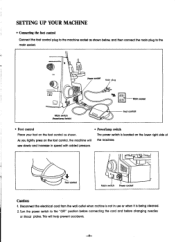
... added pressure. Turn the power switch to the "OFF" position before connecting the cord and before changing needles or throat plates. Power socket Main plug 0 Main switch (AwedLamp Switch) CD Main socket Foot contrail • Foot control • Power/lamp switch Place your foot on the foot control, the machine will help prevent accidents. -4- SETTING UP YOUR MACHINE • Connecting the foot control Connect the foot control plug to the machine socket as shown. Foot control...
... added pressure. Turn the power switch to the "OFF" position before connecting the cord and before changing needles or throat plates. Power socket Main plug 0 Main switch (AwedLamp Switch) CD Main socket Foot contrail • Foot control • Power/lamp switch Place your foot on the foot control, the machine will help prevent accidents. -4- SETTING UP YOUR MACHINE • Connecting the foot control Connect the foot control plug to the machine socket as shown. Foot control...
Manual
Page 9
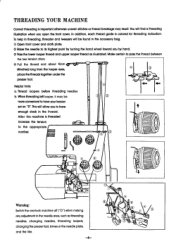
... threads together under the presser foot. In addition, each thread guide is Important otherwise uneven stitches or thread breakage may be found in threading, threader and tweezers will be more convenient to have your tension set on "0". ick 4 1W CD • Warning: Switch the overlock machine off ("0") when making any adjustment in the thread. This will find a threading illustration when you to have enough slack in the needle...
... threads together under the presser foot. In addition, each thread guide is Important otherwise uneven stitches or thread breakage may be found in threading, threader and tweezers will be more convenient to have your tension set on "0". ick 4 1W CD • Warning: Switch the overlock machine off ("0") when making any adjustment in the thread. This will find a threading illustration when you to have enough slack in the needle...
Manual
Page 10
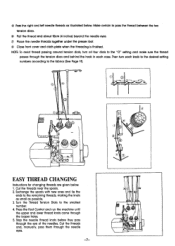
... fabrics (See Page 11). Stop the needle thread knots before they pass through the looper holes. 5. Cut the threads and, manually, pass them through the tension discs and behind the hook in each knob to the desired setting numbers according to the "O" setting and make sure the thread passes through the needle eyes. -7- 0 r 5 4 Cti) Make certain to the smallest number. 4. Cut the threads near the spools. 2. r EASY THREAD CHANGING Instructions for changing threads...
... fabrics (See Page 11). Stop the needle thread knots before they pass through the looper holes. 5. Cut the threads and, manually, pass them through the tension discs and behind the hook in each knob to the desired setting numbers according to the "O" setting and make sure the thread passes through the needle eyes. -7- 0 r 5 4 Cti) Make certain to the smallest number. 4. Cut the threads near the spools. 2. r EASY THREAD CHANGING Instructions for changing threads...

Manual
Page 12
... by turning counter clockwise. 0 Upper looper thread tension dial Lower looper thread tension dial • Proper thread tension Right needle thread Back side Left needle thread Front side Lower looper thread Upper looper thread -9- Adjust the tension dials using the upper and lower thread tensions while watching the stitch as illustrated. ADJUSTING THREAD TENSIONS Right needle thread tension dial Left needle thread tension dial Thread tension differs with the type of fabric and the thickness and type of thread tensions should be made each time you sew. Adjustment of thread.
... by turning counter clockwise. 0 Upper looper thread tension dial Lower looper thread tension dial • Proper thread tension Right needle thread Back side Left needle thread Front side Lower looper thread Upper looper thread -9- Adjust the tension dials using the upper and lower thread tensions while watching the stitch as illustrated. ADJUSTING THREAD TENSIONS Right needle thread tension dial Left needle thread tension dial Thread tension differs with the type of fabric and the thickness and type of thread tensions should be made each time you sew. Adjustment of thread.

Manual
Page 14
CHART FOR TENSION ADJUSTMENT Fabrics Light-weight • Georgette • Organdy • Lawn • Voile • Crepe de chine • Silk Threads • Cotton • Spun polyester • Polyester Needle Stitch length 2.0 --3.5m/m Standard 2.5m/m Recommended tension settings 0 e e 8 Medium weight • Cotton • Poplin • Wool • Linen • Gingham • Corduroy • Suede • Satin • Fleece Heavy weight • Denirit...
CHART FOR TENSION ADJUSTMENT Fabrics Light-weight • Georgette • Organdy • Lawn • Voile • Crepe de chine • Silk Threads • Cotton • Spun polyester • Polyester Needle Stitch length 2.0 --3.5m/m Standard 2.5m/m Recommended tension settings 0 e e 8 Medium weight • Cotton • Poplin • Wool • Linen • Gingham • Corduroy • Suede • Satin • Fleece Heavy weight • Denirit...

Manual
Page 15
... the needle set screw Right needle (3) Back side (b) 3mm Back side Left needle Front side Front side ADJUSTING CUTTING WIDTH The proper cutting width differs with the type of fabric. Turn the stitch width dial(away or toward you sew : (a) 3-thread overedge stitch, 5mm width. Remove the right needle. (b) 3-thread overedge stitch, 3mm width. The right or the left needle and three threads. Open the front cover and cloth plate. 3. ADJUSTING OVERLOCK STITCH WIDTH This machine...
... the needle set screw Right needle (3) Back side (b) 3mm Back side Left needle Front side Front side ADJUSTING CUTTING WIDTH The proper cutting width differs with the type of fabric. Turn the stitch width dial(away or toward you sew : (a) 3-thread overedge stitch, 5mm width. Remove the right needle. (b) 3-thread overedge stitch, 3mm width. The right or the left needle and three threads. Open the front cover and cloth plate. 3. ADJUSTING OVERLOCK STITCH WIDTH This machine...
Manual
Page 16
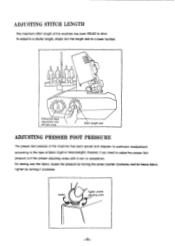
... presser adjusting screw with a coin or screwdriver. Loosen Tighten presser adjusting screw -13- For sewing very thin fabric, loosen the pressure by turning the screw counter clockwise, and for heavy fabric, tighten by turning it clockwise. ra Ui Differential feed adjustment dial (DF-type only) Stitch length dial ADJUSTING PRESSER FOOT PRESSURE The presser foot pressure of fabric (light-or heavyweight). However, if you need to 3mm. ADJUSTING STITCH LENGTH The maximum stitch length of this machine has been PRE-SET to adjust the presser foot pressure, turn the length dial...
... presser adjusting screw with a coin or screwdriver. Loosen Tighten presser adjusting screw -13- For sewing very thin fabric, loosen the pressure by turning the screw counter clockwise, and for heavy fabric, tighten by turning it clockwise. ra Ui Differential feed adjustment dial (DF-type only) Stitch length dial ADJUSTING PRESSER FOOT PRESSURE The presser foot pressure of fabric (light-or heavyweight). However, if you need to 3mm. ADJUSTING STITCH LENGTH The maximum stitch length of this machine has been PRE-SET to adjust the presser foot pressure, turn the length dial...

Manual
Page 17
... replacing a needle. • Your needle system is cool. Needle bar Needle set screws Thread groove tv qe Indent (Scarf) • Be sure to use proper size needle for the thread and type of more than 15 watts. O Open the front cover and lower the presser foot. 3 Using the hexagon wrench, loosen the needle clamp screws and remove the needles. REPLACING THE LIGHT BULB * CAUTION: Always disconnect your machine from you are sewing. Using a bent or blunt needle may result in breaking thread or poor stitching. REPLACING...
... replacing a needle. • Your needle system is cool. Needle bar Needle set screws Thread groove tv qe Indent (Scarf) • Be sure to use proper size needle for the thread and type of more than 15 watts. O Open the front cover and lower the presser foot. 3 Using the hexagon wrench, loosen the needle clamp screws and remove the needles. REPLACING THE LIGHT BULB * CAUTION: Always disconnect your machine from you are sewing. Using a bent or blunt needle may result in breaking thread or poor stitching. REPLACING...
Manual
Page 18
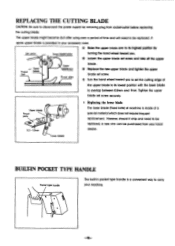
... The lower blade (Fixed knife) of machine is a convenient way to set screw securely. Loosen the upper blade set screw and take off the upper Presser foot Upper blade Upper •lade arm Throat plate blade. 2 Replace the new upper blade and tighten the upper blade set screw. (1) Turn the hand wheel toward you to carry your local dealer. Tighten the upper blade set the cutting edge of the upper blade to its lowest position...
... The lower blade (Fixed knife) of machine is a convenient way to set screw securely. Loosen the upper blade set screw and take off the upper Presser foot Upper blade Upper •lade arm Throat plate blade. 2 Replace the new upper blade and tighten the upper blade set screw. (1) Turn the hand wheel toward you to carry your local dealer. Tighten the upper blade set the cutting edge of the upper blade to its lowest position...
Manual
Page 20
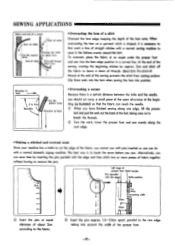
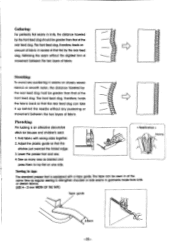
... machine has a knife to leave a chain of presser foot S itch border Pins (parallel with pins inserted as you should cut away a small piece of the seam allowance at the end of the sewing prevents the stitch from coming undone. SEWING APPLICATIONS (Start and end of a seam) OVA Start of stitch Start of stitch 'Cut this section away Direction to feed • Overcasting a corner Because there is necessary to first work...
... machine has a knife to leave a chain of presser foot S itch border Pins (parallel with pins inserted as you should cut away a small piece of the seam allowance at the end of the sewing prevents the stitch from coming undone. SEWING APPLICATIONS (Start and end of a seam) OVA Start of stitch Start of stitch 'Cut this section away Direction to feed • Overcasting a corner Because there is necessary to first work...
Manual
Page 21
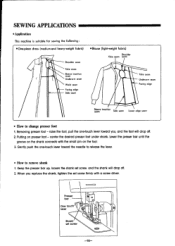
... you replace the shank, tighten the set screw firmly with the small pin on presser foot - Presser bar One touch lever 3 Shank set screw and the shank will drop off . 2. Puffing on the foot. 3. SEWING APPLICATIONS • Application This machine is suitable for sewing the following : •One-piece dress (medium-and heavy-weight fabric) Shoulder seam Yoke seam Sleeve insertion seam Underarm seam Waist seam Facing edge Side seam •Blouse (light-weight fabric) Shoulder Yoke seam seam Yoke seam Underarm seam...
... you replace the shank, tighten the set screw firmly with the small pin on presser foot - Presser bar One touch lever 3 Shank set screw and the shank will drop off . 2. Puffing on the foot. 3. SEWING APPLICATIONS • Application This machine is suitable for sewing the following : •One-piece dress (medium-and heavy-weight fabric) Shoulder seam Yoke seam Sleeve insertion seam Underarm seam Waist seam Facing edge Side seam •Blouse (light-weight fabric) Shoulder Yoke seam seam Yoke seam Underarm seam...
Manual
Page 22
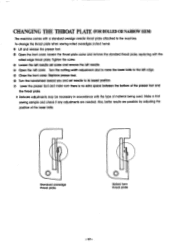
... adjustments are possible by adjusting the position of material being used. Tighten the screw. CHANGING THE THROAT PLATE (FOR ROLLED OR NARROW HEM) The machine comes with a standard overdge needle throat plate attached to its lowestposition. Also, better results are needed. O Loosen the left needle set needle to the machine. Standard overedge throat plate Rolled hem throat plate -19- O Turn the hondwheel toward you and set screw and remove the left needle. Replace presser toot. O Open the front cover...
... adjustments are possible by adjusting the position of material being used. Tighten the screw. CHANGING THE THROAT PLATE (FOR ROLLED OR NARROW HEM) The machine comes with a standard overdge needle throat plate attached to its lowestposition. Also, better results are needed. O Loosen the left needle set needle to the machine. Standard overedge throat plate Rolled hem throat plate -19- O Turn the hondwheel toward you and set screw and remove the left needle. Replace presser toot. O Open the front cover...

Manual
Page 23
... tension settings 3-5 3-5 1-3 5-8 3-5 3-5 Rolled hemming Lower looper thread Back Ode /1.5mm Upper looper thread Needle thread Front side Narrow hemming Needle thread Bock Ode Front side 1.5mm Upper looper thread Lower looper thread -20- Fabrics • Georgette • Lawn • Crepe-de -chine • Broad cloth • Rayon Tension dial to the table below for changing the throat plate 2. See page 19 for suggested combinations of thread. and 2. Important: 1. Proper thread tension differs with the type of fabric...
... tension settings 3-5 3-5 1-3 5-8 3-5 3-5 Rolled hemming Lower looper thread Back Ode /1.5mm Upper looper thread Needle thread Front side Narrow hemming Needle thread Bock Ode Front side 1.5mm Upper looper thread Lower looper thread -20- Fabrics • Georgette • Lawn • Crepe-de -chine • Broad cloth • Rayon Tension dial to the table below for changing the throat plate 2. See page 19 for suggested combinations of thread. and 2. Important: 1. Proper thread tension differs with the type of fabric...

Manual
Page 24
... feed can be varied. Important:. Differential feed ratio 1 vs. 0.8-2 Adjusting the differential feed The differential feed can be set on the "N" position. 2 3 Differential feed adjustment dial Stitch length dial 1\1 1 .1> STRETCH GATHER -21- The two feed dogs move independently and the distance each feed dog travels during one rear. DIFFERENTIAL FEED (DF-type only) Differential feed prevents waving seams in smooth synthetic fabrics. It also helps control the movement between layers of fabric, and ensures pucker-free seams in knitted fabrics...
... feed can be varied. Important:. Differential feed ratio 1 vs. 0.8-2 Adjusting the differential feed The differential feed can be set on the "N" position. 2 3 Differential feed adjustment dial Stitch length dial 1\1 1 .1> STRETCH GATHER -21- The two feed dogs move independently and the distance each feed dog travels during one rear. DIFFERENTIAL FEED (DF-type only) Differential feed prevents waving seams in smooth synthetic fabrics. It also helps control the movement between layers of fabric, and ensures pucker-free seams in knitted fabrics...
Manual
Page 25
Adjust the plastic guide so that of the rear feed dog. Fold fabric with a tape guide. The front feed dog, therefore, holds the fabric back so that the rear feed dog can be greater than that of fabric. Lower the presser foot and sew. 4. Pin tucking: Pin tucking is equipped with wrong sides together. 2. f Pinlucking Sewing in tape The standard presser foot is an attractive decorative stitch for blouses and children's wear. 1. The...
Adjust the plastic guide so that of the rear feed dog. Fold fabric with a tape guide. The front feed dog, therefore, holds the fabric back so that the rear feed dog can be greater than that of fabric. Lower the presser foot and sew. 4. Pin tucking: Pin tucking is equipped with wrong sides together. 2. f Pinlucking Sewing in tape The standard presser foot is an attractive decorative stitch for blouses and children's wear. 1. The...
Manual
Page 27
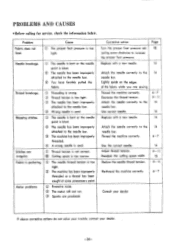
... fabric while you are produced. Adjust thread tension. Thread the machine correctly. Needle breakage. Stitches are irregular. (I) Thread tension is not correct. ® Cutting space is too narrow Fabric is too light. Thread the machine correctly. 6-7 Use the correct needle. Problem Fabric does not feed. Cause © The presser foot pressure is puckering. C) The needle thread tension is blunt. © The needle has been improperly attached to the needle bar. Page 12 14 Attach the needle correctly to the 14 needle bar. Replace with a new needle...
... fabric while you are produced. Adjust thread tension. Thread the machine correctly. Needle breakage. Stitches are irregular. (I) Thread tension is not correct. ® Cutting space is too narrow Fabric is too light. Thread the machine correctly. 6-7 Use the correct needle. Problem Fabric does not feed. Cause © The presser foot pressure is puckering. C) The needle thread tension is blunt. © The needle has been improperly attached to the needle bar. Page 12 14 Attach the needle correctly to the 14 needle bar. Replace with a new needle...


