
Manual
Page 2
... and before cleaning. Always use . Do not pLill or push fabric while stitching. Warning -To reduce the risk of the overlock machine and foot control free from outlet. 9. Do not unplug by or near children. 2. When changing throat plate, be sure to be used or where ... bent needles. 13. Do not operate where aerosol (spray) products are being used as threading needles, changing needles, threading loopers, changing the presser foot, changing knives, changing the needle plate, and the like. 15. SAVE THESE INSTRUCTIONS HELPFUL HINTS 1. For instructions on how to break. 12. ...
... and before cleaning. Always use . Do not pLill or push fabric while stitching. Warning -To reduce the risk of the overlock machine and foot control free from outlet. 9. Do not unplug by or near children. 2. When changing throat plate, be sure to be used or where ... bent needles. 13. Do not operate where aerosol (spray) products are being used as threading needles, changing needles, threading loopers, changing the presser foot, changing knives, changing the needle plate, and the like. 15. SAVE THESE INSTRUCTIONS HELPFUL HINTS 1. For instructions on how to break. 12. ...
Manual
Page 5
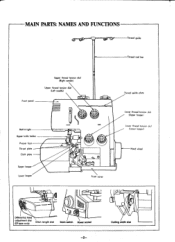
Cutting width dial MAIN PARTS: NAMES AND FUNCTIONS Thread guide Thread reel bar Front panel Upper thread tension dial (Right needle) Upper thread tension dial (Left needle) Built in light Upper knife holder Presser foot Throat plate ----e Cloth plate Upper looper Lower looper • IYI /slime Front cover Thread guide plate Lower thread tension dial (Upper looper) Lower thread tension dial (Lower looper) Hand wheel 0 791/ 4 0 Differential feed adjustment dial (DF-type only) Stitch length dial Main switch Power socket -2-
Cutting width dial MAIN PARTS: NAMES AND FUNCTIONS Thread guide Thread reel bar Front panel Upper thread tension dial (Right needle) Upper thread tension dial (Left needle) Built in light Upper knife holder Presser foot Throat plate ----e Cloth plate Upper looper Lower looper • IYI /slime Front cover Thread guide plate Lower thread tension dial (Upper looper) Lower thread tension dial (Lower looper) Hand wheel 0 791/ 4 0 Differential feed adjustment dial (DF-type only) Stitch length dial Main switch Power socket -2-
Manual
Page 7
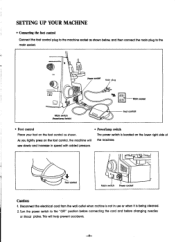
... the machine. sew slowly and increase in use or when it is located on the lower right side of As you lightly press on the foot control as shown below, and then connect the main plug to the "OFF" position before connecting the cord and before changing needles or throat plates.... Turn the power switch to the main socket. SETTING UP YOUR MACHINE • Connecting the foot control Connect the foot control plug to the machine socket as shown. Disconnect the electrical cord from the wall outlet when mchine is not in speed with added...
... the machine. sew slowly and increase in use or when it is located on the lower right side of As you lightly press on the foot control as shown below, and then connect the main plug to the "OFF" position before connecting the cord and before changing needles or throat plates.... Turn the power switch to the main socket. SETTING UP YOUR MACHINE • Connecting the foot control Connect the foot control plug to the machine socket as shown. Disconnect the electrical cord from the wall outlet when mchine is not in speed with added...
Manual
Page 9
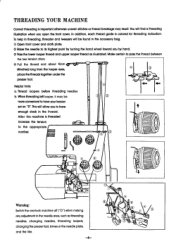
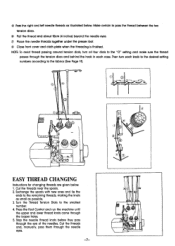
... tension discs. 0 Pull the thread end about 10cm (4inches) long from the looper eyes, C)) place the threads together under the presser foot. This will allow you to have your tension set on "0". To help in threading, threader and tweezers will find a threading illustration when... you by hand. 0 Pass the lower looper thread and upper looper thread as threading needles, changing needles, threading loopers, changing the presser foot, knives or the needle plate, and the like. -6- 0 0 7 After the machine Is threaded increase the tension to its highest point by...
... tension discs. 0 Pull the thread end about 10cm (4inches) long from the looper eyes, C)) place the threads together under the presser foot. This will allow you to have your tension set on "0". To help in threading, threader and tweezers will find a threading illustration when... you by hand. 0 Pass the lower looper thread and upper looper thread as threading needles, changing needles, threading loopers, changing the presser foot, knives or the needle plate, and the like. -6- 0 0 7 After the machine Is threaded increase the tension to its highest point by...
Manual
Page 10
Press the Foot Control and run the machine until the upper and lower thread knots come through the eye of the needles. ® Pass the right and left ... between the two tension discs. ® Pull the thread end about 10cm (4 inches) beyond the needle eyes. (?) Place the needle threads together under the presser foot. ® Close front cover and cloth plate when the threading is finished. Stop the needle thread knots before they pass through the looper holes. 5. Make...
Press the Foot Control and run the machine until the upper and lower thread knots come through the eye of the needles. ® Pass the right and left ... between the two tension discs. ® Pull the thread end about 10cm (4 inches) beyond the needle eyes. (?) Place the needle threads together under the presser foot. ® Close front cover and cloth plate when the threading is finished. Stop the needle thread knots before they pass through the looper holes. 5. Make...
Manual
Page 11
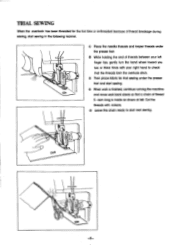
... hand wheel toward you two or three times with your left . TRIAL SEWING When the overlook has been threaded for trial sewing under the presser foot. ® While holding the end of threads between your right hand to start sewing. ® When work is finished, continue running the machine and move... or re-threaded because of thread breakage during sewing, start sewing in the following manner. (D Place the needle threads and looper threads under the presser foot and start next sewing.
... hand wheel toward you two or three times with your left . TRIAL SEWING When the overlook has been threaded for trial sewing under the presser foot. ® While holding the end of threads between your right hand to start sewing. ® When work is finished, continue running the machine and move... or re-threaded because of thread breakage during sewing, start sewing in the following manner. (D Place the needle threads and looper threads under the presser foot and start next sewing.
Manual
Page 16
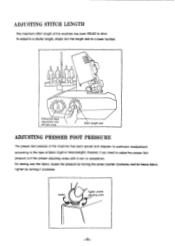
..., if you need to the type of fabric (light-or heavyweight). ra Ui Differential feed adjustment dial (DF-type only) Stitch length dial ADJUSTING PRESSER FOOT PRESSURE The presser foot pressure of the machine has been pre-set and requires no particular readjustment according to adjust the presser... foot pressure, turn the length dial to 3mm. ADJUSTING STITCH LENGTH The maximum stitch length of this machine has been PRE-SET to a lower number. Loosen ...
..., if you need to the type of fabric (light-or heavyweight). ra Ui Differential feed adjustment dial (DF-type only) Stitch length dial ADJUSTING PRESSER FOOT PRESSURE The presser foot pressure of the machine has been pre-set and requires no particular readjustment according to adjust the presser... foot pressure, turn the length dial to 3mm. ADJUSTING STITCH LENGTH The maximum stitch length of this machine has been PRE-SET to a lower number. Loosen ...

Manual
Page 17
... bulb by turning the handwheel towards you are sewing. GI) Make one complete turn of material you . O Open the front cover and lower the presser foot. 3 Using the hexagon wrench, loosen the needle clamp screws and remove the needles. CP Insert the needle as it is 1301705H (HAx1). ) Raise the needle...
... bulb by turning the handwheel towards you are sewing. GI) Make one complete turn of material you . O Open the front cover and lower the presser foot. 3 Using the hexagon wrench, loosen the needle clamp screws and remove the needles. CP Insert the needle as it is 1301705H (HAx1). ) Raise the needle...
Manual
Page 18
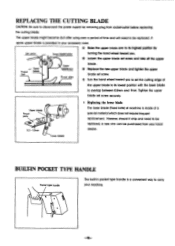
... blade arm to Its highest position by removing plug from your machine. -15- Loosen the upper blade set screw and take off the upper Presser foot Upper blade Upper •lade arm Throat plate blade. 2 Replace the new upper blade and tighten the upper blade set screw. (1) Turn the hand wheel...
... blade arm to Its highest position by removing plug from your machine. -15- Loosen the upper blade set screw and take off the upper Presser foot Upper blade Upper •lade arm Throat plate blade. 2 Replace the new upper blade and tighten the upper blade set screw. (1) Turn the hand wheel...
Manual
Page 20
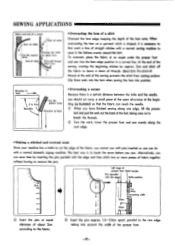
...and then stitch two or more pieces of fabric together without having to leave a chain of the presser foot. -17- This chain-off thread at an angle under the presser foot and sew into the hem edge position in the fullness evenly around the hem. Overlap the stitch by ... before you can do with the edge) Knife position `a- 5cAm - C) Turn the work, lower the presser foot and sew evenly along one edge, lift the presser foot and pull the work a line of presser foot S itch border Pins (parallel with a normal domestic zigzag machine. d. -.4 Cut away Overcasting width 6mm 12mm ...
...and then stitch two or more pieces of fabric together without having to leave a chain of the presser foot. -17- This chain-off thread at an angle under the presser foot and sew into the hem edge position in the fullness evenly around the hem. Overlap the stitch by ... before you can do with the edge) Knife position `a- 5cAm - C) Turn the work, lower the presser foot and sew evenly along one edge, lift the presser foot and pull the work a line of presser foot S itch border Pins (parallel with a normal domestic zigzag machine. d. -.4 Cut away Overcasting width 6mm 12mm ...
Manual
Page 21
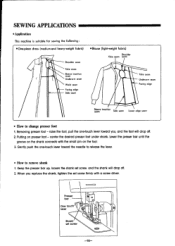
...touch lever 3 Shank set screw and the shank will drop off . 2. center the desired presser foot under shank. Keep the presser bar up, loosen the shank set screw -18- raise the foot, pull the one -touch lever toward you replace the shank, tighten the set screw firmly with... lever toward the needle to release the lever. • How to change presser foot 1. Puffing on the foot. 3. Lower the presser bar until the groove on the shank connects with a screw driver. When you , and the foot will drop off . 2. SEWING APPLICATIONS • Application This machine is suitable for...
...touch lever 3 Shank set screw and the shank will drop off . 2. center the desired presser foot under shank. Keep the presser bar up, loosen the shank set screw -18- raise the foot, pull the one -touch lever toward you replace the shank, tighten the set screw firmly with... lever toward the needle to release the lever. • How to change presser foot 1. Puffing on the foot. 3. Lower the presser bar until the groove on the shank connects with a screw driver. When you , and the foot will drop off . 2. SEWING APPLICATIONS • Application This machine is suitable for...
Manual
Page 22
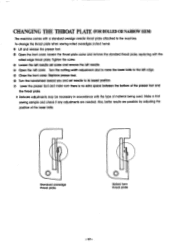
...needed. O Open the left needle. Make a trial sewing sample and check if any adjustments are possible by adjusting the position of the presser foot and the throat plate. * Delicate adjustments may be necessary In accordance with the rolled edge throat plate. To change the throat plate when sewing... rolled overedges (rolled hems): O Lift and release the presser foot. Replace presser toot. TI Lower the presser foot and make sure there is no extra space between the bottom of the lower knife. CHANGING THE THROAT PLATE (FOR ...
...needed. O Open the left needle. Make a trial sewing sample and check if any adjustments are possible by adjusting the position of the presser foot and the throat plate. * Delicate adjustments may be necessary In accordance with the rolled edge throat plate. To change the throat plate when sewing... rolled overedges (rolled hems): O Lift and release the presser foot. Replace presser toot. TI Lower the presser foot and make sure there is no extra space between the bottom of the lower knife. CHANGING THE THROAT PLATE (FOR ...
Manual
Page 25
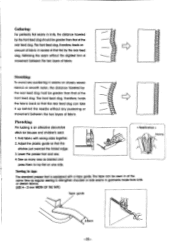
... the plastic guide so that fed by the rear feed dog, flattening the seam without any puckering in seams on one side. Lower the presser foot and sew. 4. The front feed dog, therefore, holds the fabric back so that the rear feed dog can be greater than that of fabric in... tape The standard presser foot is an attractive decorative stitch for blouses and children's wear. 1. The tape can take it up behind the needle without the slightest hint of movement...
... the plastic guide so that fed by the rear feed dog, flattening the seam without any puckering in seams on one side. Lower the presser foot and sew. 4. The front feed dog, therefore, holds the fabric back so that the rear feed dog can be greater than that of fabric in... tape The standard presser foot is an attractive decorative stitch for blouses and children's wear. 1. The tape can take it up behind the needle without the slightest hint of movement...
Manual
Page 26
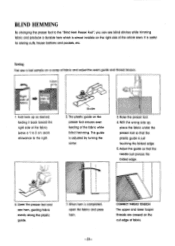
...scrap of fabric and adjust the seam guide and thread tension. 1-2cm, Right side of fabric Wrong side of fabric 70 - 1. Raise the presser foot. 4. Lower the presser foot and sew hem, guiding fabric evenly along the plastic guide. 7. When hem is just touching the folded edge. 5. Leave a 1 to 2 ...cm seam allowance to the "Blind Hem Presser Foot", you can sew blind stitches while trimming fabric and produce a durable hem which is almost invisible on the cut edge of the fabric while blind...
...scrap of fabric and adjust the seam guide and thread tension. 1-2cm, Right side of fabric Wrong side of fabric 70 - 1. Raise the presser foot. 4. Lower the presser foot and sew hem, guiding fabric evenly along the plastic guide. 7. When hem is just touching the folded edge. 5. Leave a 1 to 2 ...cm seam allowance to the "Blind Hem Presser Foot", you can sew blind stitches while trimming fabric and produce a durable hem which is almost invisible on the cut edge of the fabric while blind...
Manual
Page 27
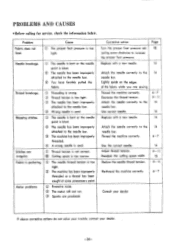
... to the needle bar. ® Wrong needle is used . Corrective action Turn the presser foot pressure adlusting screw clockwise to the needle bar. Thread the machine correctly. Cause © The presser foot pressure is too light. Motor problems. C) Excessive noise. ® The motor will not run.... ® Sparks are sewing. Page 12 14 Attach the needle correctly to increase the presser foot pressure. Readjust the cutting space width Reduce the needle thread tension. 14 9-11 13 9-11 Re-thread the machine correctly. 6-7 Consult your ...
... to the needle bar. ® Wrong needle is used . Corrective action Turn the presser foot pressure adlusting screw clockwise to the needle bar. Thread the machine correctly. Cause © The presser foot pressure is too light. Motor problems. C) Excessive noise. ® The motor will not run.... ® Sparks are sewing. Page 12 14 Attach the needle correctly to increase the presser foot pressure. Readjust the cutting space width Reduce the needle thread tension. 14 9-11 13 9-11 Re-thread the machine correctly. 6-7 Consult your ...


