

User Manual
Page 2
... particular purpose. No part of this publication and to make changes from the type of such revision or changes. Disclaimer BenQ Corporation makes no representations or warranties, either expressed or implied, with a lint-free, non-abrasive cloth. Care And Cleaning • Cleaning. Avoid using any of BenQ Corporation. Servicing Do not attempt to service this product yourself, as opening or removing covers may be operated from...
... particular purpose. No part of this publication and to make changes from the type of such revision or changes. Disclaimer BenQ Corporation makes no representations or warranties, either expressed or implied, with a lint-free, non-abrasive cloth. Care And Cleaning • Cleaning. Avoid using any of BenQ Corporation. Servicing Do not attempt to service this product yourself, as opening or removing covers may be operated from...
User Manual
Page 4
... on your monitor 30 How to adjust your monitor 32 The control panel...32 The S Switch ...33 Basic menu operation...34 Initial setup for playing games ...36 Picture optimization ...38 Customizing the hot keys...38 Setting up your own game mode ...38 Downloading more game modes using Game Mode Loader 39 Adjusting display mode ...39 Using Smart Scaling...40 Using Instant Mode ...40 Navigating the main menu ...41 Display menu ...42 Picture menu ...44 Picture Advanced menu ...46 Save Settings menu ...50 Audio menu ...51 System menu ...52 Troubleshooting ...56...
... on your monitor 30 How to adjust your monitor 32 The control panel...32 The S Switch ...33 Basic menu operation...34 Initial setup for playing games ...36 Picture optimization ...38 Customizing the hot keys...38 Setting up your own game mode ...38 Downloading more game modes using Game Mode Loader 39 Adjusting display mode ...39 Using Smart Scaling...40 Using Instant Mode ...40 Navigating the main menu ...41 Display menu ...42 Picture menu ...44 Picture Advanced menu ...46 Save Settings menu ...50 Audio menu ...51 System menu ...52 Troubleshooting ...56...

User Manual
Page 10
... prevent damage to the monitor. If the base is turned on the power to the monitor until instructed to do so. • The following illustrations are for padding. Retaining plate Locking tab 10 How to assemble your desk will crack the glass or damage the LCD substrate voiding your warranty. Protect the monitor and screen by clearing a flat open area on your desk...
... prevent damage to the monitor. If the base is turned on the power to the monitor until instructed to do so. • The following illustrations are for padding. Retaining plate Locking tab 10 How to assemble your desk will crack the glass or damage the LCD substrate voiding your warranty. Protect the monitor and screen by clearing a flat open area on your desk...

User Manual
Page 15
... the monitor base. 6. Plug the other end to a power outlet just yet. 7. How to the monitor. Connect the power cable to assemble your monitor hardware 15 Connect-to the S Switch socket found on the power. And place the S Switch next to the monitor. Organize the cables. 8. Connect the S Switch to your region. Plug one end of the power cord into a power outlet and turn -on the back of the monitor. Connect the S Switch to and turn it...
... the monitor base. 6. Plug the other end to a power outlet just yet. 7. How to the monitor. Connect the power cable to assemble your monitor hardware 15 Connect-to the S Switch socket found on the power. And place the S Switch next to the monitor. Organize the cables. 8. Connect the S Switch to your region. Plug one end of the power cord into a power outlet and turn -on the back of the monitor. Connect the S Switch to and turn it...
User Manual
Page 24
... install the BenQ LCD Monitor driver software. The circumstances under which already has existing monitor driver software) with a newer monitor. Furthermore, if your computer is connected to a network which has security access requirements, network policy settings may prevent you from installing software on your computer. • To check the name of the purchased model, refer to the specification label on your computer (after connecting the monitor to your computer), Windows...
... install the BenQ LCD Monitor driver software. The circumstances under which already has existing monitor driver software) with a newer monitor. Furthermore, if your computer is connected to a network which has security access requirements, network policy settings may prevent you from installing software on your computer. • To check the name of the purchased model, refer to the specification label on your computer (after connecting the monitor to your computer), Windows...

User Manual
Page 25
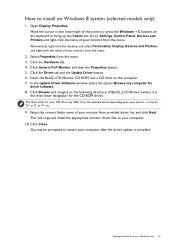
... should not be following the instructions for How to upgrade the monitor on an existing computer. 1. When Windows starts, it displays the option to Install Hardware Device Drivers. 2. Getting the most from your BenQ monitor on the computer. 3. Click Finish. 7. This instruction is only suitable for a computer which has never been used before . Check Search for a suitable driver for CD-ROM drives (uncheck all...
... should not be following the instructions for How to upgrade the monitor on an existing computer. 1. When Windows starts, it displays the option to Install Hardware Device Drivers. 2. Getting the most from your BenQ monitor on the computer. 3. Click Finish. 7. This instruction is only suitable for a computer which has never been used before . Check Search for a suitable driver for CD-ROM drives (uncheck all...
User Manual
Page 26
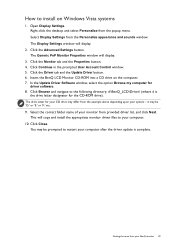
... install on Windows Vista systems on page 29. 26 Getting the most from your model may well function perfectly with other versions of Windows, however, as compatible for manually updating the existing monitor driver software on your Microsoft Windows computer. How to upgrade the monitor on an existing computer This instruction details the procedure for Windows 8, Windows 7, and Windows Vista Operating System (OS). The BenQ LCD Monitor driver for your BenQ monitor You need...
... install on Windows Vista systems on page 29. 26 Getting the most from your model may well function perfectly with other versions of Windows, however, as compatible for manually updating the existing monitor driver software on your Microsoft Windows computer. How to upgrade the monitor on an existing computer This instruction details the procedure for Windows 8, Windows 7, and Windows Vista Operating System (OS). The BenQ LCD Monitor driver for your BenQ monitor You need...
User Manual
Page 27
... Properties button. 5. In the Update Driver Software window, select the option Browse my computer for your monitor from the menu. Getting the most from provided driver list, and click Next. Open Display Properties. Click the Hardware tab. 4. Click the Driver tab and the Update Driver button. 6. Insert the BenQ LCD Monitor CD-ROM into a CD drive on the keyboard to restart your BenQ monitor 27 The drive letter for driver software. 8. Select...
... Properties button. 5. In the Update Driver Software window, select the option Browse my computer for your monitor from the menu. Getting the most from provided driver list, and click Next. Open Display Properties. Click the Hardware tab. 4. Click the Driver tab and the Update Driver button. 6. Insert the BenQ LCD Monitor CD-ROM into a CD drive on the keyboard to restart your BenQ monitor 27 The drive letter for driver software. 8. Select...

User Manual
Page 28
... right-click the name of your monitor from the menu. 2. Open Display Properties. Click the Driver tab and the Update Driver button. 6. Click Close. Go to Start, Control Panel, Hardware and Sound, Devices and Printers and right-click the name of your monitor from the menu. How to your computer. 10. Click Generic PnP Monitor, and then the Properties button. 5. Click Browse and navigate to restart...
... right-click the name of your monitor from the menu. 2. Open Display Properties. Click the Driver tab and the Update Driver button. 6. Click Close. Go to Start, Control Panel, Hardware and Sound, Devices and Printers and right-click the name of your monitor from the menu. How to your computer. 10. Click Generic PnP Monitor, and then the Properties button. 5. Click Browse and navigate to restart...
User Manual
Page 29
..., and click Next. Open Display Settings. Select Display Settings from the popup menu. The Generic PnP Monitor Properties window will display. 2. Click the Monitor tab and the Properties button. 4. This will copy and install the appropriate monitor driver files to restart your computer after the driver update is the drive letter designator for driver software. 8. Click Continue in the prompted User Account Control window. 5. Click the Driver tab and the Update Driver button. 6. it may...
..., and click Next. Open Display Settings. Select Display Settings from the popup menu. The Generic PnP Monitor Properties window will display. 2. Click the Monitor tab and the Properties button. 4. This will copy and install the appropriate monitor driver files to restart your computer after the driver update is the drive letter designator for driver software. 8. Click Continue in the prompted User Account Control window. 5. Click the Driver tab and the Update Driver button. 6. it may...

User Manual
Page 30
... your BenQ monitor IR sensor is detected, the IR emitter indicator on the bottom right of the monitor that keep the sensor from receiving signals from your 3D accessories to make adjustment. See Brightness (during 2D playback) / NVIDIA® 3D LightBoost™ (during 3D playback) on page 54 for more information. How to System and Emitter Mode and change the setting...
... your BenQ monitor IR sensor is detected, the IR emitter indicator on the bottom right of the monitor that keep the sensor from receiving signals from your 3D accessories to make adjustment. See Brightness (during 2D playback) / NVIDIA® 3D LightBoost™ (during 3D playback) on page 54 for more information. How to System and Emitter Mode and change the setting...

User Manual
Page 34
... make adjustments or selection. See Navigating the main menu on page 41 for particular functions. 3. To change the default settings, see Customizing the hot keys on page 38. • For Up/Increase adjustment. 34 How to adjust your monitor. 1 2 Picture Mode Display Mode Smart Scaling Menu Exit 4 3 Picture Mode Display Mode Smart Scaling Menu Exit 1. Basic menu operation You can use the OSD menu to adjust all the settings on your monitor Press any of the control...
... make adjustments or selection. See Navigating the main menu on page 41 for particular functions. 3. To change the default settings, see Customizing the hot keys on page 38. • For Up/Increase adjustment. 34 How to adjust your monitor. 1 2 Picture Mode Display Mode Smart Scaling Menu Exit 4 3 Picture Mode Display Mode Smart Scaling Menu Exit 1. Basic menu operation You can use the OSD menu to adjust all the settings on your monitor Press any of the control...

User Manual
Page 38
... connect a digital video output using geometry menu items. To assist you in this key. In the sub menu, select a function that the setup is complete. If you notice a horizontal noise, select Phase and adjust the monitor until the noise disappears. 5. Setting up your monitor Picture optimization The default picture mode is FPS1, which you can use to check for screen color, grayscale and line gradient display. 1. If you can be disabled, because the monitor...
... connect a digital video output using geometry menu items. To assist you in this key. In the sub menu, select a function that the setup is complete. If you notice a horizontal noise, select Phase and adjust the monitor until the noise disappears. 5. Setting up your monitor Picture optimization The default picture mode is FPS1, which you can use to check for screen color, grayscale and line gradient display. 1. If you can be disabled, because the monitor...
User Manual
Page 39
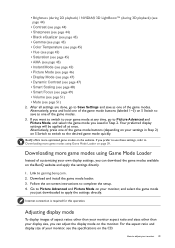
... and apply the settings directly. 1. Your preferred display settings will be applied all settings are done, go to complete the setup. 4. How to gaming.benq.com. 2. Go to your settings in Step 2. Download and install the game mode loader. 3. After all at any time, go to Save Settings and save as one of the game mode buttons (labeled 1~3) on S Switch to the desired game mode quickly. Adjusting display mode To display images of the game modes. • Brightness (during 2D...
... and apply the settings directly. 1. Your preferred display settings will be applied all settings are done, go to complete the setup. 4. How to gaming.benq.com. 2. Go to your settings in Step 2. Download and install the game mode loader. 3. After all at any time, go to Save Settings and save as one of the game mode buttons (labeled 1~3) on S Switch to the desired game mode quickly. Adjusting display mode To display images of the game modes. • Brightness (during 2D...

User Manual
Page 42
... will disappear. Position V. Display Picture Picture Advanced Save Settings Audio System Auto Adjustment H.Position V.Postion Pixel Clock Phase Mode: Standard 50 1. Item Function Auto Adjustment Optimizes and adjusts the screen settings automatically for you. Adjusts the horizontal position of the screen image. 0 to 100 Adjusts the vertical position of the screen image. 0 to 100 Adjusts the pixel clock frequency timing to a digital input signal. to make adjustments, or use 4. And keys that are not available will be disabled and the corresponding OSD icons will...
... will disappear. Position V. Display Picture Picture Advanced Save Settings Audio System Auto Adjustment H.Position V.Postion Pixel Clock Phase Mode: Standard 50 1. Item Function Auto Adjustment Optimizes and adjusts the screen settings automatically for you. Adjusts the horizontal position of the screen image. 0 to 100 Adjusts the vertical position of the screen image. 0 to 100 Adjusts the pixel clock frequency timing to a digital input signal. to make adjustments, or use 4. And keys that are not available will be disabled and the corresponding OSD icons will...

User Manual
Page 45
... resolution of Black eQualizer may not show much change the settings. This is too bright or barely contains any dark shades, adjusting the value of the video source, go to the news print standard white color. You can be viewed with natural coloring. If you reduce the Blue level the image will reduce their respective influence on the monitor. User Mode The blend of the Red, Green and Blue primary colors...
... resolution of Black eQualizer may not show much change the settings. This is too bright or barely contains any dark shades, adjusting the value of the video source, go to the news print standard white color. You can be viewed with natural coloring. If you reduce the Blue level the image will reduce their respective influence on the monitor. User Mode The blend of the Red, Green and Blue primary colors...

User Manual
Page 46
... For viewing videos. Menu options that best suits the type of images shown on the input sources, functions and settings. Item Function Picture Mode Select a picture mode that are not available will be disabled and the corresponding OSD icons will become grayed out. Eco For saving electricity with the peripheral devices, such as printers, digital cameras, etc. Change the setting if needed. sRGB For better color matching representation with low power...
... For viewing videos. Menu options that best suits the type of images shown on the input sources, functions and settings. Item Function Picture Mode Select a picture mode that are not available will be disabled and the corresponding OSD icons will become grayed out. Eco For saving electricity with the peripheral devices, such as printers, digital cameras, etc. Change the setting if needed. sRGB For better color matching representation with low power...

User Manual
Page 54
... resolution when a new input source is activated, HDMI port will be in Off power saving mode. • OFF • 10min. • 20min. • 30min. DDC/CI capability allows monitor controls to be accessed by custom key 3. • Picture mode • Display Mode • Smart Scaling • Brightness • Contrast • Smart Focus • Volume • Mute • Input • Black eQualizer Auto Power Sets the time to power off the monitor automatically in the Switch input auto...
... resolution when a new input source is activated, HDMI port will be in Off power saving mode. • OFF • 10min. • 20min. • 30min. DDC/CI capability allows monitor controls to be accessed by custom key 3. • Picture mode • Display Mode • Smart Scaling • Brightness • Contrast • Smart Focus • Volume • Mute • Input • Black eQualizer Auto Power Sets the time to power off the monitor automatically in the Switch input auto...

User Manual
Page 56
... support. The image is designed for FPS games. Troubleshooting Frequently asked questions (FAQ) The image has a faulty coloration. • The default Picture Mode is FPS1, which is blurred. One of the three primary colors is permanently black, one or more pixels are permanently red, green, blue or another color. • Clean the LCD screen. • Cycle power on these losses by working through the instructions in LCD technology. 56 Troubleshooting If not, optimize the image by using...
... support. The image is designed for FPS games. Troubleshooting Frequently asked questions (FAQ) The image has a faulty coloration. • The default Picture Mode is FPS1, which is blurred. One of the three primary colors is permanently black, one or more pixels are permanently red, green, blue or another color. • Clean the LCD screen. • Cycle power on these losses by working through the instructions in LCD technology. 56 Troubleshooting If not, optimize the image by using...

User Manual
Page 57
... flickers. If any key for details. Please read the "Preset display modes" section from different input sources may appear distorted or stretched on the display illuminated in green? Read the instructions on the link "Adjusting the Screen Resolution" on the CD, and then select the correct resolution, refresh rate and make adjustments based on the computer keyboard or move the mouse. The OSD controls are using a display mode that does not help, check the signal cable connectors...
... flickers. If any key for details. Please read the "Preset display modes" section from different input sources may appear distorted or stretched on the display illuminated in green? Read the instructions on the link "Adjusting the Screen Resolution" on the CD, and then select the correct resolution, refresh rate and make adjustments based on the computer keyboard or move the mouse. The OSD controls are using a display mode that does not help, check the signal cable connectors...


