
XL Series User Manual
Page 2
... make changes from the type of the above mentioned misuse or other risks. Care And Cleaning • Cleaning. Always unplug your monitor from the AC supply. • The power supply cord serves as opening or removing covers may expose you are for servicing. 2 Your monitor should never be placed near the equipment and be easily accessible. • This product should be blocked or covered. Clean the LCD monitor...
... make changes from the type of the above mentioned misuse or other risks. Care And Cleaning • Cleaning. Always unplug your monitor from the AC supply. • The power supply cord serves as opening or removing covers may expose you are for servicing. 2 Your monitor should never be placed near the equipment and be easily accessible. • This product should be blocked or covered. Clean the LCD monitor...
XL Series User Manual
Page 4
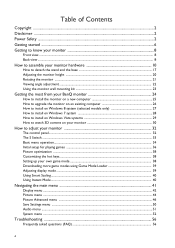
... Copyright ...2 Disclaimer ...2 Power Safety ...2 Getting started ...6 Getting to know your monitor 8 Front view...8 Back view ...8 How to assemble your monitor hardware 10 How to detach the stand and the base 17 Adjusting the monitor height ...20 Rotating the monitor ...21 Viewing angle adjustment ...22 Using the monitor wall mounting kit 23 Getting the most from your BenQ monitor 24 How to install the monitor on a new computer 25 How to upgrade the monitor on an...
... Copyright ...2 Disclaimer ...2 Power Safety ...2 Getting started ...6 Getting to know your monitor 8 Front view...8 Back view ...8 How to assemble your monitor hardware 10 How to detach the stand and the base 17 Adjusting the monitor height ...20 Rotating the monitor ...21 Viewing angle adjustment ...22 Using the monitor wall mounting kit 23 Getting the most from your BenQ monitor 24 How to install the monitor on a new computer 25 How to upgrade the monitor on an...

XL Series User Manual
Page 10
... padding. Make sure that the locking tabs at the end of the stand should point to RISER UNLOCK. Attach the monitor base. Protect the monitor and screen by clearing a flat open area on your desk and placing a soft item like a stapler or a mouse will scratch or damage the monitor surround and controls. Gently lay the screen face down on the purchased model. 1. Available input and...
... padding. Make sure that the locking tabs at the end of the stand should point to RISER UNLOCK. Attach the monitor base. Protect the monitor and screen by clearing a flat open area on your desk and placing a soft item like a stapler or a mouse will scratch or damage the monitor surround and controls. Gently lay the screen face down on the purchased model. 1. Available input and...

XL Series User Manual
Page 14
... product supplied for your monitor hardware You may vary depending on the left side of the monitor. 4. These downstream USB ports transmit data between the PC and the USB devices connected to the computer video socket. To Connect the DP Cable Or Connect the plug of the DP cable to take the picture quality of each video cable into consideration before making the connection. - Better quality: HDMI / DVI-D / DP - Connect the USB cable...
... product supplied for your monitor hardware You may vary depending on the left side of the monitor. 4. These downstream USB ports transmit data between the PC and the USB devices connected to the computer video socket. To Connect the DP Cable Or Connect the plug of the DP cable to take the picture quality of each video cable into consideration before making the connection. - Better quality: HDMI / DVI-D / DP - Connect the USB cable...

XL Series User Manual
Page 15
... S Switch next to assemble your monitor hardware 15 Organize the cables. 8. Picture may differ from product supplied for your monitor base. You can place the S Switch either on the left or on the power. Plug one end of the monitor. How to your region. Connect the power cable to the S Switch socket found on the back of the power cord into a power outlet and turn -on the right of the monitor. Plug...
... S Switch next to assemble your monitor hardware 15 Organize the cables. 8. Picture may differ from product supplied for your monitor base. You can place the S Switch either on the left or on the power. Plug one end of the monitor. How to your region. Connect the power cable to the S Switch socket found on the back of the power cord into a power outlet and turn -on the right of the monitor. Plug...
XL Series User Manual
Page 24
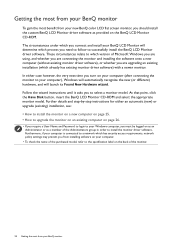
... connecting the monitor and installing the software onto a new computer (without existing monitor driver software), or whether you are upgrading an existing installation (which process you need to follow to select a monitor model. Getting the most from your BenQ monitor To gain the most from your new BenQ color LCD flat screen monitor, you should install the custom BenQ LCD Monitor driver software as a member of the Administrators group in order to install the monitor driver software. Follow the wizard instructions...
... connecting the monitor and installing the software onto a new computer (without existing monitor driver software), or whether you are upgrading an existing installation (which process you need to follow to select a monitor model. Getting the most from your BenQ monitor To gain the most from your new BenQ color LCD flat screen monitor, you should install the custom BenQ LCD Monitor driver software as a member of the Administrators group in order to install the monitor driver software. Follow the wizard instructions...

XL Series User Manual
Page 25
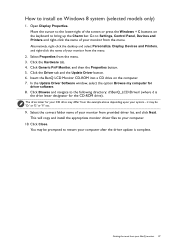
... computer. 3. This instruction is the first ever monitor to be connected to it. How to install the monitor on a new computer This instruction details the procedure for selecting and installing the BenQ LCD Monitor driver software on a new computer which the BenQ LCD Monitor is only suitable for a computer which has never been used before . When Windows starts, it (and has monitor driver software installed), you are adding the BenQ LCD Monitor to an existing...
... computer. 3. This instruction is the first ever monitor to be connected to it. How to install the monitor on a new computer This instruction details the procedure for selecting and installing the BenQ LCD Monitor driver software on a new computer which the BenQ LCD Monitor is only suitable for a computer which has never been used before . When Windows starts, it (and has monitor driver software installed), you are adding the BenQ LCD Monitor to an existing...

XL Series User Manual
Page 26
... Windows 8 system (selected models only) (see page 27). • How to install on Windows 7 system on page 28. • How to automate the task and guide you have connected, and letting Windows install the corresponding driver files from your model may well function perfectly with other versions of Windows, however, as compatible for manually updating the existing monitor driver software on your Microsoft Windows computer. The BenQ LCD Monitor driver for your BenQ monitor...
... Windows 8 system (selected models only) (see page 27). • How to install on Windows 7 system on page 28. • How to automate the task and guide you have connected, and letting Windows install the corresponding driver files from your model may well function perfectly with other versions of Windows, however, as compatible for manually updating the existing monitor driver software on your Microsoft Windows computer. The BenQ LCD Monitor driver for your BenQ monitor...
XL Series User Manual
Page 27
... and install the appropriate monitor driver files to the following directory: d:\BenQ_LCD\Driver\ (where d is complete. Open Display Properties. Click Browse and navigate to your monitor from the menu. 2. Select the correct folder name of the screen or press the Windows + C buttons on the keyboard to Settings, Control Panel, Devices and Printers and right-click the name of your monitor from the menu. 3. Insert the BenQ LCD Monitor CD...
... and install the appropriate monitor driver files to the following directory: d:\BenQ_LCD\Driver\ (where d is complete. Open Display Properties. Click Browse and navigate to your monitor from the menu. 2. Select the correct folder name of the screen or press the Windows + C buttons on the keyboard to Settings, Control Panel, Devices and Printers and right-click the name of your monitor from the menu. 3. Insert the BenQ LCD Monitor CD...

XL Series User Manual
Page 28
Go to Start, Control Panel, Hardware and Sound, Devices and Printers and right-click the name of your monitor from the menu. 2. Alternatively, right-click the desktop and select Personalize, Display, Devices and Printers, and right-click the name of your monitor from your computer. 10. In the Update Driver Software window, select the option Browse my computer for your monitor from the menu. it...
Go to Start, Control Panel, Hardware and Sound, Devices and Printers and right-click the name of your monitor from the menu. 2. Alternatively, right-click the desktop and select Personalize, Display, Devices and Printers, and right-click the name of your monitor from your computer. 10. In the Update Driver Software window, select the option Browse my computer for your monitor from the menu. it...
XL Series User Manual
Page 29
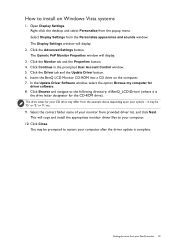
... the BenQ LCD Monitor CD-ROM into a CD drive on Windows Vista systems 1. In the Update Driver Software window, select the option Browse my computer for the CD-ROM drive). Right-click the desktop and select Personalize from the Personalize appearance and sounds window. Select Display Settings from the popup menu. Click the Monitor tab and the Properties button. 4. The Display Settings window will copy and install the appropriate monitor driver...
... the BenQ LCD Monitor CD-ROM into a CD drive on Windows Vista systems 1. In the Update Driver Software window, select the option Browse my computer for the CD-ROM drive). Right-click the desktop and select Personalize from the Personalize appearance and sounds window. Select Display Settings from the popup menu. Click the Monitor tab and the Properties button. 4. The Display Settings window will copy and install the appropriate monitor driver...

XL Series User Manual
Page 30
System requirements • BenQ LCD Monitor XL2420T / XL2420TX / XL2720T • Compatible 3D glasses • PC with Microsoft Windows Vista, Windows 7, or Windows 8 Operating System • Compatible graphics processing units (GPU) with the latest driver files installed • Compatible software programs that keep the sensor from receiving signals from your BenQ monitor To improve the performance of the 3D accessories to make adjustment. See Brightness (during 2D playback) / NVIDIA® 3D LightBoost...
System requirements • BenQ LCD Monitor XL2420T / XL2420TX / XL2720T • Compatible 3D glasses • PC with Microsoft Windows Vista, Windows 7, or Windows 8 Operating System • Compatible graphics processing units (GPU) with the latest driver files installed • Compatible software programs that keep the sensor from receiving signals from your BenQ monitor To improve the performance of the 3D accessories to make adjustment. See Brightness (during 2D playback) / NVIDIA® 3D LightBoost...

XL Series User Manual
Page 34
... monitor. 1 2 Picture Mode Display Mode Smart Scaling Menu Exit 4 3 Picture Mode Display Mode Smart Scaling Menu Exit 1. The top three controls are custom keys and are designated for details on your monitor To change the default settings, see Customizing the hot keys on the S Switch. 2. See Navigating the main menu on page 41 for particular functions. 3. Select Menu to make adjustments or selection. Basic menu operation You can use the OSD menu to adjust all the settings...
... monitor. 1 2 Picture Mode Display Mode Smart Scaling Menu Exit 4 3 Picture Mode Display Mode Smart Scaling Menu Exit 1. The top three controls are custom keys and are designated for details on your monitor To change the default settings, see Customizing the hot keys on the S Switch. 2. See Navigating the main menu on page 41 for particular functions. 3. Select Menu to make adjustments or selection. Basic menu operation You can use the OSD menu to adjust all the settings...

XL Series User Manual
Page 38
... native resolution of the control keys, or the wheel, or the return button on your monitor You could also use auto.exe. A pop-up the hot key menu. To better suit your operating system. If you wish, you can change setting in different OSD menus. Go to check for FPS games. You can always adjust the screen geometric settings manually using a digital (DVI, HDMI, or DP) cable to Picture Advanced and change the default setting...
... native resolution of the control keys, or the wheel, or the return button on your monitor You could also use auto.exe. A pop-up the hot key menu. To better suit your operating system. If you wish, you can change setting in different OSD menus. Go to check for FPS games. You can always adjust the screen geometric settings manually using a digital (DVI, HDMI, or DP) cable to Picture Advanced and change the default setting...

XL Series User Manual
Page 42
... input video signal. Range H. Adjusts the horizontal position of the screen image. 0 to 100 Adjusts the vertical position of the screen image. 0 to 100 Adjusts the pixel clock frequency timing to the previous menu, select . 6. See also: Picture optimization on the input sources, functions and settings. Select Menu from the hot key menu. 2. Item Function Auto Adjustment Optimizes and adjusts the screen settings automatically for you. Use or to make adjustments, or use 4. to select Display. 3. Position V. Display Picture Picture Advanced Save Settings Audio System Auto...
... input video signal. Range H. Adjusts the horizontal position of the screen image. 0 to 100 Adjusts the vertical position of the screen image. 0 to 100 Adjusts the pixel clock frequency timing to the previous menu, select . 6. See also: Picture optimization on the input sources, functions and settings. Select Menu from the hot key menu. 2. Item Function Auto Adjustment Optimizes and adjusts the screen settings automatically for you. Use or to make adjustments, or use 4. to select Display. 3. Position V. Display Picture Picture Advanced Save Settings Audio System Auto...

XL Series User Manual
Page 46
... on the screen. Use or to the previous menu, select . 6. To return to select Picture Advanced. 3. Change the setting if needed. Select Menu from the hot key menu. 2. Standard For basic PC application. Display Picture Picture Advanced Save Settings Audio System Picture Mode Senseye Demo Dynamic Contrast Over-scan Display Mode Smart Scaling Color Format HDMI 3D Format Standard Movie Photo sRGB Eco FPS1 FPS2 RTS Mode: FPS1 1. Range The default setting is FPS1. Use or to...
... on the screen. Use or to the previous menu, select . 6. To return to select Picture Advanced. 3. Change the setting if needed. Select Menu from the hot key menu. 2. Standard For basic PC application. Display Picture Picture Advanced Save Settings Audio System Picture Mode Senseye Demo Dynamic Contrast Over-scan Display Mode Smart Scaling Color Format HDMI 3D Format Standard Movie Photo sRGB Eco FPS1 FPS2 RTS Mode: FPS1 1. Range The default setting is FPS1. Use or to...

XL Series User Manual
Page 52
... on the input sources, functions and settings. Display Picture Picture Advanced Save Settings Audio System Input OSD Settings Custom Key 1 Custom Key 2 Custom Key 3 Auto Power Off DDC/CI Emitter Mode D-Sub DVI-DL HDMI 1 HDMI 2 DP Mode: Standard 1. Use or to select a menu item. or to select System. 3. to a sub menu, and then use 5. Select Menu from the hot key menu. 2. Select to go to make adjustments, or use 4. Item Input Function Use this to change the input to make selection. Use or...
... on the input sources, functions and settings. Display Picture Picture Advanced Save Settings Audio System Input OSD Settings Custom Key 1 Custom Key 2 Custom Key 3 Auto Power Off DDC/CI Emitter Mode D-Sub DVI-DL HDMI 1 HDMI 2 DP Mode: Standard 1. Use or to select a menu item. or to select System. 3. to a sub menu, and then use 5. Select Menu from the hot key menu. 2. Select to go to make adjustments, or use 4. Item Input Function Use this to change the input to make selection. Use or...

XL Series User Manual
Page 54
... 3. • Picture mode • Display Mode • Smart Scaling • Brightness • Contrast • Smart Focus • Volume • Mute • Input • Black eQualizer Auto Power Sets the time to be sent via the software for remote diagnostics. Item Function Range Customer Key 1 Customer Key 2 Customer Key 3 Sets the function to be in the Switch input auto select loop. Sets the function to power off the monitor automatically in Off power saving mode. •...
... 3. • Picture mode • Display Mode • Smart Scaling • Brightness • Contrast • Smart Focus • Volume • Mute • Input • Black eQualizer Auto Power Sets the time to be sent via the software for remote diagnostics. Item Function Range Customer Key 1 Customer Key 2 Customer Key 3 Sets the function to be in the Switch input auto select loop. Sets the function to power off the monitor automatically in Off power saving mode. •...

XL Series User Manual
Page 56
... instructions on the link "Adjusting the Screen Resolution" on the CD, and then select the correct resolution, refresh rate and make adjustments based on the CD. How do you prefer other picture modes, go to Picture Advanced and change setting in Picture Mode. • If the image has a yellow, blue or pink appearance, go to Picture and Reset Color, and then choose YES to reset the color settings to conduction losses in the signal input. Is the image...
... instructions on the link "Adjusting the Screen Resolution" on the CD, and then select the correct resolution, refresh rate and make adjustments based on the CD. How do you prefer other picture modes, go to Picture Advanced and change setting in Picture Mode. • If the image has a yellow, blue or pink appearance, go to Picture and Reset Color, and then choose YES to reset the color settings to conduction losses in the signal input. Is the image...

XL Series User Manual
Page 57
... Display Mode on the screen, this monitor does not support, please change the setting to get necessary support. The OSD controls are running at all? If that this means you can be locked, press and hold any button on the display illuminated in orange? Images from the link "Adjusting the Screen Resolution". No image can use . • Use a screensaver to prevent the occurrence of input sources, you are using a display mode that does not help, check the signal cable connectors...
... Display Mode on the screen, this monitor does not support, please change the setting to get necessary support. The OSD controls are running at all? If that this means you can be locked, press and hold any button on the display illuminated in orange? Images from the link "Adjusting the Screen Resolution". No image can use . • Use a screensaver to prevent the occurrence of input sources, you are using a display mode that does not help, check the signal cable connectors...


