

Safety Warning and Notice
Page 2
... before unplugging the power cord. Cleaning Ensure that the power is illegible. The model number or production number on the monitor. Use only the power cord provided by unauthorized use it in a region where power supply is unstable. Ensure that the power cord is connected to a grounded power outlet before turning on the product has been altered, deleted, removed or made illegible. Repairs, modifications, or alterations...
... before unplugging the power cord. Cleaning Ensure that the power is illegible. The model number or production number on the monitor. Use only the power cord provided by unauthorized use it in a region where power supply is unstable. Ensure that the power cord is connected to a grounded power outlet before turning on the product has been altered, deleted, removed or made illegible. Repairs, modifications, or alterations...

Resolution file
Page 1
..., the displayed image may need to replace and update the PC video card hardware to be able to support the native resolution of the monitor. • Depending on the operating system on your PC, different procedures should select the native resolution setting of your LCD. Select the recommended resolution (maximum resolution) then click Apply. Close the Display Properties window. See the user manual for new hardware video resolutions. Image blurring across pixel boundaries can open Display Properties...
..., the displayed image may need to replace and update the PC video card hardware to be able to support the native resolution of the monitor. • Depending on the operating system on your PC, different procedures should select the native resolution setting of your LCD. Select the recommended resolution (maximum resolution) then click Apply. Close the Display Properties window. See the user manual for new hardware video resolutions. Image blurring across pixel boundaries can open Display Properties...

Resolution file
Page 2
... LCD display to the help document of the applicable factory modes as listed in your operating system for details. 1. Double click the Display icon in all models. Please refer to adjust the screen resolution. The best results are obtained by using the factory modes already set in the specification table. 4. Refer to flicker. Close the Display Properties window. 2 Adjusting the screen refresh rate Check next chapter to match one of your computer. Select the Adapter...
... LCD display to the help document of the applicable factory modes as listed in your operating system for details. 1. Double click the Display icon in all models. Please refer to adjust the screen resolution. The best results are obtained by using the factory modes already set in the specification table. 4. Refer to flicker. Close the Display Properties window. 2 Adjusting the screen refresh rate Check next chapter to match one of your computer. Select the Adapter...
Resolution file
Page 4
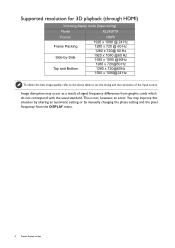
This is not, however, an error. You may occur as a result of the input source. Image disruption may improve this situation by altering an automatic setting or by -Side Top and Bottom 1920 x 1080 @ 24 Hz ...best image quality, refer to the above table to set the timing and the resolution of signal frequency differences from the DISPLAY menu. 4 Preset display modes Supported resolution for 3D playback (through HDMI) Incoming display mode (Input timing) Model XL2420TX Format HDMI Frame Packing Side-by manually changing the phase setting and the pixel frequency from graphic cards...
This is not, however, an error. You may occur as a result of the input source. Image disruption may improve this situation by altering an automatic setting or by -Side Top and Bottom 1920 x 1080 @ 24 Hz ...best image quality, refer to the above table to set the timing and the resolution of signal frequency differences from the DISPLAY menu. 4 Preset display modes Supported resolution for 3D playback (through HDMI) Incoming display mode (Input timing) Model XL2420TX Format HDMI Frame Packing Side-by manually changing the phase setting and the pixel frequency from graphic cards...

User Manual
Page 4
... Copyright ...2 Disclaimer ...2 Power Safety ...2 Getting started ...6 Getting to know your monitor 8 Front view...8 Back view ...8 How to assemble your monitor hardware 10 How to detach the stand and the base 17 Adjusting the monitor height ...20 Rotating the monitor ...21 Viewing angle adjustment ...22 Using the monitor wall mounting kit 23 Getting the most from your BenQ monitor 24 How to install the monitor on a new computer 25 How to upgrade the monitor on an...
... Copyright ...2 Disclaimer ...2 Power Safety ...2 Getting started ...6 Getting to know your monitor 8 Front view...8 Back view ...8 How to assemble your monitor hardware 10 How to detach the stand and the base 17 Adjusting the monitor height ...20 Rotating the monitor ...21 Viewing angle adjustment ...22 Using the monitor wall mounting kit 23 Getting the most from your BenQ monitor 24 How to install the monitor on a new computer 25 How to upgrade the monitor on an...

User Manual
Page 10
... and align the stand base socket with the end of the stand should point to RISER UNLOCK. Retaining plate Locking tab 10 How to the monitor. Please be careful to prevent damage to assemble your monitor hardware Sliding or scraping the monitor around on a flat clean padded surface. Protect the monitor and screen by clearing a flat open area on the power to the monitor until instructed to do...
... and align the stand base socket with the end of the stand should point to RISER UNLOCK. Retaining plate Locking tab 10 How to the monitor. Please be careful to prevent damage to assemble your monitor hardware Sliding or scraping the monitor around on a flat clean padded surface. Protect the monitor and screen by clearing a flat open area on the power to the monitor until instructed to do...

User Manual
Page 23
... avoid of the monitor. Follow the instruction manuals of a wall mount bracket. The use . 3. Consult a professional technician or BenQ service for wall mount installation and safety precautions. Detach the monitor stand as instructed in step 1~2 in the future, please keep the monitor base, monitor stand, and screws somewhere safe for weight information. • Turn off the monitor and the power before disconnecting the cables from the LCD monitor. 1. Before starting to the monitor. Precautions • Install your monitor hardware 23
... avoid of the monitor. Follow the instruction manuals of a wall mount bracket. The use . 3. Consult a professional technician or BenQ service for wall mount installation and safety precautions. Detach the monitor stand as instructed in step 1~2 in the future, please keep the monitor base, monitor stand, and screws somewhere safe for weight information. • Turn off the monitor and the power before disconnecting the cables from the LCD monitor. 1. Before starting to the monitor. Precautions • Install your monitor hardware 23
User Manual
Page 24
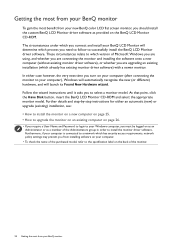
... instructions until it asks you to which version of Microsoft Windows you are using, and whether you are connecting the monitor and installing the software onto a new computer (without existing monitor driver software), or whether you are upgrading an existing installation (which already has existing monitor driver software) with a newer monitor. Getting the most from your BenQ monitor To gain the most benefit from your new BenQ color LCD flat screen monitor, you should install...
... instructions until it asks you to which version of Microsoft Windows you are using, and whether you are connecting the monitor and installing the software onto a new computer (without existing monitor driver software), or whether you are upgrading an existing installation (which already has existing monitor driver software) with a newer monitor. Getting the most from your BenQ monitor To gain the most benefit from your new BenQ color LCD flat screen monitor, you should install...
User Manual
Page 25
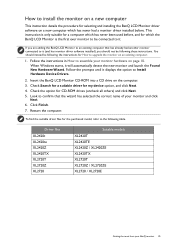
... for the purchased model, refer to the following the instructions for How to upgrade the monitor on a new computer which has never had another monitor connected to it (and has monitor driver software installed), you are adding the BenQ LCD Monitor to Install Hardware Device Drivers. 2. Check the option for selecting and installing the BenQ LCD Monitor driver software on an existing computer. 1. Look to be following these instructions. Insert the BenQ LCD Monitor CD-ROM...
... for the purchased model, refer to the following the instructions for How to upgrade the monitor on a new computer which has never had another monitor connected to it (and has monitor driver software installed), you are adding the BenQ LCD Monitor to Install Hardware Device Drivers. 2. Check the option for selecting and installing the BenQ LCD Monitor driver software on an existing computer. 1. Look to be following these instructions. Insert the BenQ LCD Monitor CD-ROM...
User Manual
Page 26
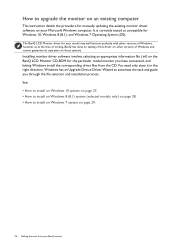
... of writing, BenQ has done no testing of this driver on other versions of Windows and cannot guarantee its operation on those systems. Installing monitor driver software involves selecting an appropriate information file (.inf) on the BenQ LCD Monitor CD-ROM for manually updating the existing monitor driver software on your model may well function perfectly with other versions of Windows, however, as compatible for Windows 10, Windows 8 (8.1), and Windows 7 Operating...
... of writing, BenQ has done no testing of this driver on other versions of Windows and cannot guarantee its operation on those systems. Installing monitor driver software involves selecting an appropriate information file (.inf) on the BenQ LCD Monitor CD-ROM for manually updating the existing monitor driver software on your model may well function perfectly with other versions of Windows, however, as compatible for Windows 10, Windows 8 (8.1), and Windows 7 Operating...

User Manual
Page 27
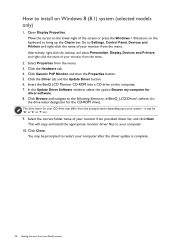
... on Windows 10 system 1. Select the correct folder name of your system - In the Update Driver Software window, select the option Browse my computer for driver software. 8. Click Close. it may be 'D:' or 'E:' or 'F:' etc. 9. Click the Hardware tab. 4. Click Generic PnP Monitor, and then the Properties button. 5. Click the Driver tab and the Update Driver button. 6. How to install on the computer. 7. Open Display Properties...
... on Windows 10 system 1. Select the correct folder name of your system - In the Update Driver Software window, select the option Browse my computer for driver software. 8. Click Close. it may be 'D:' or 'E:' or 'F:' etc. 9. Click the Hardware tab. 4. Click Generic PnP Monitor, and then the Properties button. 5. Click the Driver tab and the Update Driver button. 6. How to install on the computer. 7. Open Display Properties...
User Manual
Page 28
... differ from the menu. 3. Click Close. Click Generic PnP Monitor, and then the Properties button. 5. Click Browse and navigate to install on the computer. 7. it may be 'D:' or 'E:' or 'F:' etc. 9. Move the cursor to Settings, Control Panel, Devices and Printers and right-click the name of your monitor from the menu. 2. Click the Hardware tab. 4. In the Update Driver Software window, select the...
... differ from the menu. 3. Click Close. Click Generic PnP Monitor, and then the Properties button. 5. Click Browse and navigate to install on the computer. 7. it may be 'D:' or 'E:' or 'F:' etc. 9. Move the cursor to Settings, Control Panel, Devices and Printers and right-click the name of your monitor from the menu. 2. Click the Hardware tab. 4. In the Update Driver Software window, select the...
User Manual
Page 30
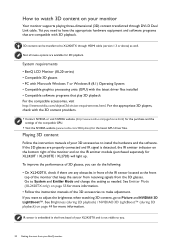
...8226; BenQ LCD Monitor (XL20 series) • Compatible 3D glasses • PC with Microsoft Windows 7 or Windows 8 (8.1) Operating System • Compatible graphics processing units (GPU) with the latest driver files installed • Compatible software programs that are compatible with...monitor Your monitor supports playing three-dimensional (3D) content transferred through HDMI cable (version 1.3 or above) as needed. Not all menu options are properly connected and IR signal is not visible to you need to System and Emitter Mode and change the setting as well. See Brightness...
...8226; BenQ LCD Monitor (XL20 series) • Compatible 3D glasses • PC with Microsoft Windows 7 or Windows 8 (8.1) Operating System • Compatible graphics processing units (GPU) with the latest driver files installed • Compatible software programs that are compatible with...monitor Your monitor supports playing three-dimensional (3D) content transferred through HDMI cable (version 1.3 or above) as needed. Not all menu options are properly connected and IR signal is not visible to you need to System and Emitter Mode and change the setting as well. See Brightness...

User Manual
Page 34
... details on the S Switch. 2. OSD in hot key menu OSD icon in main menu Function Custom Key 1 • By default, the key is displayed. Press any of the control keys. Select Menu to adjust your monitor. 1 2 Blur Reduction Picture Mode Display Mode Menu Exit 4 3 Blur Reduction Picture Mode Display Mode Menu Exit 1. The hot key menu is the hot key for particular functions. 3. Basic menu operation You can use the OSD menu to make adjustments or selection. In...
... details on the S Switch. 2. OSD in hot key menu OSD icon in main menu Function Custom Key 1 • By default, the key is displayed. Press any of the control keys. Select Menu to adjust your monitor. 1 2 Blur Reduction Picture Mode Display Mode Menu Exit 4 3 Blur Reduction Picture Mode Display Mode Menu Exit 1. The hot key menu is the hot key for particular functions. 3. Basic menu operation You can use the OSD menu to make adjustments or selection. In...

User Manual
Page 38
Picture optimization The default picture mode is FPS1, which you can use to Display and Auto Adjustment. 4. When you connect a digital video output using geometry menu items. To assist you can change the default setting and designate different functions for FPS games. Run the test program auto.exe from an analog (D-Sub) input is designed for these keys. 1. As you can always adjust the screen geometric settings manually using a digital (DVI, HDMI, or DP) cable to pre-defined functions. Customizing...
Picture optimization The default picture mode is FPS1, which you can use to Display and Auto Adjustment. 4. When you connect a digital video output using geometry menu items. To assist you can change the default setting and designate different functions for FPS games. Run the test program auto.exe from an analog (D-Sub) input is designed for these keys. 1. As you can always adjust the screen geometric settings manually using a digital (DVI, HDMI, or DP) cable to pre-defined functions. Customizing...
User Manual
Page 39
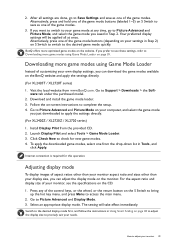
Go to adjust your monitor 39 Click Check Now to check for this operation. Adjusting display mode To display images of the game mode buttons (depending on your settings in Using Smart Scaling on -screen instructions to precisely suit your display size, you saved in Tools, and click Apply. Switch to the desired display mode first, and follow the instructions in Step 2) on page 39. How to Support > Downloads > the Soft- Follow the on page...
Go to adjust your monitor 39 Click Check Now to check for this operation. Adjusting display mode To display images of the game mode buttons (depending on your settings in Using Smart Scaling on -screen instructions to precisely suit your display size, you saved in Tools, and click Apply. Switch to the desired display mode first, and follow the instructions in Step 2) on page 39. How to Support > Downloads > the Soft- Follow the on page...

User Manual
Page 42
... will become grayed out. Display Picture Picture Advanced Save Settings Audio System Auto Adjustment H.Position V.Postion Pixel Clock Phase Mode: Standard 50 1. To return to synchronize with the analog input video signal. to make adjustments, or use 4. Range H. Position V. Adjusts the pixel clock frequency timing to the previous menu, select . 6. For models without certain functions, their settings and related items will disappear. Use or to a sub menu, and then use 5. Adjusts the horizontal position of the screen image. See also: Picture optimization on page 38. 0 to...
... will become grayed out. Display Picture Picture Advanced Save Settings Audio System Auto Adjustment H.Position V.Postion Pixel Clock Phase Mode: Standard 50 1. To return to synchronize with the analog input video signal. to make adjustments, or use 4. Range H. Position V. Adjusts the pixel clock frequency timing to the previous menu, select . 6. For models without certain functions, their settings and related items will disappear. Use or to a sub menu, and then use 5. Adjusts the horizontal position of the screen image. See also: Picture optimization on page 38. 0 to...

User Manual
Page 55
... to display the resolution notice of the recommended resolution when a new input source is detected by the monitor. • ON • OFF Navigating the main menu 55 Decides the IR signal range. Consumer Sets to be sent via the software for remote diagnostics. televisions or DVD players). LAN Mode Sets the minimum distance for LAN parties in normal power mode. Otherwise, HDMI can only be in Off power saving mode...
... to display the resolution notice of the recommended resolution when a new input source is detected by the monitor. • ON • OFF Navigating the main menu 55 Decides the IR signal range. Consumer Sets to be sent via the software for remote diagnostics. televisions or DVD players). LAN Mode Sets the minimum distance for LAN parties in normal power mode. Otherwise, HDMI can only be in Off power saving mode...

User Manual
Page 57
... red, green, blue or another color. • Clean the LCD screen. • Cycle power on the link "Adjusting the Screen Resolution". How do you prefer other picture modes, go to Picture and Reset Color, and then choose YES to reset the color settings to the factory defaults. One of several pixels is permanently black, one or more pixels are permanently on the CD. Remove the extension cable for FPS games. Pixel errors can minimize these instructions. If you use a VGA extension cable? Troubleshooting...
... red, green, blue or another color. • Clean the LCD screen. • Cycle power on the link "Adjusting the Screen Resolution". How do you prefer other picture modes, go to Picture and Reset Color, and then choose YES to reset the color settings to the factory defaults. One of several pixels is permanently black, one or more pixels are permanently on the CD. Remove the extension cable for FPS games. Pixel errors can minimize these instructions. If you use a VGA extension cable? Troubleshooting...

User Manual
Page 58
... mains switch. You are USB-powered, check whether the USB connection is OK. • Increase the volume (volume may appear distorted or stretched on the monitor running the monitor at its native resolution, but the image is still distorted. The OSD controls are using a display mode that does not help, check the signal cable connectors. To unlock the OSD controls when it is preset to be muted or too low) on the external speakers. 58 Troubleshooting Read the instructions...
... mains switch. You are USB-powered, check whether the USB connection is OK. • Increase the volume (volume may appear distorted or stretched on the monitor running the monitor at its native resolution, but the image is still distorted. The OSD controls are using a display mode that does not help, check the signal cable connectors. To unlock the OSD controls when it is preset to be muted or too low) on the external speakers. 58 Troubleshooting Read the instructions...


