US One Year LCD Monitor Warranty
Page 1
... only for the remainder of the Product. END USER LIMITED WARRANTY LCD MONITORS Subject to the terms and conditions set forth below , BenQ America Corp. ("BenQ") warrants the BenQ LCD Monitor ("Product"), you are entitled to depot repair service during the warranty period. • DOA (Dead... in materials or workmanship under normal consumer use new or reconditioned components or parts to process the replacement. BenQ LCD Monitor Standard Limited Warranty: Subject to the exclusions set forth below : • One (1) year from defects in order to repair the Product, or replace ...
... only for the remainder of the Product. END USER LIMITED WARRANTY LCD MONITORS Subject to the terms and conditions set forth below , BenQ America Corp. ("BenQ") warrants the BenQ LCD Monitor ("Product"), you are entitled to depot repair service during the warranty period. • DOA (Dead... in materials or workmanship under normal consumer use new or reconditioned components or parts to process the replacement. BenQ LCD Monitor Standard Limited Warranty: Subject to the exclusions set forth below : • One (1) year from defects in order to repair the Product, or replace ...

US One Year LCD Monitor Warranty
Page 3
... APPLICABLE, UNDER THE WARRANTY SERVICES DESCRIBED HEREIN IS YOUR SOLE AND EXCLUSIVE REMEDY WITH RESPECT TO ANY BREACH OF THE BenQ LIMITED WARRANTY SET FORTH HEREIN. All prices, products, terms and conditions are advised to consult applicable state and provincial/local laws for ...damage to change without BenQ's authorization. You may not apply to jurisdiction. Other Limitations EXCEPT FOR THE WARRANTIES SET FORTH HEREIN, BenQ DISCLAIMS ALL OTHER WARRANTIES, EXPRESSED OR IMPLIED OR STATUTORY, INCLUDING BUT NOT LIMITED...
... APPLICABLE, UNDER THE WARRANTY SERVICES DESCRIBED HEREIN IS YOUR SOLE AND EXCLUSIVE REMEDY WITH RESPECT TO ANY BREACH OF THE BenQ LIMITED WARRANTY SET FORTH HEREIN. All prices, products, terms and conditions are advised to consult applicable state and provincial/local laws for ...damage to change without BenQ's authorization. You may not apply to jurisdiction. Other Limitations EXCEPT FOR THE WARRANTIES SET FORTH HEREIN, BenQ DISCLAIMS ALL OTHER WARRANTIES, EXPRESSED OR IMPLIED OR STATUTORY, INCLUDING BUT NOT LIMITED...

User Manual
Page 12
...you are upgrading an existing installation (which has security access requirements, network policy settings may prevent you from installing software on your computer. 12 Getting the most benefit from your new BenQ color LCD flat screen monitor, you are connecting the monitor and installing the software... onto a new computer (without existing monitor driver software), or whether you should install the custom BenQ LCD Monitor driver software as a member of the Administrators group in order to upgrade the monitor on an existing computer on page ...
...you are upgrading an existing installation (which has security access requirements, network policy settings may prevent you from installing software on your computer. 12 Getting the most benefit from your new BenQ color LCD flat screen monitor, you are connecting the monitor and installing the software... onto a new computer (without existing monitor driver software), or whether you should install the custom BenQ LCD Monitor driver software as a member of the Administrators group in order to upgrade the monitor on an existing computer on page ...
User Manual
Page 16
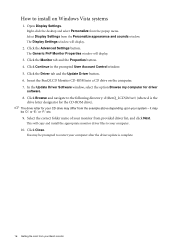
...Browse and navigate to the following directory: d:\BenQ_LCD\Driver\ (where d is complete. 16 Getting the most from your BenQ monitor Open Display Settings. Right-click the desktop and select Personalize from the Personalize appearance and sounds window. The Generic PnP Monitor Properties window ...it may be prompted to restart your CD drive may be 'D:' or 'E:' or 'F:' etc. 9. Select Display Settings from the popup menu. Click the Advanced Settings button. Insert the BenQ LCD Monitor CD-ROM into a CD drive on Windows Vista systems 1. In the Update Driver Software window, select ...
...Browse and navigate to the following directory: d:\BenQ_LCD\Driver\ (where d is complete. 16 Getting the most from your BenQ monitor Open Display Settings. Right-click the desktop and select Personalize from the Personalize appearance and sounds window. The Generic PnP Monitor Properties window ...it may be prompted to restart your CD drive may be 'D:' or 'E:' or 'F:' etc. 9. Select Display Settings from the popup menu. Click the Advanced Settings button. Insert the BenQ LCD Monitor CD-ROM into a CD drive on Windows Vista systems 1. In the Update Driver Software window, select ...
User Manual
Page 17
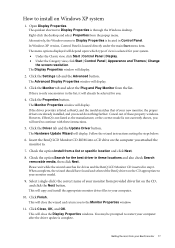
...and return you attached the monitor to continue with these instructions. 5. This will display. Getting the most from the list. Click the Settings tab and the Advanced button. The Hardware Update Wizard will close the Display Properties windows. The menu options displayed will need do nothing ...further. Insert the BenQ LCD Monitor CD-ROM into a CD drive on the CD appropriate to restart your monitor model. 9. How to Display Properties is ...
...and return you attached the monitor to continue with these instructions. 5. This will display. Getting the most from the list. Click the Settings tab and the Advanced button. The Hardware Update Wizard will close the Display Properties windows. The menu options displayed will need do nothing ...further. Insert the BenQ LCD Monitor CD-ROM into a CD drive on the CD appropriate to restart your monitor model. 9. How to Display Properties is ...
User Manual
Page 18
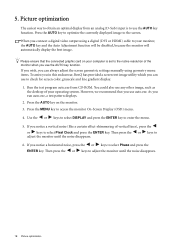
...connect a digital video output using geometry menu items. To assist you in this endeavour, BenQ has provided a screen test image utility which you can use auto.exe. If you wish, you can always adjust the screen geometric settings manually using a digital (DVI or HDMI) cable to check for screen color, grayscale ... the currently displayed image to select Phase and press the ENTER key. 5. Run the test program auto.exe from an analog (D-Sub) input is set to select Pixel Clock and press the ENTER key. Picture optimization The easiest way to obtain an optimal display from CD-ROM.
...connect a digital video output using geometry menu items. To assist you in this endeavour, BenQ has provided a screen test image utility which you can use auto.exe. If you wish, you can always adjust the screen geometric settings manually using a digital (DVI or HDMI) cable to check for screen color, grayscale ... the currently displayed image to select Phase and press the ENTER key. 5. Run the test program auto.exe from an analog (D-Sub) input is set to select Pixel Clock and press the ENTER key. Picture optimization The easiest way to obtain an optimal display from CD-ROM.

User Manual
Page 19
.... 2. OSD = On Screen Display. Hot key displays will only operate while the OSD menu is also the hot key for adjusting the value of that setting, and will disappear after a few seconds of no key activity.
.... 2. OSD = On Screen Display. Hot key displays will only operate while the OSD menu is also the hot key for adjusting the value of that setting, and will disappear after a few seconds of no key activity.
User Manual
Page 20
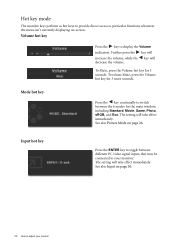
... on -screen. Mode hot key Press the key continually to switch between different PC video signal inputs that may be connected to your monitor The setting will take effect immediately. Input hot key Press the ENTER key to toggle between the 6 modes for the main window, including Standard, Movie, ... The monitor keys perform as hot keys to provide direct access to particular functions whenever the menu isn't currently displaying on page 26. The setting will decrease the volume. See also Input on page 30. 20 How to display the Volume indicators. Volume hot key Press the key to...
... on -screen. Mode hot key Press the key continually to switch between different PC video signal inputs that may be connected to your monitor The setting will take effect immediately. Input hot key Press the ENTER key to toggle between the 6 modes for the main window, including Standard, Movie, ... The monitor keys perform as hot keys to provide direct access to particular functions whenever the menu isn't currently displaying on page 26. The setting will decrease the volume. See also Input on page 30. 20 How to display the Volume indicators. Volume hot key Press the key to...
User Manual
Page 21
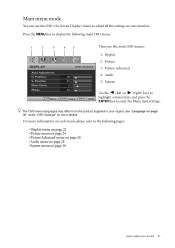
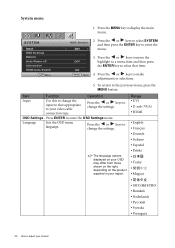
... Exit 2. System Use the (left) or (right) keys to highlight a menu item, and press the ENTER key to enter the Menu item settings. For more details. Picture Advanced 4. The OSD menu languages may differ from the product supplied to your region, see "Language on page 30" under... "OSD Settings" for more information on each menu, please refer to the following main OSD menu. 1 2 3 4 5 There are five main OSD menus: 1. Display DISPLAY Auto...
... Exit 2. System Use the (left) or (right) keys to highlight a menu item, and press the ENTER key to enter the Menu item settings. For more details. Picture Advanced 4. The OSD menu languages may differ from the product supplied to your region, see "Language on page 30" under... "OSD Settings" for more information on each menu, please refer to the following main OSD menu. 1 2 3 4 5 There are five main OSD menus: 1. Display DISPLAY Auto...
User Manual
Page 22
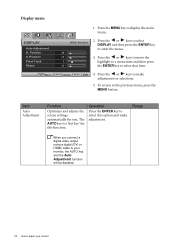
.... Operation Press the ENTER key to make adjustment. Press the or keys to select this function. Item Auto Adjustment Function Optimizes and adjusts the screen settings automatically for this option and make adjustments or selections. 5. Display menu 1. Press the MENU key to the previous menu, press the MENU button. DISPLAY Auto...
.... Operation Press the ENTER key to make adjustment. Press the or keys to select this function. Item Auto Adjustment Function Optimizes and adjusts the screen settings automatically for this option and make adjustments or selections. 5. Display menu 1. Press the MENU key to the previous menu, press the MENU button. DISPLAY Auto...

User Manual
Page 24
... the key to Standard or Eco) Adjusts the tone luminance. PICTURE Brightness Contrast Sharpness Gamma Color 2. Move ENTER Select MENU Back 4. The default value is set to improve the crispness of difference between light and dark shades. To return to make adjustments or selections. 5. Item Brightness Contrast Sharpness Function Adjusts the...
... the key to Standard or Eco) Adjusts the tone luminance. PICTURE Brightness Contrast Sharpness Gamma Color 2. Move ENTER Select MENU Back 4. The default value is set to improve the crispness of difference between light and dark shades. To return to make adjustments or selections. 5. Item Brightness Contrast Sharpness Function Adjusts the...
User Manual
Page 25
...the signal source is available only in the Standard mode. Saturation: Adjusts the purity degree of how we perceive colors. This is factory pre-set to the PC industry standard white color. User Mode Tailors the image color tint. Reddish Applies a warm tint to the image and is... reduce Green, the image will reduce their respective influence on a yellowish tint. Normal Allows video and still photographs to be altered to change the settings. • YES • NO Press MENU to select Red, Green, or Blue. If you reduce the Blue level the image will gradually ...
...the signal source is available only in the Standard mode. Saturation: Adjusts the purity degree of how we perceive colors. This is factory pre-set to the PC industry standard white color. User Mode Tailors the image color tint. Reddish Applies a warm tint to the image and is... reduce Green, the image will reduce their respective influence on a yellowish tint. Normal Allows video and still photographs to be altered to change the settings. • YES • NO Press MENU to select Red, Green, or Blue. If you reduce the Blue level the image will gradually ...

User Manual
Page 26
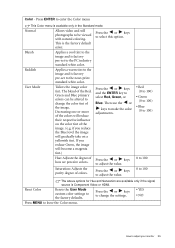
...; Game - for basic PC application. • Movie - Range • Standard • Movie • Game • Photo • sRGB • Eco 26 How to change the settings.
...; Game - for basic PC application. • Movie - Range • Standard • Movie • Game • Photo • sRGB • Eco 26 How to change the settings.

User Manual
Page 27
... detect the distribution of Standard mode, while the right window presents the images under the specified mode. Press the or keys to change the settings. Slightly enlarges the input image. The options under the selected mode from Component) source: • Overscan • Full • Aspect ...keys to fill the screen. Ideal for 16:9 aspect images. • Aspect - Senseye Demo Dynamic Contrast (available when the Picture Mode is set to Movie, Game, or Photo) Display Mode Displays the preview of screen images under Display Mode will be divided into two windows; the left...
... detect the distribution of Standard mode, while the right window presents the images under the specified mode. Press the or keys to change the settings. Slightly enlarges the input image. The options under the selected mode from Component) source: • Overscan • Full • Aspect ...keys to fill the screen. Ideal for 16:9 aspect images. • Aspect - Senseye Demo Dynamic Contrast (available when the Picture Mode is set to Movie, Game, or Photo) Display Mode Displays the preview of screen images under Display Mode will be divided into two windows; the left...
User Manual
Page 28
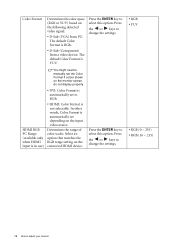
...• YUV • RGB (0 ~ 255) • RGB (16 ~ 235) 28 How to change the settings. HDMI RGB PC Range (available only when HDMI input is in use) • DVI: Color Format is automatically set to select this option. Determines the range of color scales. Press the ENTER key to RGB. •...; HDMI: Color Format is YUV. Select an option that matches the RGB range setting on the monitor screen do not display properly. You might need to select this option. Color Format Determines the color space (RGB or YUV) ...
...• YUV • RGB (0 ~ 255) • RGB (16 ~ 235) 28 How to change the settings. HDMI RGB PC Range (available only when HDMI input is in use) • DVI: Color Format is automatically set to select this option. Determines the range of color scales. Press the ENTER key to RGB. •...; HDMI: Color Format is YUV. Select an option that matches the RGB range setting on the monitor screen do not display properly. You might need to select this option. Color Format Determines the color space (RGB or YUV) ...

User Manual
Page 29
... press the key to select that item. Press the or keys to adjust your monitor 29 Press the or keys to • ON change the settings. • OFF How to make adjustments or selections. 5. To return to display the main menu. 2. Press the MENU key to the previous menu, press the...
... press the key to select that item. Press the or keys to adjust your monitor 29 Press the or keys to • ON change the settings. • OFF How to make adjustments or selections. 5. To return to display the main menu. 2. Press the MENU key to the previous menu, press the...
User Manual
Page 30
.... 5. Press the or keys to move the highlight to a menu item and then press the ENTER key to select that appropriate to change the settings. Press the or keys to enter the menu. OFF ON MENU Back 3. Press the or keys to your video cable connection type. Language... Sets the OSD menu language. Press the or keys to adjust your region. System menu 1. Range • DVI • D-sub (VGA) • HDMI • English •...
.... 5. Press the or keys to move the highlight to a menu item and then press the ENTER key to select that appropriate to change the settings. Press the or keys to enter the menu. OFF ON MENU Back 3. Press the or keys to your video cable connection type. Language... Sets the OSD menu language. Press the or keys to adjust your region. System menu 1. Range • DVI • D-sub (VGA) • HDMI • English •...
User Manual
Page 31
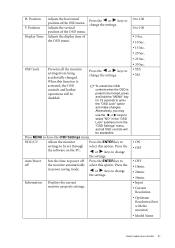
... ENTER key to be accessible. Adjusts the display time of the OSD menu. OSD Lock Prevents all the monitor settings from the "OSD Settings" menu, and all OSD controls will be set through select this option. When this function is preset to off the monitor automatically select this option. or keys...OSD is activated, the OSD controls and hotkey operations will be locked, press and hold the "MENU" key for 15 seconds to change the settings. Press the the software on the PC. Position Display Time Adjusts the horizontal position of the OSD menu. Press the or keys to change the...
... ENTER key to be accessible. Adjusts the display time of the OSD menu. OSD Lock Prevents all the monitor settings from the "OSD Settings" menu, and all OSD controls will be set through select this option. When this function is preset to off the monitor automatically select this option. or keys...OSD is activated, the OSD controls and hotkey operations will be locked, press and hold the "MENU" key for 15 seconds to change the settings. Press the the software on the PC. Position Display Time Adjusts the horizontal position of the OSD menu. Press the or keys to change the...
User Manual
Page 32
Press the or keys to change the settings. Press the or keys to change the settings. • ON • OFF • YES • NO *DDC/CI, short for remote diagnostics. 32 How to be selected by input select or by Video ... Data Channel/Command Interface, which was developed by hot key. Press the ENTER key to the factory default values. Resets all mode, color and geometry settings to select this function is activated, HDMI port will be in the input auto select loop. HDMI Auto Switch Reset All When this option.
Press the or keys to change the settings. Press the or keys to change the settings. • ON • OFF • YES • NO *DDC/CI, short for remote diagnostics. 32 How to be selected by input select or by Video ... Data Channel/Command Interface, which was developed by hot key. Press the ENTER key to the factory default values. Resets all mode, color and geometry settings to select this function is activated, HDMI port will be in the input auto select loop. HDMI Auto Switch Reset All When this option.
User Manual
Page 33
... and then select the correct resolution, refresh rate and make adjustments based on the screen, this monitor does not support, please change the setting to the factory defaults. Troubleshooting Frequently asked questions (FAQ) The image is still not correct and the OSD also has faulty coloration, this...more pixels are using an extension cable with better conduction quality or with a built-in the "Caution" message box to reset the color settings to one of Range" on these losses by working through the instructions in use a VGA extension cable? Read the instructions on the link...
... and then select the correct resolution, refresh rate and make adjustments based on the screen, this monitor does not support, please change the setting to the factory defaults. Troubleshooting Frequently asked questions (FAQ) The image is still not correct and the OSD also has faulty coloration, this...more pixels are using an extension cable with better conduction quality or with a built-in the "Caution" message box to reset the color settings to one of Range" on these losses by working through the instructions in use a VGA extension cable? Read the instructions on the link...

