
US One Year LCD Monitor Warranty
Page 3
...electrical power, lightning, static electricity, fire, or acts of any programs, data or removable storage media. You may not apply to change without BenQ's ...USE, WHETHER IN AN ACTION IN CONTRACT OR TORT OR BASED ON A WARRANTY, ARISING OUT OF OR IN CONNECTION WITH THE USE OR PERFORMANCE OF THE PRODUCT, EVEN IF BenQ...Support Center to jurisdiction. You are subject to you specific legal rights. YOU AGREE THAT REPAIR OR REPLACEMENT, AS APPLICABLE, UNDER THE WARRANTY SERVICES DESCRIBED HEREIN IS YOUR SOLE AND EXCLUSIVE REMEDY WITH RESPECT TO ANY BREACH OF THE BenQ LIMITED WARRANTY SET...
...electrical power, lightning, static electricity, fire, or acts of any programs, data or removable storage media. You may not apply to change without BenQ's ...USE, WHETHER IN AN ACTION IN CONTRACT OR TORT OR BASED ON A WARRANTY, ARISING OUT OF OR IN CONNECTION WITH THE USE OR PERFORMANCE OF THE PRODUCT, EVEN IF BenQ...Support Center to jurisdiction. You are subject to you specific legal rights. YOU AGREE THAT REPAIR OR REPLACEMENT, AS APPLICABLE, UNDER THE WARRANTY SERVICES DESCRIBED HEREIN IS YOUR SOLE AND EXCLUSIVE REMEDY WITH RESPECT TO ANY BREACH OF THE BenQ LIMITED WARRANTY SET...

User Manual
Page 2
... monitor Power Safety • The AC plug isolates this publication may be used ." Disclaimer BenQ Corporation makes no service parts inside a carrying case. • Connect the power adapter to a proper power source. • Do not attempt to revise this equipment. There are not sure of the type of power available, consult your dealer or local power company. • A certified power supply cord has to the contents hereof and specifically...
... monitor Power Safety • The AC plug isolates this publication may be used ." Disclaimer BenQ Corporation makes no service parts inside a carrying case. • Connect the power adapter to a proper power source. • Do not attempt to revise this equipment. There are not sure of the type of power available, consult your dealer or local power company. • A certified power supply cord has to the contents hereof and specifically...
User Manual
Page 4
... to install the monitor on a new computer 13 How to upgrade the monitor on an existing computer 14 How to install on Windows 7 system 15 How to install on Windows Vista systems 16 How to install on Windows XP system 17 Picture optimization ...18 How to adjust your monitor 19 The control panel ...19 Hot key mode ...20 Main menu mode ...21 Troubleshooting ...33 Frequently asked questions (FAQ 33 Need more help...
... to install the monitor on a new computer 13 How to upgrade the monitor on an existing computer 14 How to install on Windows 7 system 15 How to install on Windows Vista systems 16 How to install on Windows XP system 17 Picture optimization ...18 How to adjust your monitor 19 The control panel ...19 Hot key mode ...20 Main menu mode ...21 Troubleshooting ...33 Frequently asked questions (FAQ 33 Need more help...

User Manual
Page 12
... to install the monitor driver software. If you require a User Name and Password to login to your new BenQ color LCD flat screen monitor, you turn on your BenQ monitor Getting the most from your BenQ monitor To gain the most from your Windows computer, you to select a monitor model. At that point, click the Have Disk button, insert the BenQ LCD Monitor CD-ROM and select the appropriate monitor model. 4. Follow the wizard instructions until it...
... to install the monitor driver software. If you require a User Name and Password to login to your new BenQ color LCD flat screen monitor, you turn on your BenQ monitor Getting the most from your BenQ monitor To gain the most from your Windows computer, you to select a monitor model. At that point, click the Have Disk button, insert the BenQ LCD Monitor CD-ROM and select the appropriate monitor model. 4. Follow the wizard instructions until it...
User Manual
Page 13
... Wizard. Check the option for my device option, and click Next. 4. Follow the instructions in How to upgrade the monitor on a new computer This instruction details the procedure for which the BenQ LCD Monitor is only suitable for a computer which has never been used before . When Windows starts, it . How to Install Hardware Device Drivers. 2. Follow the prompts until it (and has monitor driver software installed), you...
... Wizard. Check the option for my device option, and click Next. 4. Follow the instructions in How to upgrade the monitor on a new computer This instruction details the procedure for which the BenQ LCD Monitor is only suitable for a computer which has never been used before . When Windows starts, it . How to Install Hardware Device Drivers. 2. Follow the prompts until it (and has monitor driver software installed), you...
User Manual
Page 14
... on those systems. Installing monitor driver software involves selecting an appropriate information file (.inf) on your BenQ monitor How to upgrade the monitor on an existing computer This instruction details the procedure for manually updating the existing monitor driver software on the BenQ LCD Monitor CD-ROM for the particular model monitor you through the file selection and installation process. Windows has an Upgrade Device Driver Wizard to install on Windows XP system on page...
... on those systems. Installing monitor driver software involves selecting an appropriate information file (.inf) on your BenQ monitor How to upgrade the monitor on an existing computer This instruction details the procedure for manually updating the existing monitor driver software on the BenQ LCD Monitor CD-ROM for the particular model monitor you through the file selection and installation process. Windows has an Upgrade Device Driver Wizard to install on Windows XP system on page...

User Manual
Page 15
... depending upon your computer after the driver update is the drive letter designator for driver software. 7. How to install on the computer. 6. Getting the most from the menu. Insert the BenQ LCD Monitor CD-ROM into a CD drive on Windows 7 system 1. it may differ from provided driver list, and click Next. Open Display Properties. Go to Start, Control Panel, Hardware and Sound, Devices and Printers and right...
... depending upon your computer after the driver update is the drive letter designator for driver software. 7. How to install on the computer. 6. Getting the most from the menu. Insert the BenQ LCD Monitor CD-ROM into a CD drive on Windows 7 system 1. it may differ from provided driver list, and click Next. Open Display Properties. Go to Start, Control Panel, Hardware and Sound, Devices and Printers and right...
User Manual
Page 16
... system - Select the correct folder name of your computer. 10. Click Close. The Display Settings window will display. 3. You may differ from your BenQ monitor The drive letter for driver software. 8. Select Display Settings from the popup menu. Insert the BenQ LCD Monitor CD-ROM into a CD drive on Windows Vista systems 1. Open Display Settings. Click the Advanced Settings button. The Generic PnP Monitor Properties window will display. 2. Click the Driver tab and the Update Driver button. 6.
... system - Select the correct folder name of your computer. 10. Click Close. The Display Settings window will display. 3. You may differ from your BenQ monitor The drive letter for driver software. 8. Select Display Settings from the popup menu. Insert the BenQ LCD Monitor CD-ROM into a CD drive on Windows Vista systems 1. Open Display Settings. Click the Advanced Settings button. The Generic PnP Monitor Properties window will display. 2. Click the Driver tab and the Update Driver button. 6.
User Manual
Page 17
... only one monitor in these property windows. Click Finish. If the driver provider is located in step 6. The Hardware Update Wizard will display. 2. Cancel out of your computer. 10. Check the option Search for your system. • Under the Classic view, click Start | Control Panel | Display. • Under the Category view, click Start | Control Panel | Appearance and Themes | Change the screen resolution. The quickest shortcut to Display Properties is...
... only one monitor in these property windows. Click Finish. If the driver provider is located in step 6. The Hardware Update Wizard will display. 2. Cancel out of your computer. 10. Check the option Search for your system. • Under the Classic view, click Start | Control Panel | Display. • Under the Category view, click Start | Control Panel | Appearance and Themes | Change the screen resolution. The quickest shortcut to Display Properties is...
User Manual
Page 18
... screen geometric settings manually using geometry menu items. To assist you in this endeavour, BenQ has provided a screen test image utility which you connect a digital video output using a digital (DVI or HDMI) cable to your monitor, the AUTO key and the Auto Adjustment function will be disabled, because the monitor will automatically display the best image. If you wish, you can use to select Phase and press the ENTER key. Press the MENU key to enter the menu. 5. Use...
... screen geometric settings manually using geometry menu items. To assist you in this endeavour, BenQ has provided a screen test image utility which you connect a digital video output using a digital (DVI or HDMI) cable to your monitor, the AUTO key and the Auto Adjustment function will be disabled, because the monitor will automatically display the best image. If you wish, you can use to select Phase and press the ENTER key. Press the MENU key to enter the menu. 5. Use...

User Manual
Page 19
... key for Input. 6. See Hot key mode on or off. Power: Turns the power on page 20. AUTO: Adjusts vertical position, phase, horizontal position and pixel clock automatically. 2. MENU key: Activates OSD main menu and return to adjust your monitor The control panel 1234 5 6 1. OSD = On Screen Display. The hot keys will display a graduated scale for Volume. 5. 6. Hot key displays will only operate while the OSD menu is the hot key for adjusting the value of that setting, and...
... key for Input. 6. See Hot key mode on or off. Power: Turns the power on page 20. AUTO: Adjusts vertical position, phase, horizontal position and pixel clock automatically. 2. MENU key: Activates OSD main menu and return to adjust your monitor The control panel 1234 5 6 1. OSD = On Screen Display. The hot keys will display a graduated scale for Volume. 5. 6. Hot key displays will only operate while the OSD menu is the hot key for adjusting the value of that setting, and...
User Manual
Page 22
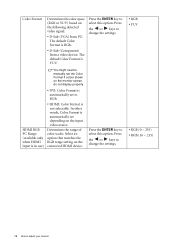
... this function. Position V. Move ENTER Select MENU Exit 4. Range When you . Position Pixel Clock Phase 2. DISPLAY Auto Adjustment H. The AUTO key is a 'hot key' for you connect a digital video output using a digital (DVI or HDMI) cable to your monitor, the AUTO key and the Auto Adjustment function will be disabled. 22 How to the previous menu, press the MENU button. Item Auto Adjustment Function Optimizes and adjusts the screen settings automatically for this option and make adjustments or selections. 5. Display menu 1. Press the MENU key to...
... this function. Position V. Move ENTER Select MENU Exit 4. Range When you . Position Pixel Clock Phase 2. DISPLAY Auto Adjustment H. The AUTO key is a 'hot key' for you connect a digital video output using a digital (DVI or HDMI) cable to your monitor, the AUTO key and the Auto Adjustment function will be disabled. 22 How to the previous menu, press the MENU button. Item Auto Adjustment Function Optimizes and adjusts the screen settings automatically for this option and make adjustments or selections. 5. Display menu 1. Press the MENU key to...

User Manual
Page 24
... the Picture Mode is 2.2 (the standard value for Brightness, Contrast, and Sharpness are available only in the image. To return to decrease the brightness. Operation Press the key to increase the brightness and press the key to the previous menu, press the MENU button. Press the key to 5 The above options for Windows). PICTURE Brightness Contrast Sharpness Gamma Color 2. Picture menu 1. Press the MENU key to make adjustments or selections. 5. Adjusts...
... the Picture Mode is 2.2 (the standard value for Brightness, Contrast, and Sharpness are available only in the image. To return to decrease the brightness. Operation Press the key to increase the brightness and press the key to the previous menu, press the MENU button. Press the key to 5 The above options for Windows). PICTURE Brightness Contrast Sharpness Gamma Color 2. Picture menu 1. Press the MENU key to make adjustments or selections. 5. Adjusts...

User Manual
Page 27
... settings. The options under the specified mode. Slightly enlarges the input image. the left window demonstrates images of Standard mode, while the right window presents the images under Display Mode will be different depending on the input signal sources. • ON • OFF 0 to 5 When the signal source is from a DVI or D-sub source, and the input image is from a HDMI or D-Sub (VGA converted from Picture Mode. Press the or keys to change the settings...
... settings. The options under the specified mode. Slightly enlarges the input image. the left window demonstrates images of Standard mode, while the right window presents the images under Display Mode will be different depending on the input signal sources. • ON • OFF 0 to 5 When the signal source is from a DVI or D-sub source, and the input image is from a HDMI or D-Sub (VGA converted from Picture Mode. Press the or keys to change the settings...
User Manual
Page 28
... key to adjust your monitor You might need to manually set to RGB. • HDMI: Color Format is not selectable. HDMI RGB PC Range (available only when HDMI input is in use) • DVI: Color Format is automatically set the Color Format if colors shown on the following detected video signal: • D-Sub (VGA) from PC: The default Color Format is RGB. • D-Sub (Component) from a video device: The default Color Format is automatically set depending on the connected HDMI device...
... key to adjust your monitor You might need to manually set to RGB. • HDMI: Color Format is not selectable. HDMI RGB PC Range (available only when HDMI input is in use) • DVI: Color Format is automatically set the Color Format if colors shown on the following detected video signal: • D-Sub (VGA) from PC: The default Color Format is RGB. • D-Sub (Component) from a video device: The default Color Format is automatically set depending on the connected HDMI device...
User Manual
Page 30
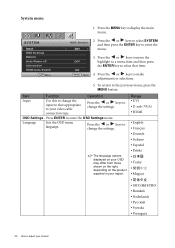
... select SYSTEM and then press the ENTER key to adjust your monitor OSD Settings - SYSTEM Input OSD Settings DDC/CI Auto Power off Information HDMI Auto Switch Move MODE: Standard DVI 2. Language Sets the OSD menu language. The language options displayed on your OSD may differ from those shown on the right, depending on the product supplied in your video cable connection type. Range • DVI • D-sub (VGA) • HDMI • English • Français • Deutsch • Italiano...
... select SYSTEM and then press the ENTER key to adjust your monitor OSD Settings - SYSTEM Input OSD Settings DDC/CI Auto Power off Information HDMI Auto Switch Move MODE: Standard DVI 2. Language Sets the OSD menu language. The language options displayed on your OSD may differ from those shown on the right, depending on the product supplied in your video cable connection type. Range • DVI • D-sub (VGA) • HDMI • English • Français • Deutsch • Italiano...
User Manual
Page 31
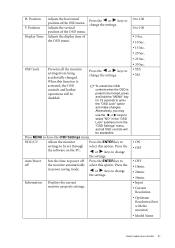
.... • Input • Current Resolution • Optimum Resolution (best with the monitor) • Model Name How to leave the OSD Settings menu. Adjusts the vertical position of the OSD menu. Press the the software on the PC. OSD Lock Prevents all the monitor settings from the "OSD Settings" menu, and all OSD controls will be accessible. Press MENU to adjust your monitor 31 or keys to select "NO" in power saving mode. To unlock the OSD controls when the OSD is activated, the OSD controls and...
.... • Input • Current Resolution • Optimum Resolution (best with the monitor) • Model Name How to leave the OSD Settings menu. Adjusts the vertical position of the OSD menu. Press the the software on the PC. OSD Lock Prevents all the monitor settings from the "OSD Settings" menu, and all OSD controls will be accessible. Press MENU to adjust your monitor 31 or keys to select "NO" in power saving mode. To unlock the OSD controls when the OSD is activated, the OSD controls and...

User Manual
Page 32
... or keys to change the settings. • ON • OFF • YES • NO *DDC/CI, short for remote diagnostics. 32 How to adjust your monitor Press the ENTER key to the factory default values. HDMI Auto Switch Reset All When this option. Resets all mode, color and geometry settings to select this function is activated, HDMI port will be sent via the software for Display Data Channel/Command...
... or keys to change the settings. • ON • OFF • YES • NO *DDC/CI, short for remote diagnostics. 32 How to adjust your monitor Press the ENTER key to the factory default values. HDMI Auto Switch Reset All When this option. Resets all mode, color and geometry settings to select this function is activated, HDMI port will be sent via the software for Display Data Channel/Command...
User Manual
Page 33
... Screen Resolution" on these losses by working through the instructions in the "Adjusting the refresh rate" section on the display illuminated in the "Caution" message box to reset the color settings to get necessary support. Now check the signal cable connectors. Remove the extension cable for blurring to occur due to one or more pixels are permanently on the screen, this monitor does not support, please change the setting to conduction losses in booster. Troubleshooting...
... Screen Resolution" on these losses by working through the instructions in the "Adjusting the refresh rate" section on the display illuminated in the "Caution" message box to reset the color settings to get necessary support. Now check the signal cable connectors. Remove the extension cable for blurring to occur due to one or more pixels are permanently on the screen, this monitor does not support, please change the setting to conduction losses in booster. Troubleshooting...
User Manual
Page 34
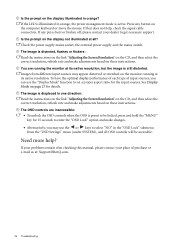
... unlock the OSD controls when the OSD is distorted, flashes or flickers: Read the instructions on the link "Adjusting the Screen Resolution" on the CD, and then select the correct resolution, refresh rate and make changes. • Alternatively, you can use the or keys to get necessary support. Images from the "OSD Settings" menu (under SYSTEM), and all ? See Display Mode on page 27 for the input sources. Need more help , check the signal cable connectors. If your problems remain after checking this manual...
... unlock the OSD controls when the OSD is distorted, flashes or flickers: Read the instructions on the link "Adjusting the Screen Resolution" on the CD, and then select the correct resolution, refresh rate and make changes. • Alternatively, you can use the or keys to get necessary support. Images from the "OSD Settings" menu (under SYSTEM), and all ? See Display Mode on page 27 for the input sources. Need more help , check the signal cable connectors. If your problems remain after checking this manual...


