

User Manual
Page 1
RP653 / RP703 / RP750 / RP750K Interactive Flat Panel User Manual
RP653 / RP703 / RP750 / RP750K Interactive Flat Panel User Manual

User Manual
Page 3
... 2 Safety notice for remote control 3 Battery safety notice 3 BenQ ecoFACTS 4 Package contents 5 Setting up the display 6 Mounting the display 6 Parts of the display and their functions 8 Front panel (RP653 / RP703 8 Front panel (RP750 / 750K 8 Input/output terminals (RP653 / RP703 10 Input/output terminals (RP750 / RP750K 11 Remote control 12 Using the remote control 14...
... 2 Safety notice for remote control 3 Battery safety notice 3 BenQ ecoFACTS 4 Package contents 5 Setting up the display 6 Mounting the display 6 Parts of the display and their functions 8 Front panel (RP653 / RP703 8 Front panel (RP750 / 750K 8 Input/output terminals (RP653 / RP703 10 Input/output terminals (RP750 / RP750K 11 Remote control 12 Using the remote control 14...

User Manual
Page 4
... 35 Settings menu 35 System settings 39 Android system interface 41 Main interface 41 EZWrite 3.0 42 Product information 68 Specifications (RP653 / RP703 68 Specifications (RP750 / RP750K 70 Dimensions (RP653 73 Dimensions (RP703 74 Dimensions (RP750/750K 75 Supported input signal resolution (RP653/RP703/RP750)... 76 Supported input signal resolution (RP750K 78 Troubleshooting 80 8/23/16
... 35 Settings menu 35 System settings 39 Android system interface 41 Main interface 41 EZWrite 3.0 42 Product information 68 Specifications (RP653 / RP703 68 Specifications (RP750 / RP750K 70 Dimensions (RP653 73 Dimensions (RP703 74 Dimensions (RP750/750K 75 Supported input signal resolution (RP653/RP703/RP750)... 76 Supported input signal resolution (RP750K 78 Troubleshooting 80 8/23/16
User Manual
Page 10
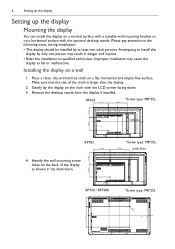
... this display by at least two adult persons. RP653 *Screw type: M8*25L RP703 4. Improper installation may result in the illustration. *Screw type: M8*25L RP750 / RP750K *Screw type: M8*25L Remove the desktop stands from the display if installed. Installing the display on a horizontal surface with the LCD screen facing down...
... this display by at least two adult persons. RP653 *Screw type: M8*25L RP703 4. Improper installation may result in the illustration. *Screw type: M8*25L RP750 / RP750K *Screw type: M8*25L Remove the desktop stands from the display if installed. Installing the display on a horizontal surface with the LCD screen facing down...
User Manual
Page 15
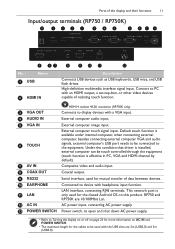
...an HDMI output, a set-top-box, or other video devices capable of the display and their functions 11 Input/output terminals (RP750 / RP750K) HDMI4(4K2K) HDMI4(4K2K) LAN No. Default touch function is available under internal computer, when connecting external computer, besides connecting ... a VGA input. 4 AUDIO IN External computer audio input. 5 VGA IN External computer image input. 6 TOUCH External computer touch signal input. RP750 and RP750K are 5m (USB2.0) and 3m (USB3.0). Name 1 USB 2 HDMI IN Description Connects USB devices such as USB keyboards, USB mice, and...
...an HDMI output, a set-top-box, or other video devices capable of the display and their functions 11 Input/output terminals (RP750 / RP750K) HDMI4(4K2K) HDMI4(4K2K) LAN No. Default touch function is available under internal computer, when connecting external computer, besides connecting ... a VGA input. 4 AUDIO IN External computer audio input. 5 VGA IN External computer image input. 6 TOUCH External computer touch signal input. RP750 and RP750K are 5m (USB2.0) and 3m (USB3.0). Name 1 USB 2 HDMI IN Description Connects USB devices such as USB keyboards, USB mice, and...

User Manual
Page 21
Connection 17 Connecting the digital inputs 1. To view images from this input, press the INPUT button on the remote control to switch to the HDMI input jack on the display using an HDMI cable. 2. RP653 / RP703 / RP750 RP750K HDMI cable HDMI4(4K2K) DVD player HDMI cable DVD player • The applicable cable is not supplied and should be purchased separately. • HDMI 4 is for RP750K only. Connect the HDMI output jack of a computer or A/V device (such as a VCR or DVD player) to respective input source.
Connection 17 Connecting the digital inputs 1. To view images from this input, press the INPUT button on the remote control to switch to the HDMI input jack on the display using an HDMI cable. 2. RP653 / RP703 / RP750 RP750K HDMI cable HDMI4(4K2K) DVD player HDMI cable DVD player • The applicable cable is not supplied and should be purchased separately. • HDMI 4 is for RP750K only. Connect the HDMI output jack of a computer or A/V device (such as a VCR or DVD player) to respective input source.
User Manual
Page 27
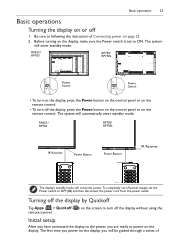
... sure to following the instruction of Before turning on page 22. 2. Turning off the display without using the remote control. RP653 / RP703 RP750/ RP750k Power Switch Power Switch • To turn on the display, press the Power button on the control panel or on the remote control...., you are ready to power on or off power supply, set to the power, you will automatically enter standby mode. RP653 / RP703 RP750/ RP750k IR Receiver Power Button Power Button IR Receiver Power Button The display's standby mode still consumes power. The system will enter standby mode. To...
... sure to following the instruction of Before turning on page 22. 2. Turning off the display without using the remote control. RP653 / RP703 RP750/ RP750k Power Switch Power Switch • To turn on the display, press the Power button on the control panel or on the remote control...., you are ready to power on or off power supply, set to the power, you will automatically enter standby mode. RP653 / RP703 RP750/ RP750k IR Receiver Power Button Power Button IR Receiver Power Button The display's standby mode still consumes power. The system will enter standby mode. To...

User Manual
Page 28
... sticker attached on the screen to boot up the language, date and time, and network. Tap Next on the back of the screen. • The RP750K General Setting also features an HDMI4 input for the display to begin. Then enter the serial number (can enable the Eye Care function on -screen... -screen instructions to start up from the bottom-center of the display) and click OK to obtain the software license key, please visit http://DSdownload.BenQ.com. Follow the on the display. Switching input signals To select an input signal do either one of the following: • Press the INPUT ...
... sticker attached on the screen to boot up the language, date and time, and network. Tap Next on the back of the screen. • The RP750K General Setting also features an HDMI4 input for the display to begin. Then enter the serial number (can enable the Eye Care function on -screen... -screen instructions to start up from the bottom-center of the display) and click OK to obtain the software license key, please visit http://DSdownload.BenQ.com. Follow the on the display. Switching input signals To select an input signal do either one of the following: • Press the INPUT ...

User Manual
Page 60
... a page and click to Saving files on page 56 for download by mobile devices. 1. Refer to delete the page selected. - Saving files The RP653/RP703/RP750/RP750K display allows you to save drawings or annotations as image files either in the internal memory of any connected external storage device to save the...
... a page and click to Saving files on page 56 for download by mobile devices. 1. Refer to delete the page selected. - Saving files The RP653/RP703/RP750/RP750K display allows you to save drawings or annotations as image files either in the internal memory of any connected external storage device to save the...

User Manual
Page 74
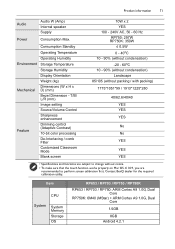
70 Product information Specifications (RP750 / RP750K) Item LCD panel Touch Backlight Panel size Pixel pitch (mm) Native resolution (pixels) Brightness (cd/m2) (typical) Contrast (typical) Response time (ms) (typical) ...Thickness Computer Video Input Output Audio USB Control TV Tuner Computer Video Audio External speaker out (L/R) Specifications RP750 / RP750K Direct LED 75" RP750: 0.8648 RP750K: 0.4324 RP750: 1920 x 1080 RP750K: 3840 x 2160 RP750: 400 nits RP750K: 450 nits 5000:1 6 RP750: 8-bit(16.7M) RP750K: 10-bit (Dithered 1.06B) IR Touch 32767 x 32767 up to 20 points touch (varies ...
70 Product information Specifications (RP750 / RP750K) Item LCD panel Touch Backlight Panel size Pixel pitch (mm) Native resolution (pixels) Brightness (cd/m2) (typical) Contrast (typical) Response time (ms) (typical) ...Thickness Computer Video Input Output Audio USB Control TV Tuner Computer Video Audio External speaker out (L/R) Specifications RP750 / RP750K Direct LED 75" RP750: 0.8648 RP750K: 0.4324 RP750: 1920 x 1080 RP750K: 3840 x 2160 RP750: 400 nits RP750K: 450 nits 5000:1 6 RP750: 8-bit(16.7M) RP750K: 10-bit (Dithered 1.06B) IR Touch 32767 x 32767 up to 20 points touch (varies ...
User Manual
Page 75
...Product information 71 Audio Audio W (Amp) Internal speaker Supply Power Consumption Max. Item CPU System System Memory Storage OS RP653 / RP703 / RP750 / RP750K RP653 / RP703 / RP750: ARM Cortex A9 1.0G, Dual Core RP750K: 6M40 (MStar) + ARM Cortex A9 1.0G, Dual Core 1.5GB 8GB Android 4.2.1 T/B/ L/R (mm) Image setting Source/Volume Control ... Feature Consumption Standby Operating Temperature Operating Humidity Storage Temperature Storage Humidity Display Orientation Weight (kg) Dimensions (W x H x D) (mm) Bezel Dimension - Contact BenQ dealer for the required calibration utility.
...Product information 71 Audio Audio W (Amp) Internal speaker Supply Power Consumption Max. Item CPU System System Memory Storage OS RP653 / RP703 / RP750 / RP750K RP653 / RP703 / RP750: ARM Cortex A9 1.0G, Dual Core RP750K: 6M40 (MStar) + ARM Cortex A9 1.0G, Dual Core 1.5GB 8GB Android 4.2.1 T/B/ L/R (mm) Image setting Source/Volume Control ... Feature Consumption Standby Operating Temperature Operating Humidity Storage Temperature Storage Humidity Display Orientation Weight (kg) Dimensions (W x H x D) (mm) Bezel Dimension - Contact BenQ dealer for the required calibration utility.

User Manual
Page 84
...the mute function or increase the audio volume level and try again. Refer to Supported input signal resolution (RP653/RP703/RP750) on page 76 and Supported input signal resolution (RP750K) on ? Refer to select a supported resolution and try again. • Are there any loose cable connections?... Have you chosen an unsupported output resolution on page 78 to Supported input signal resolution (RP653/RP703/RP750) on page 76 and Supported input signal resolution (RP750K) on the device and try again. • Have you locked the control panel buttons? Turn on page...
...the mute function or increase the audio volume level and try again. Refer to Supported input signal resolution (RP653/RP703/RP750) on page 76 and Supported input signal resolution (RP750K) on ? Refer to select a supported resolution and try again. • Are there any loose cable connections?... Have you chosen an unsupported output resolution on page 78 to Supported input signal resolution (RP653/RP703/RP750) on page 76 and Supported input signal resolution (RP750K) on the device and try again. • Have you locked the control panel buttons? Turn on page...