
User Manual
Page 2
... Installing the new lens...14 Removing the existing lens from the projector 15 Choosing a location...16 Projection distance and screen size 17 Lens shift adjustable range 20 Making connections...21 Preparations...21 Connect to PC...21 Connect to video equipment...22 Connect to control port...22 Connect to screen trigger...23 Connect to external digital transmitter 24 Using the projector 25 Preparations...25 Turning the orojector on or off 26 Selecting an input source 27 Using the menus...28 Adjusting the projected Image...
... Installing the new lens...14 Removing the existing lens from the projector 15 Choosing a location...16 Projection distance and screen size 17 Lens shift adjustable range 20 Making connections...21 Preparations...21 Connect to PC...21 Connect to video equipment...22 Connect to control port...22 Connect to screen trigger...23 Connect to external digital transmitter 24 Using the projector 25 Preparations...25 Turning the orojector on or off 26 Selecting an input source 27 Using the menus...28 Adjusting the projected Image...

User Manual
Page 3
...supported timing...59 RS232 command control 61 Control the projector through a network 64 Set up the projector for networking 64 Control the projector through a web browser 65 Projector Status...65 Alert mail setup...66 Crestron control page...67 Troubleshooting...69 Indicator messages...69 Common problems and solutions...70 Tips for troubleshooting...70 Image problems...70 Lamp problems...71 Remote control problems...71 BenQ ecoFACTS...72 Copyright...73 Disclaimer...73 Statement regarding hyperlinks and third-party websites 73 Using On-Screen Display...
...supported timing...59 RS232 command control 61 Control the projector through a network 64 Set up the projector for networking 64 Control the projector through a web browser 65 Projector Status...65 Alert mail setup...66 Crestron control page...67 Troubleshooting...69 Indicator messages...69 Common problems and solutions...70 Tips for troubleshooting...70 Image problems...70 Lamp problems...71 Remote control problems...71 BenQ ecoFACTS...72 Copyright...73 Disclaimer...73 Statement regarding hyperlinks and third-party websites 73 Using On-Screen Display...

User Manual
Page 5
... in standby mode): - Use only BenQ's Ceiling Mount Kit for replacement. !! 8. Do not look straight into the projector will void your warranty. Excessive operation of displaying inverted images for ceiling mount installation. If the projector does become wet, disconnect it is capable of lamps beyond the rated lamp life. Do not block the vents holes while the projector is on rare occasions. UPS 7. English 5. In areas where the mains power supply voltage...
... in standby mode): - Use only BenQ's Ceiling Mount Kit for replacement. !! 8. Do not look straight into the projector will void your warranty. Excessive operation of displaying inverted images for ceiling mount installation. If the projector does become wet, disconnect it is capable of lamps beyond the rated lamp life. Do not block the vents holes while the projector is on rare occasions. UPS 7. English 5. In areas where the mains power supply voltage...
User Manual
Page 10
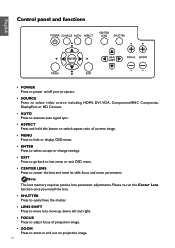
... Control panel and functions • POWER Press to power on/off your projector. • SOURCE Press to select video source including HDMI, DVI, VGA, Component/BNC Composite, DisplayPort or HD Connect. • AUTO Press to execute auto signal sync. • ASPECT Press and hold this button to switch aspect ratio of projection image. • ZOOM Press to center the lens and reset its shift, focus and zoom parameters. Note The lens memory requires precise lens parameter adjustments...
... Control panel and functions • POWER Press to power on/off your projector. • SOURCE Press to select video source including HDMI, DVI, VGA, Component/BNC Composite, DisplayPort or HD Connect. • AUTO Press to execute auto signal sync. • ASPECT Press and hold this button to switch aspect ratio of projection image. • ZOOM Press to center the lens and reset its shift, focus and zoom parameters. Note The lens memory requires precise lens parameter adjustments...

User Manual
Page 11
Press to display SERVICE menu. • LIGHT Press to open /close shutter. • ID SET: Not available with this model. 11 English Remote control and functions • ON Press to power projector. • OFF Press to power off projector. • FOCUS +/Press to adjust focus of projection image. • ZOOM +/Press to zoom in and out on projection image. • TEST PATTERN Press to open backlight of remote controller. • CLEAR: Not available with this model. •...
Press to display SERVICE menu. • LIGHT Press to open /close shutter. • ID SET: Not available with this model. 11 English Remote control and functions • ON Press to power projector. • OFF Press to power off projector. • FOCUS +/Press to adjust focus of projection image. • ZOOM +/Press to zoom in and out on projection image. • TEST PATTERN Press to open backlight of remote controller. • CLEAR: Not available with this model. •...

User Manual
Page 16
... projection screen and the BenQ Projector Ceiling Mount Kit are covered 16 Front Table: Select this installation location. *Set Ceiling Rear after you turn the projector on. 4. Contact your equipment. 1. Take into consideration the size and position of your screen, the location of your dealer for quick setup and portability. 3. The projector must be used at temperatures between the projector and the rest of a suitable power outlet, as well as the location and distance...
... projection screen and the BenQ Projector Ceiling Mount Kit are covered 16 Front Table: Select this installation location. *Set Ceiling Rear after you turn the projector on. 4. Contact your equipment. 1. Take into consideration the size and position of your screen, the location of your dealer for quick setup and portability. 3. The projector must be used at temperatures between the projector and the rest of a suitable power outlet, as well as the location and distance...

User Manual
Page 24
... Connect of your projector supports to video, RS-232, remote controller, and network control signal receiving but not Power over 100 meters may be damaged and signal transmission quality poor, reducing transmission distance and image quality. 24 Otherwise the cable may lead to projection screen interruption, interference, or control signal failure. • Please use Cat.5e RJ-45 cable or better and prevent the cable from becoming twisted. If the optional digital transmitter supports...
... Connect of your projector supports to video, RS-232, remote controller, and network control signal receiving but not Power over 100 meters may be damaged and signal transmission quality poor, reducing transmission distance and image quality. 24 Otherwise the cable may lead to projection screen interruption, interference, or control signal failure. • Please use Cat.5e RJ-45 cable or better and prevent the cable from becoming twisted. If the optional digital transmitter supports...

User Manual
Page 26
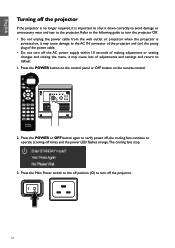
... guide to power on the remote control to start the projector.The Power and Lamp LED flashes green and the cooling fan start up. Press the POWER button on the projector or ON button on the projector. 1. Once the power LED is lit a solid green, the projector is red after power has been applied. 2. Note:The projector will be a problem with the start operating. 3. English Turning the orojector on or off Once the projector is correctly located and the power cable and other connections...
... guide to power on the remote control to start the projector.The Power and Lamp LED flashes green and the cooling fan start up. Press the POWER button on the projector or ON button on the projector. 1. Once the power LED is lit a solid green, the projector is red after power has been applied. 2. Note:The projector will be a problem with the start operating. 3. English Turning the orojector on or off Once the projector is correctly located and the power cable and other connections...
User Manual
Page 32
... adjustment or setting changes and closing the menu, it down correctly to avoid damage or unnecessary wear and tear to operate (cooling-off the projector. 32 Press the POWER button on the control panel or OFF button on , it may cause loss of adjustments and settings and return to turn off the AC power supply within 10 seconds of the power cable. • Do not turn off time) and the power LED flashes orange...
... adjustment or setting changes and closing the menu, it down correctly to avoid damage or unnecessary wear and tear to operate (cooling-off the projector. 32 Press the POWER button on the control panel or OFF button on , it may cause loss of adjustments and settings and return to turn off the AC power supply within 10 seconds of the power cable. • Do not turn off time) and the power LED flashes orange...
User Manual
Page 36
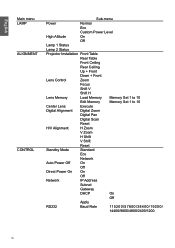
...ALIGNMENT CONTROL Sub-menu Power Normal Eco Custom Power Level High Altitude On Off Lamp 1 Status Lamp 2 Status Projector Installation Front Table Rear Table Front Ceiling Rear Ceiling Up + Front Down + Front Lens Control Zoom Focus Shift V Shift H Lens Memory Load Memory Memory Set 1 to 10 Edit Memory Memory Set 1 to 10 Center Lens Execute Digital Alignment Digital Zoom Digital Pan Digital Scan Reset H/V Alignment H Zoom V Zoom H Shift V Shift Reset Standby Mode Standard Eco Network Auto Power Off On Off Direct Power On On Off Network IP Address...
...ALIGNMENT CONTROL Sub-menu Power Normal Eco Custom Power Level High Altitude On Off Lamp 1 Status Lamp 2 Status Projector Installation Front Table Rear Table Front Ceiling Rear Ceiling Up + Front Down + Front Lens Control Zoom Focus Shift V Shift H Lens Memory Load Memory Memory Set 1 to 10 Edit Memory Memory Set 1 to 10 Center Lens Execute Digital Alignment Digital Zoom Digital Pan Digital Scan Reset H/V Alignment H Zoom V Zoom H Shift V Shift Reset Standby Mode Standard Eco Network Auto Power Off On Off Direct Power On On Off Network IP Address...
User Manual
Page 42
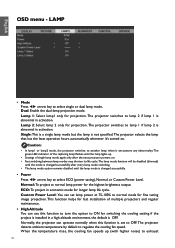
... installed in economic mode for fast installation of single lamp mode apply only after the next projector powers on . When the temperature rises, the cooling fan speeds up . • Settings of multiple projectors and regular maintenance. • High Altitude You can set to OFF. The projector switches to lamp 1 if lamp 2 is abnormal in activation. The projector switches to lamp 2 if lamp 1 is abnormal in activation. The green LED indicator of the replacing lamp flashes until the lamp lights...
... installed in economic mode for fast installation of single lamp mode apply only after the next projector powers on . When the temperature rises, the cooling fan speeds up . • Settings of multiple projectors and regular maintenance. • High Altitude You can set to OFF. The projector switches to lamp 1 if lamp 2 is abnormal in activation. The projector switches to lamp 2 if lamp 1 is abnormal in activation. The green LED indicator of the replacing lamp flashes until the lamp lights...

User Manual
Page 46
... the lowest power ( H Shit: Use ◄► to move the narrowed projected image horizontally. This function is only available when the projected image is narrowed. V Shift: Use ◄► to move the narrowed projected image vertically. CONTROL DISPLAY Direct Power On • Standby Power Press ◄► arrow key to toggle switch between Standard, ECO and Network mode. Standard: The projector can be turned on using the remote control, RS-232 command or network control.
... the lowest power ( H Shit: Use ◄► to move the narrowed projected image horizontally. This function is only available when the projected image is narrowed. V Shift: Use ◄► to move the narrowed projected image vertically. CONTROL DISPLAY Direct Power On • Standby Power Press ◄► arrow key to toggle switch between Standard, ECO and Network mode. Standard: The projector can be turned on using the remote control, RS-232 command or network control.

User Manual
Page 47
... the projector only with the remote controller or its power switch. • Please change in network settings till the following communication channel before using the remote control function. 47 It takes several seconds to execute the change the standby mode of the network domain assigns an IP address to show the IP address input window. For further information on network control connections and settings, please refer to the Remote control manual. • RS232 Baud Rate: Set transmission...
... the projector only with the remote controller or its power switch. • Please change in network settings till the following communication channel before using the remote control function. 47 It takes several seconds to execute the change the standby mode of the network domain assigns an IP address to show the IP address input window. For further information on network control connections and settings, please refer to the Remote control manual. • RS232 Baud Rate: Set transmission...

User Manual
Page 52
... of hours of use .There is ceiling mounted. 52 Failure to ensure that the lamp should be replaced, i.e., if LAMP 1 and/or LAMP 2 light up carefully. Contact an authorized service station for each lamp. Additionally, check carefully to do so, may fail or terminate their life in which you can order from the cooling air circulation holes. English Replacing the lamp The projection lamps should be cleaned up , replace the lamp with a new...
... of hours of use .There is ceiling mounted. 52 Failure to ensure that the lamp should be replaced, i.e., if LAMP 1 and/or LAMP 2 light up carefully. Contact an authorized service station for each lamp. Additionally, check carefully to do so, may fail or terminate their life in which you can order from the cooling air circulation holes. English Replacing the lamp The projection lamps should be cleaned up , replace the lamp with a new...

User Manual
Page 65
...System Model Name Software Version System Status Display Source Lamp 1 Hours Lamp 1 Hours Error Status : Model number of the projector :Version of projector system software : Current projector power on status : Current input signal : Use hours of lamp 1 : Use hours of lamp 2 : Display projector error messages Network control setup information (RJ-45 Version) Lan Version IP address Subnet mask Default gateway DNS server MAC address :Version of any abnormality the projector sends emails to preset users. Alert Mail Setup: Settings for PJLink connection. In case of network control software...
...System Model Name Software Version System Status Display Source Lamp 1 Hours Lamp 1 Hours Error Status : Model number of the projector :Version of projector system software : Current projector power on status : Current input signal : Use hours of lamp 1 : Use hours of lamp 2 : Display projector error messages Network control setup information (RJ-45 Version) Lan Version IP address Subnet mask Default gateway DNS server MAC address :Version of any abnormality the projector sends emails to preset users. Alert Mail Setup: Settings for PJLink connection. In case of network control software...

User Manual
Page 66
... Projector Name Location Apply Send Test Mail : Set up name of SMTP server for the projector's sending reminder email. : Set up transmission port : Set up user name for the projector's sending reminder email through SMTP server. : Set up user password. : Enable or disable E-mail Alert function. : Set up sender's email address. : Set up recipient's email address. : Set up CC recipient's email address. : Set up projector name or ID : Set up installation location of a projector error...
... Projector Name Location Apply Send Test Mail : Set up name of SMTP server for the projector's sending reminder email. : Set up transmission port : Set up user name for the projector's sending reminder email through SMTP server. : Set up user password. : Enable or disable E-mail Alert function. : Set up sender's email address. : Set up recipient's email address. : Set up CC recipient's email address. : Set up projector name or ID : Set up installation location of a projector error...

User Manual
Page 68
... characters. Password: Set up security password at length of up password for PJLink connection on the remote controller and control panel. Press again to control projectors with standard commands regardless of signal sources. Source: Display list of who made it . Control your projector with Creston compatible devices. Blank: Pause the image projection, i.e. PJLink Security: Select On to enable PJLink security password or Off to display the OSD menu. Enter: Confirm the changes and select...
... characters. Password: Set up security password at length of up password for PJLink connection on the remote controller and control panel. Press again to control projectors with standard commands regardless of signal sources. Source: Display list of who made it . Control your projector with Creston compatible devices. Blank: Pause the image projection, i.e. PJLink Security: Select On to enable PJLink security password or Off to display the OSD menu. Enter: Confirm the changes and select...

User Manual
Page 69
...exhaust opening, and fan settings. If the problem persists, call the local service center. Projector powered on the control panel. Call the local service center. Lamp life expires Call the local service center. Call the local service center. Lamp 1/Lamp 2 LED indicator LED display Close Flashing Lights up Green Red (6 times) Red Green Projector status Operation tips Lights off Turn on AC power and power on the projector Ready to projector power on top cover of problems with setup or system error.The LEDs on the Wait until the projector starts projecting The...
...exhaust opening, and fan settings. If the problem persists, call the local service center. Projector powered on the control panel. Call the local service center. Lamp life expires Call the local service center. Call the local service center. Lamp 1/Lamp 2 LED indicator LED display Close Flashing Lights up Green Red (6 times) Red Green Projector status Operation tips Lights off Turn on AC power and power on the projector Ready to projector power on top cover of problems with setup or system error.The LEDs on the Wait until the projector starts projecting The...

User Manual
Page 70
... the projector lens is reversed or upside down Check the Ceiling & Rear setting on the remote control or projector. 4. Adjust the Focus on the screen 1. Ensure the projector-to the next step. Problem:The image is clean. 6. Keep a record of the OSD. If the problem remains unsolved, contact your notebook or desktop PC. 2. Press the AUTO SYNC button on the Setting menu of the steps you may be useful when calling for technical support or...
... the projector lens is reversed or upside down Check the Ceiling & Rear setting on the remote control or projector. 4. Adjust the Focus on the screen 1. Ensure the projector-to the next step. Problem:The image is clean. 6. Keep a record of the OSD. If the problem remains unsolved, contact your notebook or desktop PC. 2. Press the AUTO SYNC button on the Setting menu of the steps you may be useful when calling for technical support or...

User Manual
Page 71
... power button twice to turn off the projector.When the Power LED is no contrast 1. Replace the batteries. 6. Ensure that the reset switch in the compartment lid on the Picture menu of the projected image does not match the source image. Adjust the Color temperature and Picture settings. Lamp problems Problem:There is orange, press the power button. 9. Remote control problems Problem:The projector does not respond to turn off the projector.When the Power LED is not obstructed. 3. Check the battery polarity. 5. Have the remote control serviced. 8. Problem:The color...
... power button twice to turn off the projector.When the Power LED is no contrast 1. Replace the batteries. 6. Ensure that the reset switch in the compartment lid on the Picture menu of the projected image does not match the source image. Adjust the Color temperature and Picture settings. Lamp problems Problem:There is orange, press the power button. 9. Remote control problems Problem:The projector does not respond to turn off the projector.When the Power LED is not obstructed. 3. Check the battery polarity. 5. Have the remote control serviced. 8. Problem:The color...

