User Manual
Page 7
... better control of time during presentations • High quality manual zoom lens • One-key auto-adjustment to display the best picture quality • Digital keystone correction to correct distorted images • Adjustable color balance control for data/video display • High brightness projection lamp • Multi-language On-Screen Display...
... better control of time during presentations • High quality manual zoom lens • One-key auto-adjustment to display the best picture quality • Digital keystone correction to correct distorted images • Adjustable color balance control for data/video display • High brightness projection lamp • Multi-language On-Screen Display...
User Manual
Page 10
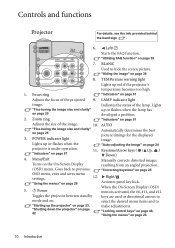
...24 projector is activated, the #6, #11, and #12 Toggles the projector between standby keys are used as directional arrows to previous "Correcting keystone" on . Focus ring "Indicators" on page 42 make adjustments. Indicates the status of the projected 9. II Power When the On-Screen ... hand sign . 1 6. Lights "Fine-tuning the image size and clarity" on page 25 Automatically determines the best picture timings for the displayed 3. Keystone/Arrow keys ( / Up, / Down) 4. AUTO "Fine-tuning the image size and clarity" on page 25 2. POWER indicator light image. Goes...
...24 projector is activated, the #6, #11, and #12 Toggles the projector between standby keys are used as directional arrows to previous "Correcting keystone" on . Focus ring "Indicators" on page 42 make adjustments. Indicates the status of the projected 9. II Power When the On-Screen ... hand sign . 1 6. Lights "Fine-tuning the image size and clarity" on page 25 Automatically determines the best picture timings for the displayed 3. Keystone/Arrow keys ( / Up, / Down) 4. AUTO "Fine-tuning the image size and clarity" on page 25 2. POWER indicator light image. Goes...
User Manual
Page 12
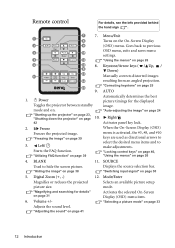
... Automatically determines the best picture timings for details" on page 31 6. Selects an available picture setup mode. Keystone/Arrow keys ( / Up, / 8 Down) 6 13 Manually corrects distorted images 14 resulting from an angled projection. "Correcting keystone" on the On-Screen Display 2 9 (OSD) menu. Right/ 42 Activates panel key lock. 2. Menu/Exit 1 8 Turns on...
... Automatically determines the best picture timings for details" on page 31 6. Selects an available picture setup mode. Keystone/Arrow keys ( / Up, / 8 Down) 6 13 Manually corrects distorted images 14 resulting from an angled projection. "Correcting keystone" on the On-Screen Display 2 9 (OSD) menu. Right/ 42 Activates panel key lock. 2. Menu/Exit 1 8 Turns on...
User Manual
Page 16
... measured projection distance is 5046 mm. Looking across this value, look across that different screens have purchased this screen size. Use the Keystone function to position the screen. How to determine the recommended screen size for a given distance This method can be used for situations ...between the projector and where you are using the zoom control) to the horizontal plane of the average distance value. 3. See "Correcting keystone" on page 25 for the projector is limited by the value determined in relation to display on either side of the projector. For...
... measured projection distance is 5046 mm. Looking across this value, look across that different screens have purchased this screen size. Use the Keystone function to position the screen. How to determine the recommended screen size for a given distance This method can be used for situations ...between the projector and where you are using the zoom control) to the horizontal plane of the average distance value. 3. See "Correcting keystone" on page 25 for the projector is limited by the value determined in relation to display on either side of the projector. For...
User Manual
Page 24
7. If the projector doesn't detect a valid signal, the message "No Signal" will see "Correcting keystone" on . If the frequency/resolution of the input signal exceeds the projector's operating range, you will continue displaying until an input signal is on • ...
7. If the projector doesn't detect a valid signal, the message "No Signal" will see "Correcting keystone" on . If the frequency/resolution of the input signal exceeds the projector's operating range, you will continue displaying until an input signal is on • ...
User Manual
Page 25
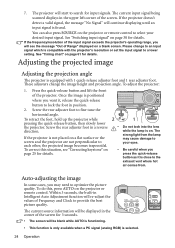
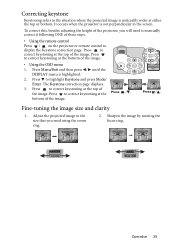
... steps. • Using the remote control Press / on the projector or remote control to correct keystoning at the top of the image. • Using the OSD menu 1. Press to display the Keystone correction page. Adjust the projected image to the size that you will need using the zoom ring.... 2. It occurs when the projector is highlighted. 2. Press Menu/Exit and then press / until the DISPLAY menu is not perpendicular to correct keystoning at the bottom of the image. Press / . Fine-tuning the image size and clarity 1. Sharpen the image by rotating the focus ring. Press ...
... steps. • Using the remote control Press / on the projector or remote control to correct keystoning at the top of the image. • Using the OSD menu 1. Press to display the Keystone correction page. Adjust the projected image to the size that you will need using the zoom ring.... 2. It occurs when the projector is highlighted. 2. Press Menu/Exit and then press / until the DISPLAY menu is not perpendicular to correct keystoning at the bottom of the image. Press / . Fine-tuning the image size and clarity 1. Sharpen the image by rotating the focus ring. Press ...
User Manual
Page 26
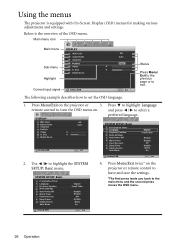
...leave and save the settings. *The first press leads you back to turn the OSD menu on. DISPLAY Wall Color Aspect Ratio Keystone Position Phase H. Exit The following example describes how to exit. SYSTEM SETUP: Basic Presentation Timer Language Projector Position Menu Settings Auto Power... Off Blank Timer Panel Key Lock Sleep Timer Splash Screen Auto Blank Analog RGB English Front Table Disable Disable Off Disable BenQ On Exit 4. Size Digital Zoom Analog RGB Off Auto 0 0 Exit SYSTEM SETUP: Basic Presentation Timer Language Projector Position Menu Settings...
...leave and save the settings. *The first press leads you back to turn the OSD menu on. DISPLAY Wall Color Aspect Ratio Keystone Position Phase H. Exit The following example describes how to exit. SYSTEM SETUP: Basic Presentation Timer Language Projector Position Menu Settings Auto Power... Off Blank Timer Panel Key Lock Sleep Timer Splash Screen Auto Blank Analog RGB English Front Table Disable Disable Off Disable BenQ On Exit 4. Size Digital Zoom Analog RGB Off Auto 0 0 Exit SYSTEM SETUP: Basic Presentation Timer Language Projector Position Menu Settings...
User Manual
Page 43
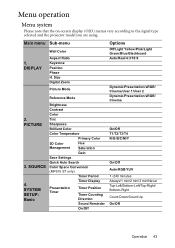
... Contrast Color Tint Sharpness Brilliant Color Color Temperature Primary Color 3D Color Management Hue Saturation Gain Save Settings Quick Auto Search Color Space Conversion (MP515 ST only) Timer Period Timer Display Presentation Timer Timer Position Timer Counting Direction Sound Reminder On/Off Options Off/Light Yellow/Pink/Light Green/Blue/Blackboard.../1 min/2 min/3 min/Never Top-Left/Bottom-Left/Top-Right/ Bottom-Right Count Down/Count Up On/Off Operation 43 DISPLAY Wall Color Aspect Ratio Keystone Position Phase H.
... Contrast Color Tint Sharpness Brilliant Color Color Temperature Primary Color 3D Color Management Hue Saturation Gain Save Settings Quick Auto Search Color Space Conversion (MP515 ST only) Timer Period Timer Display Presentation Timer Timer Position Timer Counting Direction Sound Reminder On/Off Options Off/Light Yellow/Pink/Light Green/Blue/Blackboard.../1 min/2 min/3 min/Never Top-Left/Bottom-Left/Top-Right/ Bottom-Right Count Down/Count Up On/Off Operation 43 DISPLAY Wall Color Aspect Ratio Keystone Position Phase H.

User Manual
Page 46
...to reduce image distortion. Brightness (50) Adjusts the brightness of each menu Function (Default setting/value) Wall Color (Off) Aspect Ratio (Auto) Keystone (0) Position (0) Phase Description Corrects the projected picture's color when the projection surface is selected. See "Adjusting Contrast" on your program type. There... Mode quality and further fine-tune the image based on the selections (Dynamic) listed on the same page below. Corrects any keystoning of difference between dark and light in the image. To move the projected image, use the directional arrow keys. Adjusts the ...
...to reduce image distortion. Brightness (50) Adjusts the brightness of each menu Function (Default setting/value) Wall Color (Off) Aspect Ratio (Auto) Keystone (0) Position (0) Phase Description Corrects the projected picture's color when the projection surface is selected. See "Adjusting Contrast" on your program type. There... Mode quality and further fine-tune the image based on the selections (Dynamic) listed on the same page below. Corrects any keystoning of difference between dark and light in the image. To move the projected image, use the directional arrow keys. Adjusts the ...
