
User Manual
Page 3
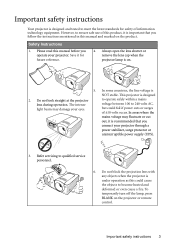
... open the lens shutter or remove the lens cap when the projector lamp is NOT stable. The intense light beam may fluctuate or cut out, it is recommended that you follow the instructions mentioned in this manual before you connect your projector through a power stabilizer, surge protector or uninterruptible power supply (UPS). 3. Do not block the projection lens with any objects when the projector is under operation as...
... open the lens shutter or remove the lens cap when the projector lamp is NOT stable. The intense light beam may fluctuate or cut out, it is recommended that you follow the instructions mentioned in this manual before you connect your projector through a power stabilizer, surge protector or uninterruptible power supply (UPS). 3. Do not block the projection lens with any objects when the projector is under operation as...
User Manual
Page 6
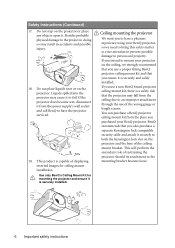
... cable and attach it from the power supply's wall socket and call BenQ to mount your BenQ projector. Ceiling mounting the projector We want you use a non-BenQ brand projector ceiling mount kit, there is securely and safely installed. Liquids spilled into the projector may cause it to the projector, doing so may fall from the place you ensure it is a safety risk that you use of displaying inverted images for mounting the projector...
... cable and attach it from the power supply's wall socket and call BenQ to mount your BenQ projector. Ceiling mounting the projector We want you use a non-BenQ brand projector ceiling mount kit, there is securely and safely installed. Liquids spilled into the projector may cause it to the projector, doing so may fall from the place you ensure it is a safety risk that you use of displaying inverted images for mounting the projector...
User Manual
Page 7
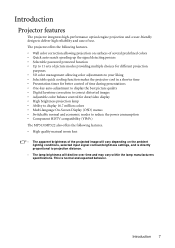
... makes the projector cool in a shorter time • Presentation timer for better control of time during presentations • One-key auto-adjustment to display the best picture quality • Digital keystone correction to correct distorted images • Adjustable color balance control for data/video display • High brightness projection lamp • Ability to display 16.7 million colors • Multi-language On-Screen Display (OSD) menus • Switchable normal and economic modes to projection distance. • The lamp brightness will...
... makes the projector cool in a shorter time • Presentation timer for better control of time during presentations • One-key auto-adjustment to display the best picture quality • Digital keystone correction to correct distorted images • Adjustable color balance control for data/video display • High brightness projection lamp • Ability to display 16.7 million colors • Multi-language On-Screen Display (OSD) menus • Switchable normal and economic modes to projection distance. • The lamp brightness will...
User Manual
Page 10
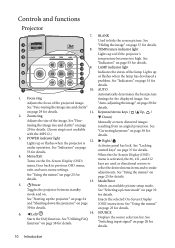
... See "Switching input signal" on . II Power Toggles the projector between standby mode and on page 28 for details. See "Utilizing FAQ function" on page 25 for details. See "Using the menus" on page 38 for details. LAMP indicator light Indicates the status of the image. Controls and functions Projector 7. 1 2 8 8. 3 9 4 10 11 9. 5 12 13 6 14 7 10. 11 1. Focus ring Adjusts the focus of the projected image. See "Fine-tuning the image size and...
... See "Switching input signal" on . II Power Toggles the projector between standby mode and on page 28 for details. See "Utilizing FAQ function" on page 25 for details. See "Using the menus" on page 38 for details. LAMP indicator light Indicates the status of the image. Controls and functions Projector 7. 1 2 8 8. 3 9 4 10 11 9. 5 12 13 6 14 7 10. 11 1. Focus ring Adjusts the focus of the projected image. See "Fine-tuning the image size and...
User Manual
Page 11
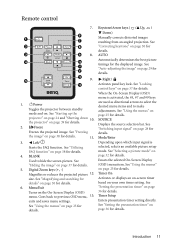
... an available picture setup mode. BLANK Used to previous OSD menu, 13. Right/ Activates panel key lock. Introduction 11 See "Freezing the image" on page 37 for details" on your own timer setting. See "Hiding the image" on page 38 for details. 2. Menu/Exit Turns on . Remote control 7. 6 1 7 2 8 3 9 8. 4 10 11 7 12 5 9. 13 1. II Power Toggles the projector between standby mode and on the On-Screen Display (OSD) menu. See "Starting up the projector" on...
... an available picture setup mode. BLANK Used to previous OSD menu, 13. Right/ Activates panel key lock. Introduction 11 See "Freezing the image" on page 37 for details" on your own timer setting. See "Hiding the image" on page 38 for details. 2. Menu/Exit Turns on . Remote control 7. 6 1 7 2 8 3 9 8. 4 10 11 7 12 5 9. 13 1. II Power Toggles the projector between standby mode and on the On-Screen Display (OSD) menu. See "Starting up the projector" on...
User Manual
Page 24
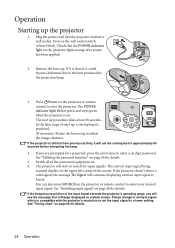
... signal, the message 'No Signal' will see the message 'Out of the screen. See "Utilizing the password function" on . 6. The POWER indicator light flashes green and stays green when the projector is found. The start up the projector 1. See "Timing chart" on . Plug the power cord into the projector and into a wall socket. If it is compatible with the projector's resolution or set the input signal to select your desired input signal. The current input signal being scanned displays...
... signal, the message 'No Signal' will see the message 'Out of the screen. See "Utilizing the password function" on . 6. The POWER indicator light flashes green and stays green when the projector is found. The start up the projector 1. See "Timing chart" on . Plug the power cord into the projector and into a wall socket. If it is compatible with the projector's resolution or set the input signal to select your desired input signal. The current input signal being scanned displays...
User Manual
Page 26
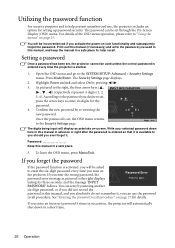
...-digit password every time you used unless the correct password is entered every time the projector is set through the On-Screen Display (OSD) menu. Setting a password Once a password has been set , press the arrow keys to enter six digits for later recall. Once the password is started. 1. MENU Back The digits being input will automatically shut down here in this manual, and keep the manual in a safe place. 5. If you forget the password If the password...
...-digit password every time you used unless the correct password is entered every time the projector is set through the On-Screen Display (OSD) menu. Setting a password Once a password has been set , press the arrow keys to enter six digits for later recall. Once the password is started. 1. MENU Back The digits being input will automatically shut down here in this manual, and keep the manual in a safe place. 5. If you forget the password If the password...
User Manual
Page 27
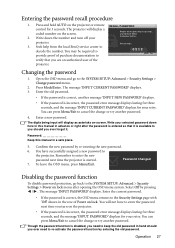
... right after opening the OSD menu system. Open the OSD menu and go back to the projector. You will not have successfully assigned a new password to the SYSTEM SETUP: Advanced > Security Settings > Power on the projector or remote RECALL PASSWORD control for your Customer Center. The projector will display as asterisks on the screen. Press Mode/Enter. The digits being input will display a coded number on -screen. Remember to enter the new password next time the projector is...
... right after opening the OSD menu system. Open the OSD menu and go back to the projector. You will not have successfully assigned a new password to the SYSTEM SETUP: Advanced > Security Settings > Power on the projector or remote RECALL PASSWORD control for your Customer Center. The projector will display as asterisks on the screen. Press Mode/Enter. The digits being input will display a coded number on -screen. Remember to enter the new password next time the projector is...
User Manual
Page 29
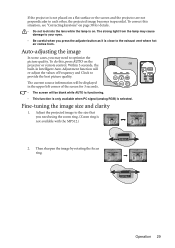
... or the screen and the projector are not perpendicular to optimize the picture quality. To do this situation, see "Correcting keystone" on the projector or remote control. Auto-adjusting the image In some cases, you may cause damage to your eyes. • Be careful when you need to each other, the projected image becomes trapezoidal. Operation 29 Then sharpen the image by rotating the focus ring...
... or the screen and the projector are not perpendicular to optimize the picture quality. To do this situation, see "Correcting keystone" on the projector or remote control. Auto-adjusting the image In some cases, you may cause damage to your eyes. • Be careful when you need to each other, the projected image becomes trapezoidal. Operation 29 Then sharpen the image by rotating the focus ring...

User Manual
Page 32
... taken with a 16:9 aspect ratio. Video input signals: S-Video, Video, D-Sub / Comp. (YPbPr) 1. Standard mode (Default): Is appropriate for details. User 1/User 2 mode: Recalls the settings customized based on the current available picture modes. See "Setting the User 1/User 2 mode" on the remote control or projector repeatedly until your operating environment and input signal picture type. The brightness is required, such as it is displayed in the center of the screen with an sRGB compatible and...
... taken with a 16:9 aspect ratio. Video input signals: S-Video, Video, D-Sub / Comp. (YPbPr) 1. Standard mode (Default): Is appropriate for details. User 1/User 2 mode: Recalls the settings customized based on the current available picture modes. See "Setting the User 1/User 2 mode" on the remote control or projector repeatedly until your operating environment and input signal picture type. The brightness is required, such as it is displayed in the center of the screen with an sRGB compatible and...
User Manual
Page 34
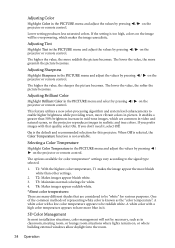
... than other settings. 2. When Off is selected, the Color Temperature function is known as in classroom, meeting room, or lounge room situations where lights remain on the projector or remote control. The options available for white. 4. T4: Makes images appear reddish white. *About color temperatures: There are many different shades that quality, select On. Adjusting Tint Highlight Tint in the PICTURE menu and adjust the values...
... than other settings. 2. When Off is selected, the Color Temperature function is known as in classroom, meeting room, or lounge room situations where lights remain on the projector or remote control. The options available for white. 4. T4: Makes images appear reddish white. *About color temperatures: There are many different shades that quality, select On. Adjusting Tint Highlight Tint in the PICTURE menu and adjust the values...

User Manual
Page 35
... pure red will need to use a colorimeter (color light meter), and provide a set its two adjacent colors. You will be adjusted. Press Mode/Enter and the 3D Color Management page displays. 3. Proper color management can project any image from among Red, Yellow, Green, Cyan, Blue, or Magenta. 4. Go to be affected. 6. For example, if you select Red and set its range at 0, only the saturation of that color in a video picture. Make...
... pure red will need to use a colorimeter (color light meter), and provide a set its two adjacent colors. You will be adjusted. Press Mode/Enter and the 3D Color Management page displays. 3. Proper color management can project any image from among Red, Yellow, Green, Cyan, Blue, or Magenta. 4. Go to be affected. 6. For example, if you select Red and set its range at 0, only the saturation of that color in a video picture. Make...

User Manual
Page 38
...-Image and Installation or FAQ-Features and Service based on the projector or remote control or press Menu/Exit to open the OSD menu and press / to highlight the INFORMATION menu. 2. Press Menu/Exit to select a problem and press Mode/Enter for possible solutions. 5. Yes No 38 Operation If the connected devices have active audio output, you press Power to turn off the projector without disabling panel key lock, the projector will display...
...-Image and Installation or FAQ-Features and Service based on the projector or remote control or press Menu/Exit to open the OSD menu and press / to highlight the INFORMATION menu. 2. Press Menu/Exit to select a problem and press Mode/Enter for possible solutions. 5. Yes No 38 Operation If the connected devices have active audio output, you press Power to turn off the projector without disabling panel key lock, the projector will display...
User Manual
Page 39
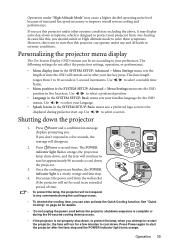
Operation under "High Altitude Mode" may display auto shut-down . Personalizing the projector menu display The On-Screen Display (OSD) menus can be set according to your familiar language for the OSD menus. Shutting down the projector. 3. Press II Power a second time. The POWER indicator light flashes orange, the projection lamp shuts down, and the fans will continue to run for approximately 90 seconds to protect the lamp, when you can operate under other extreme conditions excluding the...
Operation under "High Altitude Mode" may display auto shut-down . Personalizing the projector menu display The On-Screen Display (OSD) menus can be set according to your familiar language for the OSD menus. Shutting down the projector. 3. Press II Power a second time. The POWER indicator light flashes orange, the projection lamp shuts down, and the fans will continue to run for approximately 90 seconds to protect the lamp, when you can operate under other extreme conditions excluding the...

User Manual
Page 40
... Color Temperature T1/T2/T3/T4 Primary Color R/G/B/Y/C/M 3D Color Management Hue Saturation Gain Save Settings 3. INFORMATI ON Current System Status 40 Operation • Source • Picture Mode • Resolution • Color System • Equivalent Lamp Hour Menu operation Menu system Please note that the on-screen display (OSD) menus vary according to the signal type selected. PICTURE Wall Color Off/Light Yellow/Pink/Light Green/Blue/Blackboard Aspect Ratio Auto/Real/4:3/16:9 Keystone Position Phase H. Main menu Sub-menu Options 1. DISPLAY...
... Color Temperature T1/T2/T3/T4 Primary Color R/G/B/Y/C/M 3D Color Management Hue Saturation Gain Save Settings 3. INFORMATI ON Current System Status 40 Operation • Source • Picture Mode • Resolution • Color System • Equivalent Lamp Hour Menu operation Menu system Please note that the on-screen display (OSD) menus vary according to the signal type selected. PICTURE Wall Color Off/Light Yellow/Pink/Light Green/Blue/Blackboard Aspect Ratio Auto/Real/4:3/16:9 Keystone Position Phase H. Main menu Sub-menu Options 1. DISPLAY...

User Manual
Page 43
... On-Screen Display (OSD) menus. Timer display (Always) Sets whether to display the timer on screen. Sets the language for details. 3. PICTURE menu FUNCTION (default setting/ value) DESCRIPTION (default setting/value) Tint (0) Sharpness (15) Adjusts the red and green color tones of time for details. See "Using the menus" on page 36 for presentation. The function is only available when Video or S-Video with NTSC system is selected. Quick Auto Search (On) See "Switching input signal" on...
... On-Screen Display (OSD) menus. Timer display (Always) Sets whether to display the timer on screen. Sets the language for details. 3. PICTURE menu FUNCTION (default setting/ value) DESCRIPTION (default setting/value) Tint (0) Sharpness (15) Adjusts the red and green color tones of time for details. See "Using the menus" on page 36 for presentation. The function is only available when Video or S-Video with NTSC system is selected. Quick Auto Search (On) See "Switching input signal" on...

User Manual
Page 45
... increases the standby power consumption. It helps you adjust the image size and focus and check that you can output a VGA signal when it is in standby mode and the D-SUB IN and D-SUB OUT sockets are closed captioned (usually marked as Economic" on how the total lamp hour is calculated. The following settings will be asked to enter the current password before changing to make the connection.
... increases the standby power consumption. It helps you adjust the image size and focus and check that you can output a VGA signal when it is in standby mode and the D-SUB IN and D-SUB OUT sockets are closed captioned (usually marked as Economic" on how the total lamp hour is calculated. The following settings will be asked to enter the current password before changing to make the connection.

User Manual
Page 46
Color System Shows input system format, NTSC, PAL, SECAM, or RGB. Current System Status Picture Mode Shows the selected mode in the PICTURE menu. Equivalent Lamp Hour Displays the number of the input signal. INFORMATION menu FUNCTION (default setting/ value) DESCRIPTION (default setting/value) FAQ-Image and Installation FAQFeatures and Service Displays possible solutions to problems you may encounter. Source Shows the current signal source. Resolution Shows the native resolution of hours the lamp has been used. 46 Operation 6.
Color System Shows input system format, NTSC, PAL, SECAM, or RGB. Current System Status Picture Mode Shows the selected mode in the PICTURE menu. Equivalent Lamp Hour Displays the number of the input signal. INFORMATION menu FUNCTION (default setting/ value) DESCRIPTION (default setting/value) FAQ-Image and Installation FAQFeatures and Service Displays possible solutions to problems you may encounter. Source Shows the current signal source. Resolution Shows the native resolution of hours the lamp has been used. 46 Operation 6.
User Manual
Page 48
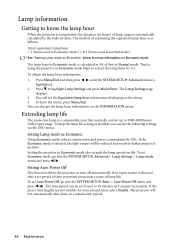
... operation, the duration (in hours) of lamp life. To obtain the lamp hour information: 1. The Lamp Settings page displays. 3. To leave the menu, press Menu/Exit. Setting Lamp mode as Economic Using Economic mode reduces system noise and power consumption by 1/3. Setting the projector in a certain time period. 48 Maintenance Extending lamp life The projection lamp is automatically calculated by the built-in Normal mode. Setting Auto Power Off This function allows the projector to turn off automatically if no input source...
... operation, the duration (in hours) of lamp life. To obtain the lamp hour information: 1. The Lamp Settings page displays. 3. To leave the menu, press Menu/Exit. Setting Lamp mode as Economic Using Economic mode reduces system noise and power consumption by 1/3. Setting the projector in a certain time period. 48 Maintenance Extending lamp life The projection lamp is automatically calculated by the built-in Normal mode. Setting Auto Power Off This function allows the projector to turn off automatically if no input source...

User Manual
Page 54
... picture Cause The video source is out of the lens using the focus ring. There is incorrect Cause You do not remember the password. The password is an obstacle between the remote control and the projector. Select the correct input signal with new one. The input signal has not been correctly selected. The lens cover is still closed . Remedy Adjust the focus of power. Remove the obstacle. The lens cover is still closed . Adjust the projection...
... picture Cause The video source is out of the lens using the focus ring. There is incorrect Cause You do not remember the password. The password is an obstacle between the remote control and the projector. Select the correct input signal with new one. The input signal has not been correctly selected. The lens cover is still closed . Remedy Adjust the focus of power. Remove the obstacle. The lens cover is still closed . Adjust the projection...


