
Safety Warning and Notice
Page 2
... fire) Reception problems occurred due to external signals (such as antenna, Cable TV) outside the monitor. Defects caused by BenQ. Never use the original accessories (e.g. Cleaning Ensure that the power is compatible with a (multi-outlet) extension cord. Always turn off the monitor before turning on the product has been altered, deleted, removed or made illegible. Repairs, modifications, or alterations...
... fire) Reception problems occurred due to external signals (such as antenna, Cable TV) outside the monitor. Defects caused by BenQ. Never use the original accessories (e.g. Cleaning Ensure that the power is compatible with a (multi-outlet) extension cord. Always turn off the monitor before turning on the product has been altered, deleted, removed or made illegible. Repairs, modifications, or alterations...
Resolution file
Page 1
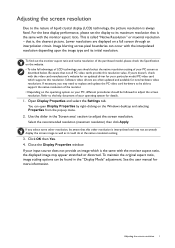
... your input source does not provide an image which supports this resolution value. Adjusting the screen resolution 1 To find out the monitor aspect ratio and native resolution of the purchased model, please check the Specification on a full screen through an interpolation circuit. Be aware that this other resolution, be aware that not all PC video cards provide this resolution. Software video drivers are displayed on the website. • To take full advantage of LCD...
... your input source does not provide an image which supports this resolution value. Adjusting the screen resolution 1 To find out the monitor aspect ratio and native resolution of the purchased model, please check the Specification on a full screen through an interpolation circuit. Be aware that this other resolution, be aware that not all PC video cards provide this resolution. Software video drivers are displayed on the website. • To take full advantage of LCD...
Resolution file
Page 2
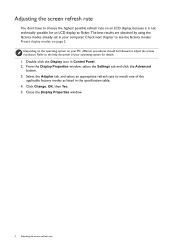
... help document of the applicable factory modes as listed in the specification table. 4. Click Change, OK, then Yes. 5. Depending on the operating system on your computer. Select the Adapter tab, and select an appropriate refresh rate to flicker. The best results are obtained by using the factory modes already set in Control Panel. 2. Refer to adjust the screen resolution. From the Display Properties window, select the Settings tab and click the Advanced button...
... help document of the applicable factory modes as listed in the specification table. 4. Click Change, OK, then Yes. 5. Depending on the operating system on your computer. Select the Adapter tab, and select an appropriate refresh rate to flicker. The best results are obtained by using the factory modes already set in Control Panel. 2. Refer to adjust the screen resolution. From the Display Properties window, select the Settings tab and click the Advanced button...

Resolution file
Page 4
... make sure the above timing works, check the compatibility and specifications of 1366x768, please adjust the resolution to the following: • For the first time using this situation by altering an automatic setting or by manually changing the phase setting and the pixel frequency from graphic cards which do not correspond with the native resolution of your graphic card first. Image disruption may improve this monitor with the resolution 1360x768, the default Display Mode...
... make sure the above timing works, check the compatibility and specifications of 1366x768, please adjust the resolution to the following: • For the first time using this situation by altering an automatic setting or by manually changing the phase setting and the pixel frequency from graphic cards which do not correspond with the native resolution of your graphic card first. Image disruption may improve this monitor with the resolution 1360x768, the default Display Mode...
User Manual
Page 5
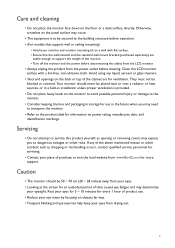
... cleaners. • Slots and openings on power rating, manufacture date, and identification markings. Servicing • Do not attempt to support the weight of the monitor. • Turn off the monitor and the power before disconnecting the cables from the LCD monitor. • Always unplug the product from the power outlet before operation. • (For models that support wall or ceiling mounting) • Install your place of purchase or...
... cleaners. • Slots and openings on power rating, manufacture date, and identification markings. Servicing • Do not attempt to support the weight of the monitor. • Turn off the monitor and the power before disconnecting the cables from the LCD monitor. • Always unplug the product from the power outlet before operation. • (For models that support wall or ceiling mounting) • Install your place of purchase or...

User Manual
Page 6
... support ...3 Getting started ...8 Getting to know your monitor 11 Front view...11 Back view ...12 Input and output ports...12 Connections ...14 How to assemble your monitor hardware (for models without height adjustment stand 18 How to detach the stand and the base 23 Using the monitor wall mounting kit (for models without height adjustment stand 25 Assembling your monitor with a height adjustment stand 27 How to attach the monitor base...27 How to detach the base ...29 Adjusting the monitor height ...30 Rotating the monitor...
... support ...3 Getting started ...8 Getting to know your monitor 11 Front view...11 Back view ...12 Input and output ports...12 Connections ...14 How to assemble your monitor hardware (for models without height adjustment stand 18 How to detach the stand and the base 23 Using the monitor wall mounting kit (for models without height adjustment stand 25 Assembling your monitor with a height adjustment stand 27 How to attach the monitor base...27 How to detach the base ...29 Adjusting the monitor height ...30 Rotating the monitor...
User Manual
Page 20
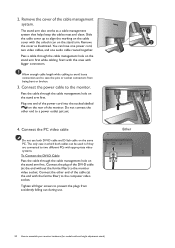
... end without height adjustment stand) Allow enough cable length while cabling to avoid loose connection and to a power outlet just yet. 4. Plug one audio cable routed together. Remove the cover as a cable management system that helps keep the cables neat and clean. Pass the cable through the cable management hole on the stand arm first. Connect the PC video cable Do not use . 1 2 Either D-SUB LINE IN 20 How to assemble your monitor hardware (for models without...
... end without height adjustment stand) Allow enough cable length while cabling to avoid loose connection and to a power outlet just yet. 4. Plug one audio cable routed together. Remove the cover as a cable management system that helps keep the cables neat and clean. Pass the cable through the cable management hole on the stand arm first. Connect the PC video cable Do not use . 1 2 Either D-SUB LINE IN 20 How to assemble your monitor hardware (for models without...
User Manual
Page 22
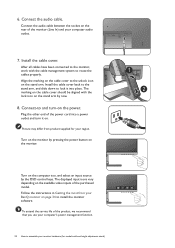
... an input source by the OSD control keys. 6. D-SUB LINE IN 1 2 Turn on the rear of the power cord into place. Plug the other end of the monitor (Line In) and your BenQ monitor on page 34 to lock it on the monitor by now. 8. The displayed input icons vary depending on the power. Picture may differ from your computer audio outlet. 7. Connect the audio cable. Install the cable cover back to the stand arm...
... an input source by the OSD control keys. 6. D-SUB LINE IN 1 2 Turn on the rear of the power cord into place. Plug the other end of the monitor (Line In) and your BenQ monitor on page 34 to lock it on the monitor by now. 8. The displayed input icons vary depending on the power. Picture may differ from your computer audio outlet. 7. Connect the audio cable. Install the cable cover back to the stand arm...
User Manual
Page 33
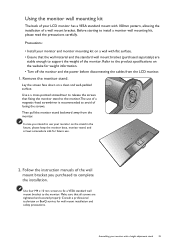
... fix a VESA standard wall mount bracket to install a monitor wall mounting kit, please read the precautions carefully. Remove the monitor stand. Use a a cross-pointed screwdriver to release the screws that fixing the monitor stand to support the weight of the monitor. Then pull the monitor stand backward away from the LCD monitor. 1. Follow the instruction manuals of losing the screws. Consult a professional technician or BenQ service for weight information. • Turn off the monitor and the power before disconnecting the cables...
... fix a VESA standard wall mount bracket to install a monitor wall mounting kit, please read the precautions carefully. Remove the monitor stand. Use a a cross-pointed screwdriver to release the screws that fixing the monitor stand to support the weight of the monitor. Then pull the monitor stand backward away from the LCD monitor. 1. Follow the instruction manuals of losing the screws. Consult a professional technician or BenQ service for weight information. • Turn off the monitor and the power before disconnecting the cables...

User Manual
Page 34
See Downloading the LCD Monitor driver files from www.BenQ.com > Support > Download & FAQ > model name > Software. 2. In either an automatic (new) or upgrade (existing) installation, see: • How to install the monitor on a new computer on page 35. • How to upgrade the monitor on an existing computer on page 36. • If you require a User Name and Password to login to your Windows computer, you from installing software on...
See Downloading the LCD Monitor driver files from www.BenQ.com > Support > Download & FAQ > model name > Software. 2. In either an automatic (new) or upgrade (existing) installation, see: • How to install the monitor on a new computer on page 35. • How to upgrade the monitor on an existing computer on page 36. • If you require a User Name and Password to login to your Windows computer, you from installing software on...

User Manual
Page 35
... be connected to it. Check Search for a suitable driver for models without height adjustment stand) on page 18 or Assembling your monitor with a height adjustment stand on page 27. Click Finish. 5. When Windows starts, it will automatically detect the new monitor and launch the Found New Hardware Wizard. Restart the computer. How to install the monitor on a new computer This instruction details the procedure for selecting and installing the BenQ LCD Monitor driver software...
... be connected to it. Check Search for a suitable driver for models without height adjustment stand) on page 18 or Assembling your monitor with a height adjustment stand on page 27. Click Finish. 5. When Windows starts, it will automatically detect the new monitor and launch the Found New Hardware Wizard. Restart the computer. How to install the monitor on a new computer This instruction details the procedure for selecting and installing the BenQ LCD Monitor driver software...

User Manual
Page 36
Windows has an Upgrade Device Driver Wizard to automate the task and guide you have connected, and letting Windows install the corresponding driver files. How to upgrade the monitor on an existing computer This instruction details the procedure for manually updating the existing monitor driver software on your BenQ monitor You need only steer it in the right direction. It is currently tested as compatible for your model may well function perfectly...
Windows has an Upgrade Device Driver Wizard to automate the task and guide you have connected, and letting Windows install the corresponding driver files. How to upgrade the monitor on an existing computer This instruction details the procedure for manually updating the existing monitor driver software on your BenQ monitor You need only steer it in the right direction. It is currently tested as compatible for your model may well function perfectly...

User Manual
Page 37
Open Display Properties. Select Properties from your BenQ monitor 37 In the Update Driver Software window, select the option Browse my computer for driver software. 7. Getting the most from the menu. 3. Click the Driver tab and the Update Driver button. 6. Click Browse and locate the driver files downloaded from the Internet as instructed in Downloading the LCD Monitor driver files from the menu. 2. Click Generic PnP Monitor, and then the Properties button. 5. You may be prompted...
Open Display Properties. Select Properties from your BenQ monitor 37 In the Update Driver Software window, select the option Browse my computer for driver software. 7. Getting the most from the menu. 3. Click the Driver tab and the Update Driver button. 6. Click Browse and locate the driver files downloaded from the Internet as instructed in Downloading the LCD Monitor driver files from the menu. 2. Click Generic PnP Monitor, and then the Properties button. 5. You may be prompted...
User Manual
Page 38
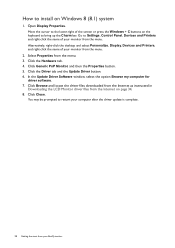
... instructed in Downloading the LCD Monitor driver files from your monitor from the menu. Move the cursor to the lower-right of your BenQ monitor How to install on the keyboard to bring up the Charm bar. Go to Settings, Control Panel, Devices and Printers and right-click the name of the screen or press the Windows + C buttons on Windows 8 (8.1) system 1. Open Display Properties. Click the Driver tab and the Update Driver button...
... instructed in Downloading the LCD Monitor driver files from your monitor from the menu. Move the cursor to the lower-right of your BenQ monitor How to install on the keyboard to bring up the Charm bar. Go to Settings, Control Panel, Devices and Printers and right-click the name of the screen or press the Windows + C buttons on Windows 8 (8.1) system 1. Open Display Properties. Click the Driver tab and the Update Driver button...
User Manual
Page 41
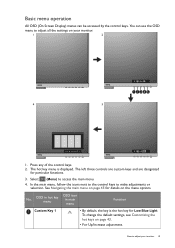
... custom keys and are designated for Low Blue Light. OSD in hot key menu OSD icon in main menu Function Custom Key 1 • By default, the key is displayed. No. How to access the main menu. 4. Basic menu operation All OSD (On Screen Display) menus can use the OSD menu to make adjustments or selection. Select (Menu) to adjust your monitor. 1 2 4 3 1. The hot key menu is the hot key for particular functions...
... custom keys and are designated for Low Blue Light. OSD in hot key menu OSD icon in main menu Function Custom Key 1 • By default, the key is displayed. No. How to access the main menu. 4. Basic menu operation All OSD (On Screen Display) menus can use the OSD menu to make adjustments or selection. Select (Menu) to adjust your monitor. 1 2 4 3 1. The hot key menu is the hot key for particular functions...

User Manual
Page 43
... the hot key menu. Adjusting display mode To display images of aspect ratios other than your display size, you can always adjust the screen geometric settings manually using a digital (DVI, HDMI, or DP) cable to change the default setting and designate different functions for more information. 1. Select an appropriate display mode. If you wish, you can adjust the display mode on the website. The utility is available on the monitor 1. As you connect a digital input signal using geometry menu items. To assist...
... the hot key menu. Adjusting display mode To display images of aspect ratios other than your display size, you can always adjust the screen geometric settings manually using a digital (DVI, HDMI, or DP) cable to change the default setting and designate different functions for more information. 1. Select an appropriate display mode. If you wish, you can adjust the display mode on the website. The utility is available on the monitor 1. As you connect a digital input signal using geometry menu items. To assist...
User Manual
Page 54
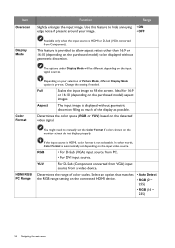
... the monitor screen do not display properly. Full Scales the input image to manually set the Color Format if colors shown on the input video source. The options under Display Mode will be displayed without geometric distortion filling as much of the display as possible. Aspect The input image is not selectable. HDMI RGB PC Range If the input source is HDMI, color format is displayed without geometric distortion. Color Format Depending on the purchased model) aspect images. Ideal...
... the monitor screen do not display properly. Full Scales the input image to manually set the Color Format if colors shown on the input video source. The options under Display Mode will be displayed without geometric distortion filling as much of the display as possible. Aspect The input image is not selectable. HDMI RGB PC Range If the input source is HDMI, color format is displayed without geometric distortion. Color Format Depending on the purchased model) aspect images. Ideal...
User Manual
Page 58
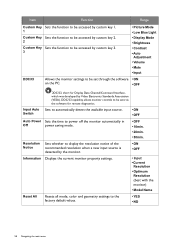
...; Picture Mode • Low Blue Light • Display Mode • Brightness • Contrast • Auto Adjustment • Volume • Mute • Input DDC/CI Allows the monitor settings to be sent via the software for Display Data Channel/Command Interface, which was developed by the monitor. • ON • OFF Information Displays the current monitor property settings. • Input • Current Resolution • Optimum Resolution (best with the monitor) • Model Name Reset All Resets all mode, color and geometry settings...
...; Picture Mode • Low Blue Light • Display Mode • Brightness • Contrast • Auto Adjustment • Volume • Mute • Input DDC/CI Allows the monitor settings to be sent via the software for Display Data Channel/Command Interface, which was developed by the monitor. • ON • OFF Information Displays the current monitor property settings. • Input • Current Resolution • Optimum Resolution (best with the monitor) • Model Name Reset All Resets all mode, color and geometry settings...
User Manual
Page 59
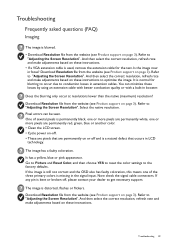
... image now in the signal input. Pixel errors can minimize these instructions. • If a VGA extension cable is used, remove the extension cable for blurring to occur due to "Adjusting the Screen Resolution". Now check the signal cable connectors. Troubleshooting 59 You can be seen. Download Resolution file from the website (see Product support on page 3). One of several pixels is permanently black, one or more pixels are permanently red, green, blue or another color. • Clean the LCD screen. • Cycle power...
... image now in the signal input. Pixel errors can minimize these instructions. • If a VGA extension cable is used, remove the extension cable for blurring to occur due to "Adjusting the Screen Resolution". Now check the signal cable connectors. Troubleshooting 59 You can be seen. Download Resolution file from the website (see Product support on page 3). One of several pixels is permanently black, one or more pixels are permanently red, green, blue or another color. • Clean the LCD screen. • Cycle power...
User Manual
Page 60
... orange, the power management mode is still distorted. Power LED indicator The LED indicator is white or orange. • If the LED lights up in solid white, the monitor is a message Out of image retention. And then select the correct resolution, refresh rate and make adjustments based on page 3). OSD controls The OSD controls are inaccessible. OSD messages A message Out of input sources, you are using a display mode that does not help, check the signal cable connectors. To have the optimal display performance of...
... orange, the power management mode is still distorted. Power LED indicator The LED indicator is white or orange. • If the LED lights up in solid white, the monitor is a message Out of image retention. And then select the correct resolution, refresh rate and make adjustments based on page 3). OSD controls The OSD controls are inaccessible. OSD messages A message Out of input sources, you are using a display mode that does not help, check the signal cable connectors. To have the optimal display performance of...


