
GW50 Series User Manual
Page 13
... the power cable. Then pull the monitor stand backward away from the stand arm. 3. Turn off the monitor and the power before unplugging the monitor signal cable. Sliding or scraping the monitor around on a flat clean padded surface. Insert a pointed object such as a screwdriver to the monitor. Protect the monitor and...
... the power cable. Then pull the monitor stand backward away from the stand arm. 3. Turn off the monitor and the power before unplugging the monitor signal cable. Sliding or scraping the monitor around on a flat clean padded surface. Insert a pointed object such as a screwdriver to the monitor. Protect the monitor and...
GW50 Series User Manual
Page 23
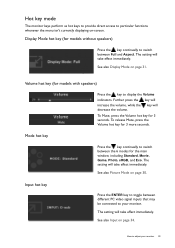
... access to display the Volume indicators. The setting will take effect immediately. Input hot key Press the ENTER key to toggle between different PC video signal inputs that may be connected to adjust your monitor. The setting will take effect immediately. Volume hot key (for the main window, including Standard, Movie...
... access to display the Volume indicators. The setting will take effect immediately. Input hot key Press the ENTER key to toggle between different PC video signal inputs that may be connected to adjust your monitor. The setting will take effect immediately. Volume hot key (for the main window, including Standard, Movie...

GW50 Series User Manual
Page 25
...or keys to make adjustment. Adjusts the vertical position of the screen image. Press the or keys to synchronize with the analog input video signal. Adjusts the pixel clock frequency timing to adjust the value. Press the MENU key to the previous menu, press the MENU button. ...To return to display the main menu. 2. Not applicable to a digital input signal. 0 to 100 0 to 100 0 to your monitor 25 Item Function Operation Range Auto Adjustment Optimizes and adjusts the screen settings automatically for this ...
...or keys to make adjustment. Adjusts the vertical position of the screen image. Press the or keys to synchronize with the analog input video signal. Adjusts the pixel clock frequency timing to adjust the value. Press the MENU key to the previous menu, press the MENU button. ...To return to display the main menu. 2. Not applicable to a digital input signal. 0 to 100 0 to 100 0 to your monitor 25 Item Function Operation Range Auto Adjustment Optimizes and adjusts the screen settings automatically for this ...

GW50 Series User Manual
Page 26
Press the or keys to a digital input signal. Not applicable to adjust the value. Range 0 to 63 See also: Picture optimization on page 21. 26 How to synchronize with the analog input video signal. Item Phase Function Operation Adjusts the pixel clock phase timing to adjust your monitor
Press the or keys to a digital input signal. Not applicable to adjust the value. Range 0 to 63 See also: Picture optimization on page 21. 26 How to synchronize with the analog input video signal. Item Phase Function Operation Adjusts the pixel clock phase timing to adjust your monitor
GW50 Series User Manual
Page 31
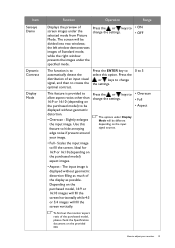
...5:4 images will fill the screen vertically. Use this feature to select this option. To find out the monitor aspect ratio of an input visual signal, and then to create the optimal contrast. Slightly enlarges the input image. Press the ENTER key to hide annoying edge noise if present around ... the or keys to change the settings. Press the or keys to allow aspect ratios other than 16:9 or 16:10 (depending on the input signal sources. • Overscan • Full • Aspect • Full - The input image is provided to change the settings. 0 to 5 This feature is...
...5:4 images will fill the screen vertically. Use this feature to select this option. To find out the monitor aspect ratio of an input visual signal, and then to create the optimal contrast. Slightly enlarges the input image. Press the ENTER key to hide annoying edge noise if present around ... the or keys to change the settings. Press the or keys to allow aspect ratios other than 16:9 or 16:10 (depending on the input signal sources. • Overscan • Full • Aspect • Full - The input image is provided to change the settings. 0 to 5 This feature is...

GW50 Series User Manual
Page 32
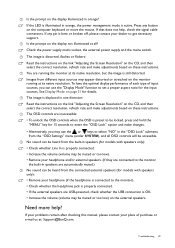
... inputs): Color Format is not selectable. Item Function Operation Range Color Format Determines the color space (RGB or YUV) based on the following detected video signal: • D-Sub (VGA) from PC: The default Color Format is RGB. • D-Sub (Component) from a video device: The default Color Format is automatically set depending...
... inputs): Color Format is not selectable. Item Function Operation Range Color Format Determines the color space (RGB or YUV) based on the following detected video signal: • D-Sub (VGA) from PC: The default Color Format is RGB. • D-Sub (Component) from a video device: The default Color Format is automatically set depending...

GW50 Series User Manual
Page 38
... through the instructions in the "Adjusting the refresh rate" section on the screen, this means one of several pixels is missing in the signal input. Now check the signal cable connectors. Select the native resolution. Select MENU > PICTURE > Color > Reset Color, and then choose "YES" in the "Caution" message box to reset...
... through the instructions in the "Adjusting the refresh rate" section on the screen, this means one of several pixels is missing in the signal input. Now check the signal cable connectors. Select the native resolution. Select MENU > PICTURE > Color > Reset Color, and then choose "YES" in the "Caution" message box to reset...
GW50 Series User Manual
Page 39
... the prompt on page 31 for details. See Display Mode on the display not illuminated at its native resolution. Need more help , check the signal cable connectors. You are USB-powered, check whether the USB connection is OK. • Increase the volume (volume may be muted or too ... to the monitor). • Check whether the headphone jack is properly connected. • If the external speakers are running at : Support@BenQ.com. Troubleshooting 39 Images from different input sources may appear distorted or stretched on the computer keyboard or move the mouse. Is the prompt ...
... the prompt on page 31 for details. See Display Mode on the display not illuminated at its native resolution. Need more help , check the signal cable connectors. You are USB-powered, check whether the USB connection is OK. • Increase the volume (volume may be muted or too ... to the monitor). • Check whether the headphone jack is properly connected. • If the external speakers are running at : Support@BenQ.com. Troubleshooting 39 Images from different input sources may appear distorted or stretched on the computer keyboard or move the mouse. Is the prompt ...


