GL2450 Series User Manual
Page 21
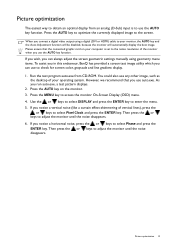
...AUTO key and the Auto Adjustment function will be disabled, because the monitor will automatically display the best image. Then press the or keys to adjust the monitor until the noise disappears. If you ...press the ENTER key. Run the test program auto.exe from an analog (D-Sub) input is set to the native resolution of vertical lines), press the or keys to enter the menu. 5. ... When you connect a digital video output using geometry menu items. To assist you in this endeavour, BenQ has provided a screen test image utility which you use to check for screen color, grayscale and line...
...AUTO key and the Auto Adjustment function will be disabled, because the monitor will automatically display the best image. Then press the or keys to adjust the monitor until the noise disappears. If you ...press the ENTER key. Run the test program auto.exe from an analog (D-Sub) input is set to the native resolution of vertical lines), press the or keys to enter the menu. 5. ... When you connect a digital video output using geometry menu items. To assist you in this endeavour, BenQ has provided a screen test image utility which you use to check for screen color, grayscale and line...

GL2450 Series User Manual
Page 29
... playing video games. for saving electricity with the peripheral devices, such as printers, DSCs, etc. • Eco - To return to • Standard change the settings. • Movie • Game • Photo • sRGB • Eco • Photo - for viewing videos. • Game - Press the or... or selections. 5. Picture Advanced menu Available menu options may vary depending on the screen. • Standard - Menu options that best suits the type of images shown on the input sources, functions and settings. Press the MENU key to display the main menu. 2.
... playing video games. for saving electricity with the peripheral devices, such as printers, DSCs, etc. • Eco - To return to • Standard change the settings. • Movie • Game • Photo • sRGB • Eco • Photo - for viewing videos. • Game - Press the or... or selections. 5. Picture Advanced menu Available menu options may vary depending on the screen. • Standard - Menu options that best suits the type of images shown on the input sources, functions and settings. Press the MENU key to display the main menu. 2.
GL2450 Series User Manual
Page 35
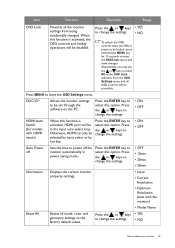
...automatically in the OSD Lock submenu from being accidentally changed. Information Reset All Displays the current monitor property settings. • Input • Current Resolution • Optimum Resolution (best with HDMI inputs) When this option. Press MENU to the factory default values. Press the or ...keys • YES to change the settings. • NO How to select NO in power saving mode. Alternatively, you...
...automatically in the OSD Lock submenu from being accidentally changed. Information Reset All Displays the current monitor property settings. • Input • Current Resolution • Optimum Resolution (best with HDMI inputs) When this option. Press MENU to the factory default values. Press the or ...keys • YES to change the settings. • NO How to select NO in power saving mode. Alternatively, you...

User Manual
Page 21
... As you connect a digital video output using geometry menu items. To assist you in this endeavour, BenQ has provided a screen test image utility which you notice a horizontal noise, press the or keys to... on the monitor. 3. Run the test program auto.exe from an analog (D-Sub) input is set to the native resolution of your monitor, the AUTO key and the Auto Adjustment function will be ...disabled, because the monitor will automatically display the best image. Then press the or keys to adjust the monitor until the noise disappears. Picture ...
... As you connect a digital video output using geometry menu items. To assist you in this endeavour, BenQ has provided a screen test image utility which you notice a horizontal noise, press the or keys to... on the monitor. 3. Run the test program auto.exe from an analog (D-Sub) input is set to the native resolution of your monitor, the AUTO key and the Auto Adjustment function will be ...disabled, because the monitor will automatically display the best image. Then press the or keys to adjust the monitor until the noise disappears. Picture ...

User Manual
Page 29
... the or keys to move the highlight to a menu item and then press the ENTER key to enter the menu. 3. Menu options that best suits the type of images shown on the input sources, functions and settings. for viewing still images. • sRGB - Press the MENU key to • Standard change the... settings. • Movie • Game • Photo • sRGB • Eco • Photo - Item Picture Mode Function Operation Range Selects a picture mode that are not available ...
... the or keys to move the highlight to a menu item and then press the ENTER key to enter the menu. 3. Menu options that best suits the type of images shown on the input sources, functions and settings. for viewing still images. • sRGB - Press the MENU key to • Standard change the... settings. • Movie • Game • Photo • sRGB • Eco • Photo - Item Picture Mode Function Operation Range Selects a picture mode that are not available ...

User Manual
Page 35
...may use the or keys to select NO in the OSD Lock submenu from being accidentally changed. Press the or keys to change the settings. • NO How to adjust your monitor 35 Press the ENTER key to select this option. Press the or keys • ...the monitor) • Model Name Resets all OSD controls will be accessible. Information Reset All Displays the current monitor property settings. • Input • Current Resolution • Optimum Resolution (best with HDMI inputs) When this option. Item Function Operation Range OSD Lock Prevents all the monitor...
...may use the or keys to select NO in the OSD Lock submenu from being accidentally changed. Press the or keys to change the settings. • NO How to adjust your monitor 35 Press the ENTER key to select this option. Press the or keys • ...the monitor) • Model Name Resets all OSD controls will be accessible. Information Reset All Displays the current monitor property settings. • Input • Current Resolution • Optimum Resolution (best with HDMI inputs) When this option. Item Function Operation Range OSD Lock Prevents all the monitor...

