
User Manual
Page 2
...; An approved power cord greater or equal to revise this product yourself, as dropping or mishandling occurs, contact qualified service personnel for servicing. 2 Clean the LCD monitor surface with respect to make changes from the wall outlet before cleaning. Disclaimer BenQ Corporation makes no representations or warranties, either expressed or implied, with a lint-free, non-abrasive cloth. Power Safety • The AC plug isolates this equipment...
...; An approved power cord greater or equal to revise this product yourself, as dropping or mishandling occurs, contact qualified service personnel for servicing. 2 Clean the LCD monitor surface with respect to make changes from the wall outlet before cleaning. Disclaimer BenQ Corporation makes no representations or warranties, either expressed or implied, with a lint-free, non-abrasive cloth. Power Safety • The AC plug isolates this equipment...
User Manual
Page 3
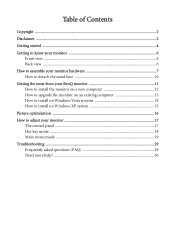
... detach the stand base 10 Getting the most from your BenQ monitor 11 How to install the monitor on a new computer 12 How to upgrade the monitor on an existing computer 13 How to install on Windows Vista systems 14 How to install on Windows XP system 15 Picture optimization ...16 How to adjust your monitor 17 The control panel ...17 Hot key mode ...18 Main menu mode 19 Troubleshooting ...29 Frequently...
... detach the stand base 10 Getting the most from your BenQ monitor 11 How to install the monitor on a new computer 12 How to upgrade the monitor on an existing computer 13 How to install on Windows Vista systems 14 How to install on Windows XP system 15 Picture optimization ...16 How to adjust your monitor 17 The control panel ...17 Hot key mode ...18 Main menu mode 19 Troubleshooting ...29 Frequently...
User Manual
Page 7
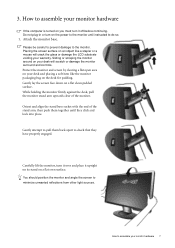
... scratch or damage the monitor surround and controls. How to check that they click and lock into place. Attach the monitor base. Orient and align the stand base socket with the end of the monitor. You should position the monitor and angle the screen to the monitor. How to pull them together until instructed to do so. 1. Do not plug-in or turn it upright on...
... scratch or damage the monitor surround and controls. How to check that they click and lock into place. Attach the monitor base. Orient and align the stand base socket with the end of the monitor. You should position the monitor and angle the screen to the monitor. How to pull them together until instructed to do so. 1. Do not plug-in or turn it upright on...

User Manual
Page 8
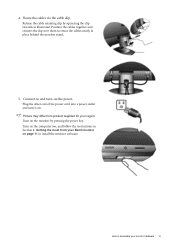
... available for direct digital connection between source video and digital LCD monitors or projectors. Plug one end of the monitor. The only case in which both DVI-D cable and D-Sub cable on the rear of the DVI-D cable to the monitor DVI-D socket and the other end to the DVI-D port on your monitor hardware Connect the power cable to the computer video D-Sub socket. The digital video signals produce a superior quality picture than analog video signals. Connect the other end...
... available for direct digital connection between source video and digital LCD monitors or projectors. Plug one end of the monitor. The only case in which both DVI-D cable and D-Sub cable on the rear of the DVI-D cable to the monitor DVI-D socket and the other end to the DVI-D port on your monitor hardware Connect the power cable to the computer video D-Sub socket. The digital video signals produce a superior quality picture than analog video signals. Connect the other end...
User Manual
Page 9
... BenQ monitor on the power. Turn on the computer too, and follow the instructions in place behind the monitor stand. 5. Connect-to retain the cables neatly in Section 4: Getting the most from product supplied for your monitor hardware 9 Route the cables via the cable clip. Plug the other end of the power cord into a power outlet and turn -on page 11 to assemble your region. How to install the monitor software. Position the cables...
... BenQ monitor on the power. Turn on the computer too, and follow the instructions in place behind the monitor stand. 5. Connect-to retain the cables neatly in Section 4: Getting the most from product supplied for your monitor hardware 9 Route the cables via the cable clip. Plug the other end of the power cord into a power outlet and turn -on page 11 to assemble your region. How to install the monitor software. Position the cables...

User Manual
Page 11
... existing monitor driver software), or whether you are upgrading an existing installation (which process you need to your new BenQ color LCD flat screen monitor, you to install the monitor driver software. 4. Getting the most from your BenQ monitor To gain the most from installing software on your Windows computer, you must be logged on page 13 If you connect and install your BenQ monitor 11 At that point, click the Have Disk button, insert the BenQ LCD Monitor...
... existing monitor driver software), or whether you are upgrading an existing installation (which process you need to your new BenQ color LCD flat screen monitor, you to install the monitor driver software. 4. Getting the most from your BenQ monitor To gain the most from installing software on your Windows computer, you must be logged on page 13 If you connect and install your BenQ monitor 11 At that point, click the Have Disk button, insert the BenQ LCD Monitor...
User Manual
Page 12
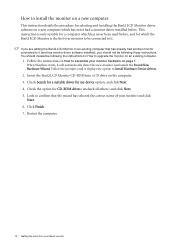
... Windows starts, it displays the option to assemble your monitor hardware on the computer. 3. Insert the BenQ LCD Monitor CD-ROM into a CD drive on page 7. Check the option for my device option, and click Next. 4. If you should instead be following the instructions for which has never had another monitor connected to it (and has monitor driver software installed), you are adding the BenQ LCD Monitor to upgrade the monitor...
... Windows starts, it displays the option to assemble your monitor hardware on the computer. 3. Insert the BenQ LCD Monitor CD-ROM into a CD drive on page 7. Check the option for my device option, and click Next. 4. If you should instead be following the instructions for which has never had another monitor connected to it (and has monitor driver software installed), you are adding the BenQ LCD Monitor to upgrade the monitor...
User Manual
Page 13
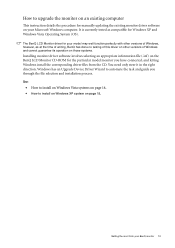
... particular model monitor you through the file selection and installation process. How to upgrade the monitor on an existing computer This instruction details the procedure for manually updating the existing monitor driver software on page 15. Getting the most from the CD. See: • How to install on Windows Vista systems on page 14. • How to automate the task and guide you have connected...
... particular model monitor you through the file selection and installation process. How to upgrade the monitor on an existing computer This instruction details the procedure for manually updating the existing monitor driver software on page 15. Getting the most from the CD. See: • How to install on Windows Vista systems on page 14. • How to automate the task and guide you have connected...
User Manual
Page 14
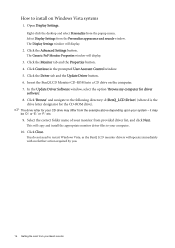
...as the BenQ LCD monitor drivers will copy and install the appropriate monitor driver files to your BenQ monitor Right-click the desktop and select Personalize from the Personalize appearance and sounds window. Select Display Settings from the popup menu. Click Continue in the prompted User Account Control window. 5. Click the Driver tab and the Update Driver button. 6. The drive letter for driver software'. 8. The Display Settings window will display. 3. The Generic PnP Monitor Properties window will display. 2. Open Display Settings. In the Update Driver Software window...
...as the BenQ LCD monitor drivers will copy and install the appropriate monitor driver files to your BenQ monitor Right-click the desktop and select Personalize from the Personalize appearance and sounds window. Select Display Settings from the popup menu. Click Continue in the prompted User Account Control window. 5. Click the Driver tab and the Update Driver button. 6. The drive letter for driver software'. 8. The Display Settings window will display. 3. The Generic PnP Monitor Properties window will display. 2. Open Display Settings. In the Update Driver Software window...

User Manual
Page 15
...; Under the Classic view, click Start | Control Panel | Display. • Under the Category view, click Start | Control Panel | Appearance and Themes | Change the screen resolution. The menu options displayed will copy and install the appropriate monitor driver files to restart Windows XP, as BenQ, and the model matches that of view is located directly under the main Start menu item. The quickest shortcut to . 7. Click the Properties button. Insert the BenQ LCD Monitor CD-ROM into a CD...
...; Under the Classic view, click Start | Control Panel | Display. • Under the Category view, click Start | Control Panel | Appearance and Themes | Change the screen resolution. The menu options displayed will copy and install the appropriate monitor driver files to restart Windows XP, as BenQ, and the model matches that of view is located directly under the main Start menu item. The quickest shortcut to . 7. Click the Properties button. Insert the BenQ LCD Monitor CD-ROM into a CD...
User Manual
Page 16
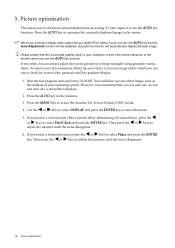
Picture optimization The easiest way to obtain an optimal display from CD-ROM. If you wish, you can always adjust the screen geometric settings manually using a digital (DVI) cable to the native resolution of the monitor when you use auto.exe. As you notice a vertical noise (like a curtain effect-shimmering of your computer is to use to select Phase and press the ENTER key. If you run auto.exe, a test pattern...
Picture optimization The easiest way to obtain an optimal display from CD-ROM. If you wish, you can always adjust the screen geometric settings manually using a digital (DVI) cable to the native resolution of the monitor when you use auto.exe. As you notice a vertical noise (like a curtain effect-shimmering of your computer is to use to select Phase and press the ENTER key. If you run auto.exe, a test pattern...
User Manual
Page 17
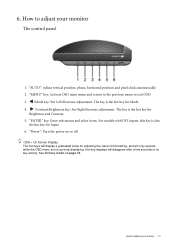
... models with DVI inputs, this key is the hot key for Input. 6. "Power": Turn the power on page 18. "MENU" key: Activate OSD main menu and return to the previous menu or exit OSD. 3. W /Mode key: For Left/Decrease adjustment. Hot-key displays will only operate while the OSD menu is the hot key for Brightness and Contrast. 5. See Hot key mode on or off. X /Contrast/Brightness key: For Right/Increase adjustment. OSD = On Screen Display...
... models with DVI inputs, this key is the hot key for Input. 6. "Power": Turn the power on page 18. "MENU" key: Activate OSD main menu and return to the previous menu or exit OSD. 3. W /Mode key: For Left/Decrease adjustment. Hot-key displays will only operate while the OSD menu is the hot key for Brightness and Contrast. 5. See Hot key mode on or off. X /Contrast/Brightness key: For Right/Increase adjustment. OSD = On Screen Display...
User Manual
Page 19
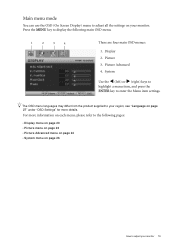
... key to your monitor. Main menu mode You can use the OSD (On Screen Display) menu to adjust all the settings on your region, see "Language on page 27" under "OSD Settings" for more information on page 26 How to adjust your monitor 19 Picture Advanced 4. Press the MENU key to display the following pages: • Display menu on page 20 • Picture menu on page 22 • Picture Advanced menu on page 24...
... key to your monitor. Main menu mode You can use the OSD (On Screen Display) menu to adjust all the settings on your region, see "Language on page 27" under "OSD Settings" for more information on page 26 How to adjust your monitor 19 Picture Advanced 4. Press the MENU key to display the following pages: • Display menu on page 20 • Picture menu on page 22 • Picture Advanced menu on page 24...
User Manual
Page 20
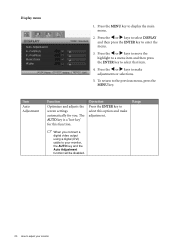
... return to make adjustment. Range When you . Display menu 1. Press the W or X keys to move the highlight to a menu item and then press the ENTER key to adjust your monitor The AUTO key is a 'hot-key' for you connect a digital video output using a digital (DVI) cable to your monitor, the AUTO key and the Auto Adjustment function will be disabled. 20 How to select that item. 4. Item Auto Adjustment Function Optimizes and adjusts the screen settings automatically...
... return to make adjustment. Range When you . Display menu 1. Press the W or X keys to move the highlight to a menu item and then press the ENTER key to adjust your monitor The AUTO key is a 'hot-key' for you connect a digital video output using a digital (DVI) cable to your monitor, the AUTO key and the Auto Adjustment function will be disabled. 20 How to select that item. 4. Item Auto Adjustment Function Optimizes and adjusts the screen settings automatically...

User Manual
Page 23
... reduce Green, the image will disable Brightness and Contrast controls. Reset Color Resets the User Mode custom color settings to leave the Color menu. Press MENU to the factory defaults. DynamicContrast (available when the Picture Mode is the factory default color. Press the ENTER key to create the optimal contrast. Press the W or X keys to 5 Activating DynamicContrast will become a magenta tint. Press the W or X keys to change the settings. • Red (0 to 100) • Green (0 to 100) • Blue (0 to...
... reduce Green, the image will disable Brightness and Contrast controls. Reset Color Resets the User Mode custom color settings to leave the Color menu. Press MENU to the factory defaults. DynamicContrast (available when the Picture Mode is the factory default color. Press the ENTER key to create the optimal contrast. Press the W or X keys to 5 Activating DynamicContrast will become a magenta tint. Press the W or X keys to change the settings. • Red (0 to 100) • Green (0 to 100) • Blue (0 to...
User Manual
Page 25
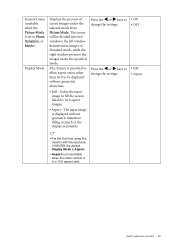
... two windows; the left window demonstrates images of the display as possible. How to change the settings. • ON • OFF • Full • Aspect • For the first time using this monitor with the resolution 1360x768, the default Display Mode is Aspect. • Aspect is not available when the video content is displayed without geometric distortion. • Full - Scales the input image to fill the screen...
... two windows; the left window demonstrates images of the display as possible. How to change the settings. • ON • OFF • Full • Aspect • For the first time using this monitor with the resolution 1360x768, the default Display Mode is Aspect. • Aspect is not available when the video content is displayed without geometric distortion. • Full - Scales the input image to fill the screen...
User Manual
Page 27
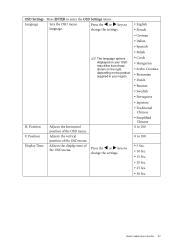
Position V. Press ENTER to language. Language Sets the OSD menu Press the W or X keys to enter the OSD Settings menu. H. Position Display Time Adjusts the horizontal position of the OSD menu. The language options displayed on your OSD may differ from those shown on the right, depending on the product supplied in your monitor 27 Adjusts the vertical position of the OSD menu. OSD Settings - change the settings. • English • French • German • Italian • Spanish • Polish • Czech...
Position V. Press ENTER to language. Language Sets the OSD menu Press the W or X keys to enter the OSD Settings menu. H. Position Display Time Adjusts the horizontal position of the OSD menu. The language options displayed on your OSD may differ from those shown on the right, depending on the product supplied in your monitor 27 Adjusts the vertical position of the OSD menu. OSD Settings - change the settings. • English • French • German • Italian • Spanish • Polish • Czech...
User Manual
Page 28
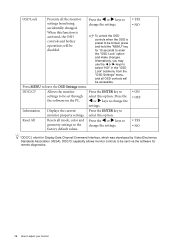
... "OSD Settings" menu, and all the monitor settings from being accidentally changed. OSD Lock Prevents all OSD controls will be disabled. Press MENU to be accessible. DDC/CI* Allows the monitor settings to leave the OSD Settings menu. Press the ENTER key to change the settings. Information Displays the current Press the ENTER key to the factory default values. Resets all mode, color and geometry settings to Reset All monitor property settings. To unlock the OSD controls when the OSD is activated, the OSD controls...
... "OSD Settings" menu, and all the monitor settings from being accidentally changed. OSD Lock Prevents all OSD controls will be disabled. Press MENU to be accessible. DDC/CI* Allows the monitor settings to leave the OSD Settings menu. Press the ENTER key to change the settings. Information Displays the current Press the ENTER key to the factory default values. Resets all mode, color and geometry settings to Reset All monitor property settings. To unlock the OSD controls when the OSD is activated, the OSD controls...
User Manual
Page 29
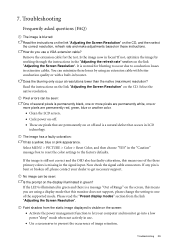
... select the correct resolution, refresh rate and make adjustments based on the screen, this monitor does not support, please change the setting to conduction losses in booster. You can minimize these instructions. Troubleshooting 29 Read the instructions on the link "Adjusting the Screen Resolution" on the display illuminated in the signal input. Pixel errors can be seen: One of Range" on these losses by working through the instructions in focus? Remove the extension cable for blurring to...
... select the correct resolution, refresh rate and make adjustments based on the screen, this monitor does not support, please change the setting to conduction losses in booster. You can minimize these instructions. Troubleshooting 29 Read the instructions on the link "Adjusting the Screen Resolution" on the display illuminated in the signal input. Pixel errors can be seen: One of Range" on these losses by working through the instructions in focus? Remove the extension cable for blurring to...
User Manual
Page 30
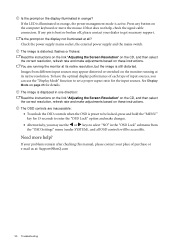
... the correct resolution, refresh rate and make adjustments based on these instructions. If that does not help ? The image is preset to be accessible. To have the optimal display performance of each type of purchase or e-mail us at: Support@BenQ.com 30 Troubleshooting See Display Mode on page 25 for 15 seconds to enter the "OSD Lock" option and make adjustments based on these instructions. If your problems remain after checking this manual, please...
... the correct resolution, refresh rate and make adjustments based on these instructions. If that does not help ? The image is preset to be accessible. To have the optimal display performance of each type of purchase or e-mail us at: Support@BenQ.com 30 Troubleshooting See Display Mode on page 25 for 15 seconds to enter the "OSD Lock" option and make adjustments based on these instructions. If your problems remain after checking this manual, please...


